
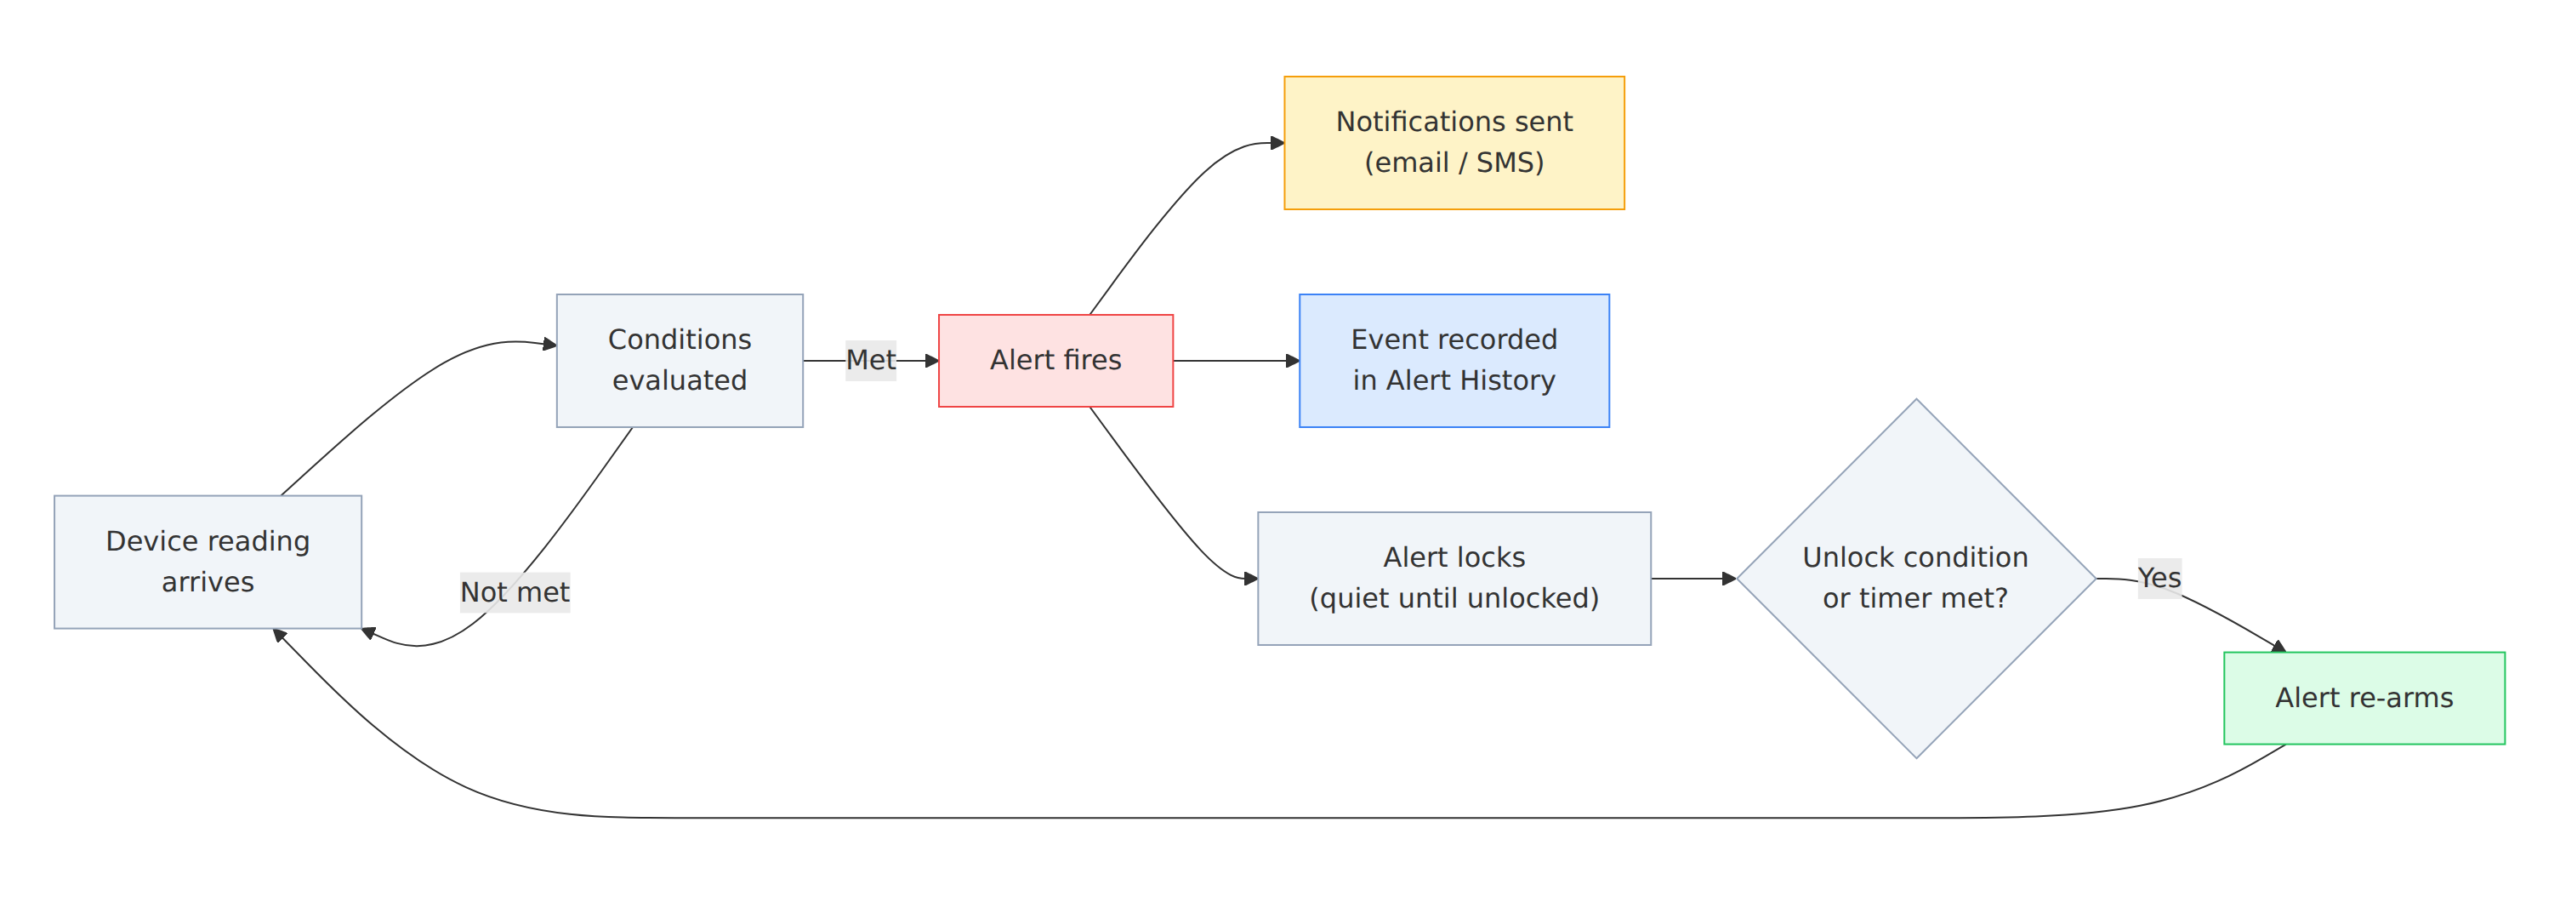
Alerts watch your device data and tell you when something needs attention. You define a condition, NEQTO.ai checks every reading against it, and when the condition is met it fires an alert and notifies the people you chose. Every alert that fires is recorded in Alert History so you can track and triage it.
Alert Types
NEQTO.ai evaluates three kinds of alert. You build threshold alerts yourself in the Set Alert dialog; connectivity and anomaly alerts are managed per device from the device’s Connectivity Monitoring and Anomaly Detection Settings tabs.
| Type | What it watches | How it triggers |
|---|---|---|
| Threshold | The current value of one or more device attributes. | Fires when your conditions are met, for example temperature Greater than 30. This is the default type in the Set Alert dialog. |
| Connectivity | Whether a device is still sending data. | Fires when a device goes silent past its timeout, and again when it comes back online. |
| Anomaly | One sensor reading versus its own physical limits and learned statistical range. | Fires when a value leaves the normal range. Configured per sensor on the device. |
Creating a Threshold Alert
Open Alerts and click the + button (its tooltip reads Create Alert) to open the Set Alert dialog. The dialog has five parts: title and severity, trigger conditions, unlock conditions (optional), notifications, and message details (optional).
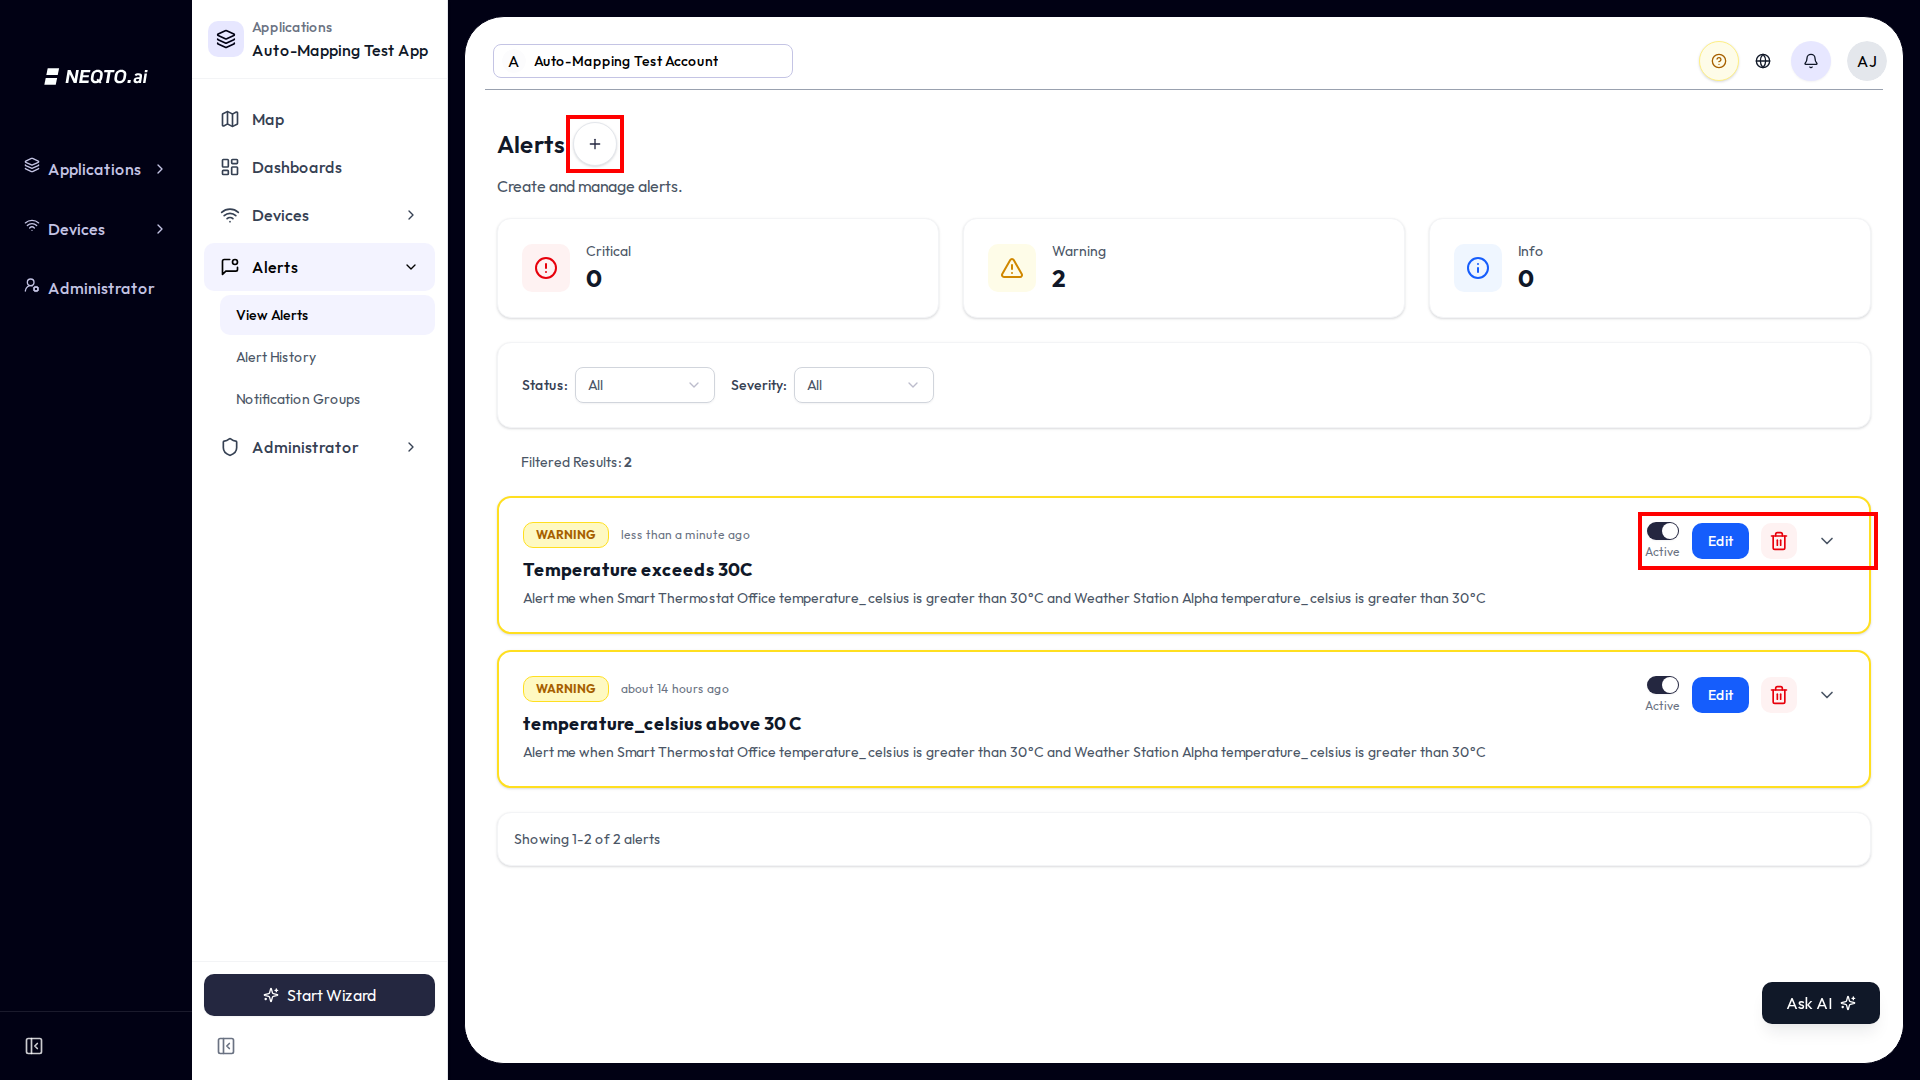
Each row shows a Status switch with an Active or Inactive badge, a Severity badge, a lock icon when the alert is currently locked (paused), the devices it covers, and the attributes it watches. The per-row actions menu (the ⋮ button) offers Edit and Delete — each only appears if you have the matching permission. There is no separate “lock” action in the menu; locking is controlled by the alert’s unlock settings, described below.
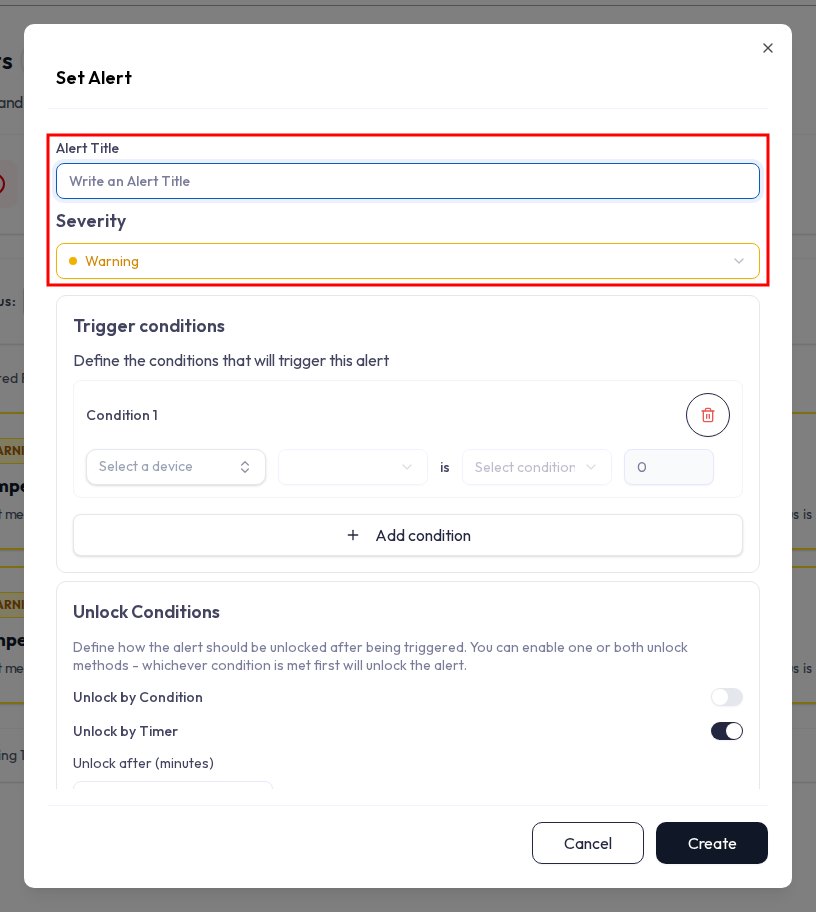
1. Title and severity
-
1Enter an Alert Title (required, up to 100 characters; letters, numbers, spaces, and the basic punctuation
- _ ( ) , . :are allowed). -
2Pick a Severity: Info (blue), Warning (yellow, the default), or Critical (red). Severity is a label for triage and filtering; it does not change when the alert fires.
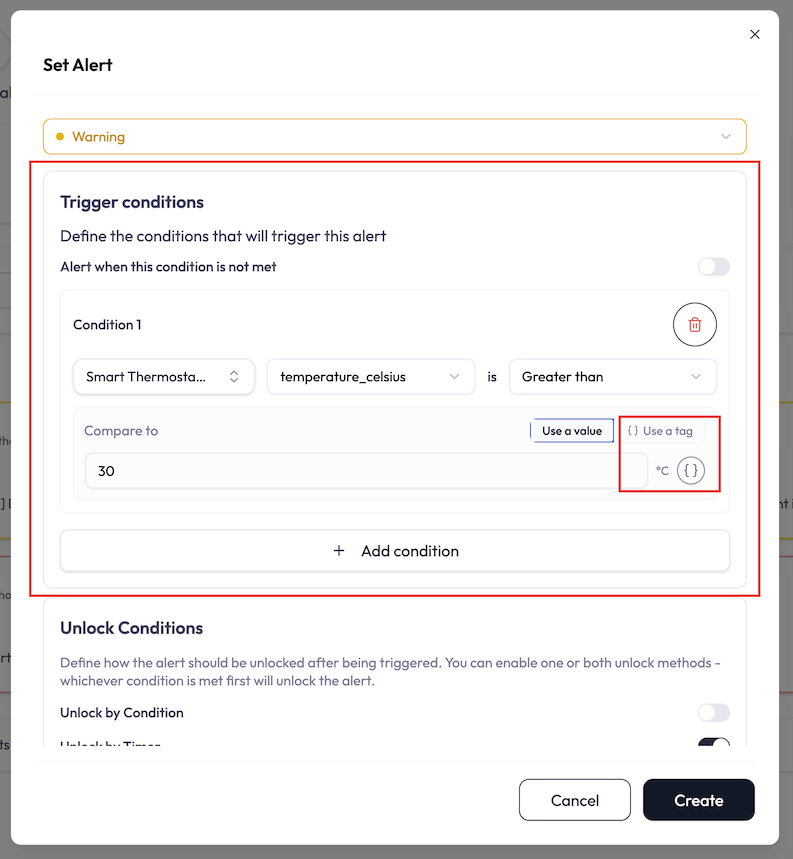
2. Trigger conditions
A condition is one row: a device, one of its attributes, an operator, and a value. Add up to 10 conditions.
The available operators depend on the attribute’s data type:
| For numbers | For text |
|---|---|
Greater than (greater) |
Contains (contains) |
Greater than or equal to (greater_equal) |
Exact match (exact_match) |
Less than (less) |
Does not match (no_match) |
Less than or equal to (less_equal) |
|
Equal to (equal) |
|
Not equal to (not_equal) |
Each condition’s value field has a Compare to switch with two modes:
- Use a value is the default. You type a fixed number (or a keyword, for text attributes) to compare against.
- Use a tag compares against one of your tags instead. Click the braces icon, search your tags, and pick one. The condition then follows that tag’s value. Edit the tag and every alert pointing at it updates, so you can keep a shared limit in one place.
The picker only offers tags whose value type fits the attribute: text tags for text attributes, number tags for numeric ones. Tags that do not fit are shown greyed out. Once you pick a tag, a short preview shows what it resolves to right now, for example Resolves to 30. If the tag is later deleted, or its type no longer fits, the field flags it and blocks Save until you fix it.
3. Unlock conditions (optional)
Unlock conditions control how an alert re-arms after it fires. When a method is on, the alert fires once, locks (goes quiet), and stays locked until it is allowed to re-arm, which prevents a flood of notifications for the same ongoing problem. The dialog turns Unlock by Timer on by default with a 60-minute timer, so out of the box an alert waits before it can fire again; turn both methods off if you want it to lock until you re-enable it by hand.
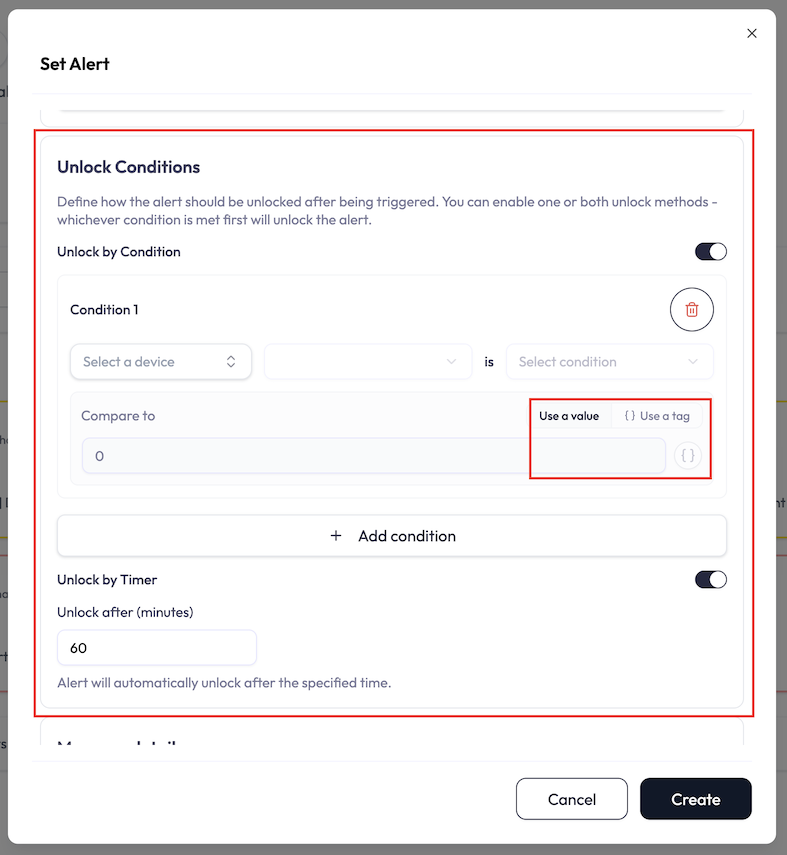
There are two unlock methods. Turning on either one enables locking automatically.
| Method | What it does |
|---|---|
| Unlock by Condition | Re-arms when a condition you define becomes true. These rows work exactly like trigger conditions (same device, attribute, operator, and value, up to 10), including the option to compare against a tag. Use the opposite of your trigger, for example trigger when temperature is above 30, unlock when it drops below 25. |
| Unlock by Timer | Re-arms automatically after a set number of minutes (minimum 1, the field defaults to 60). The countdown starts when the alert locks. |
If both are on, the alert unlocks as soon as either the condition is met or the timer expires, whichever comes first.
4. Notifications
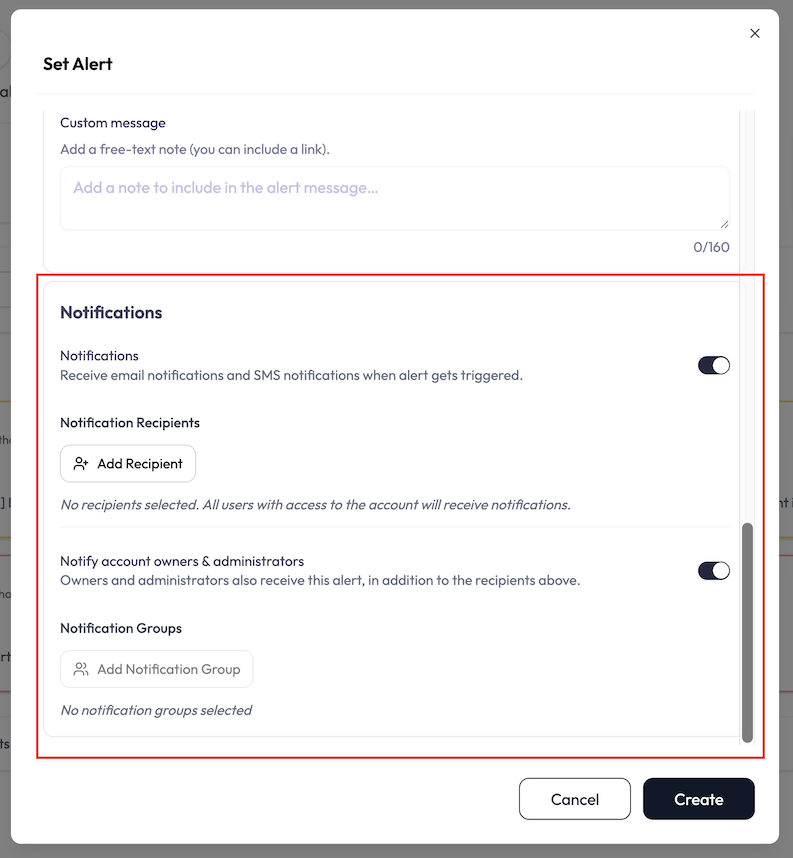
The dialog has a single Notifications toggle. Turn it on, then choose who hears about it:
- Users from your account or application, added with Add Recipient → Add User. Each is notified by email.
-
External contacts, added with Add Recipient → Add External.
You give an email address and/or a phone number and toggle
Email Notifications and SMS Notifications per contact. Phone
numbers use E.164 format, for example
+1234567890. - Notification Groups, reusable recipient lists (see below).
Notify account owners & administrators. Below the recipients is a toggle by this name, and it is on by default. While it is on, the account’s owners and administrators are always emailed too, on top of the users you picked. Turn it off to reach only the people on your list.
The toggle only matters once at least one individual user is picked. With no users picked, everyone is emailed regardless, owners and administrators included.
5. Message details (optional)
Below the recipients, a Message details section lets you enrich the alert message that goes out by email and SMS. Its help text reads “Optionally add extra details to the alert message sent by email and SMS.” Everything here is off by default.
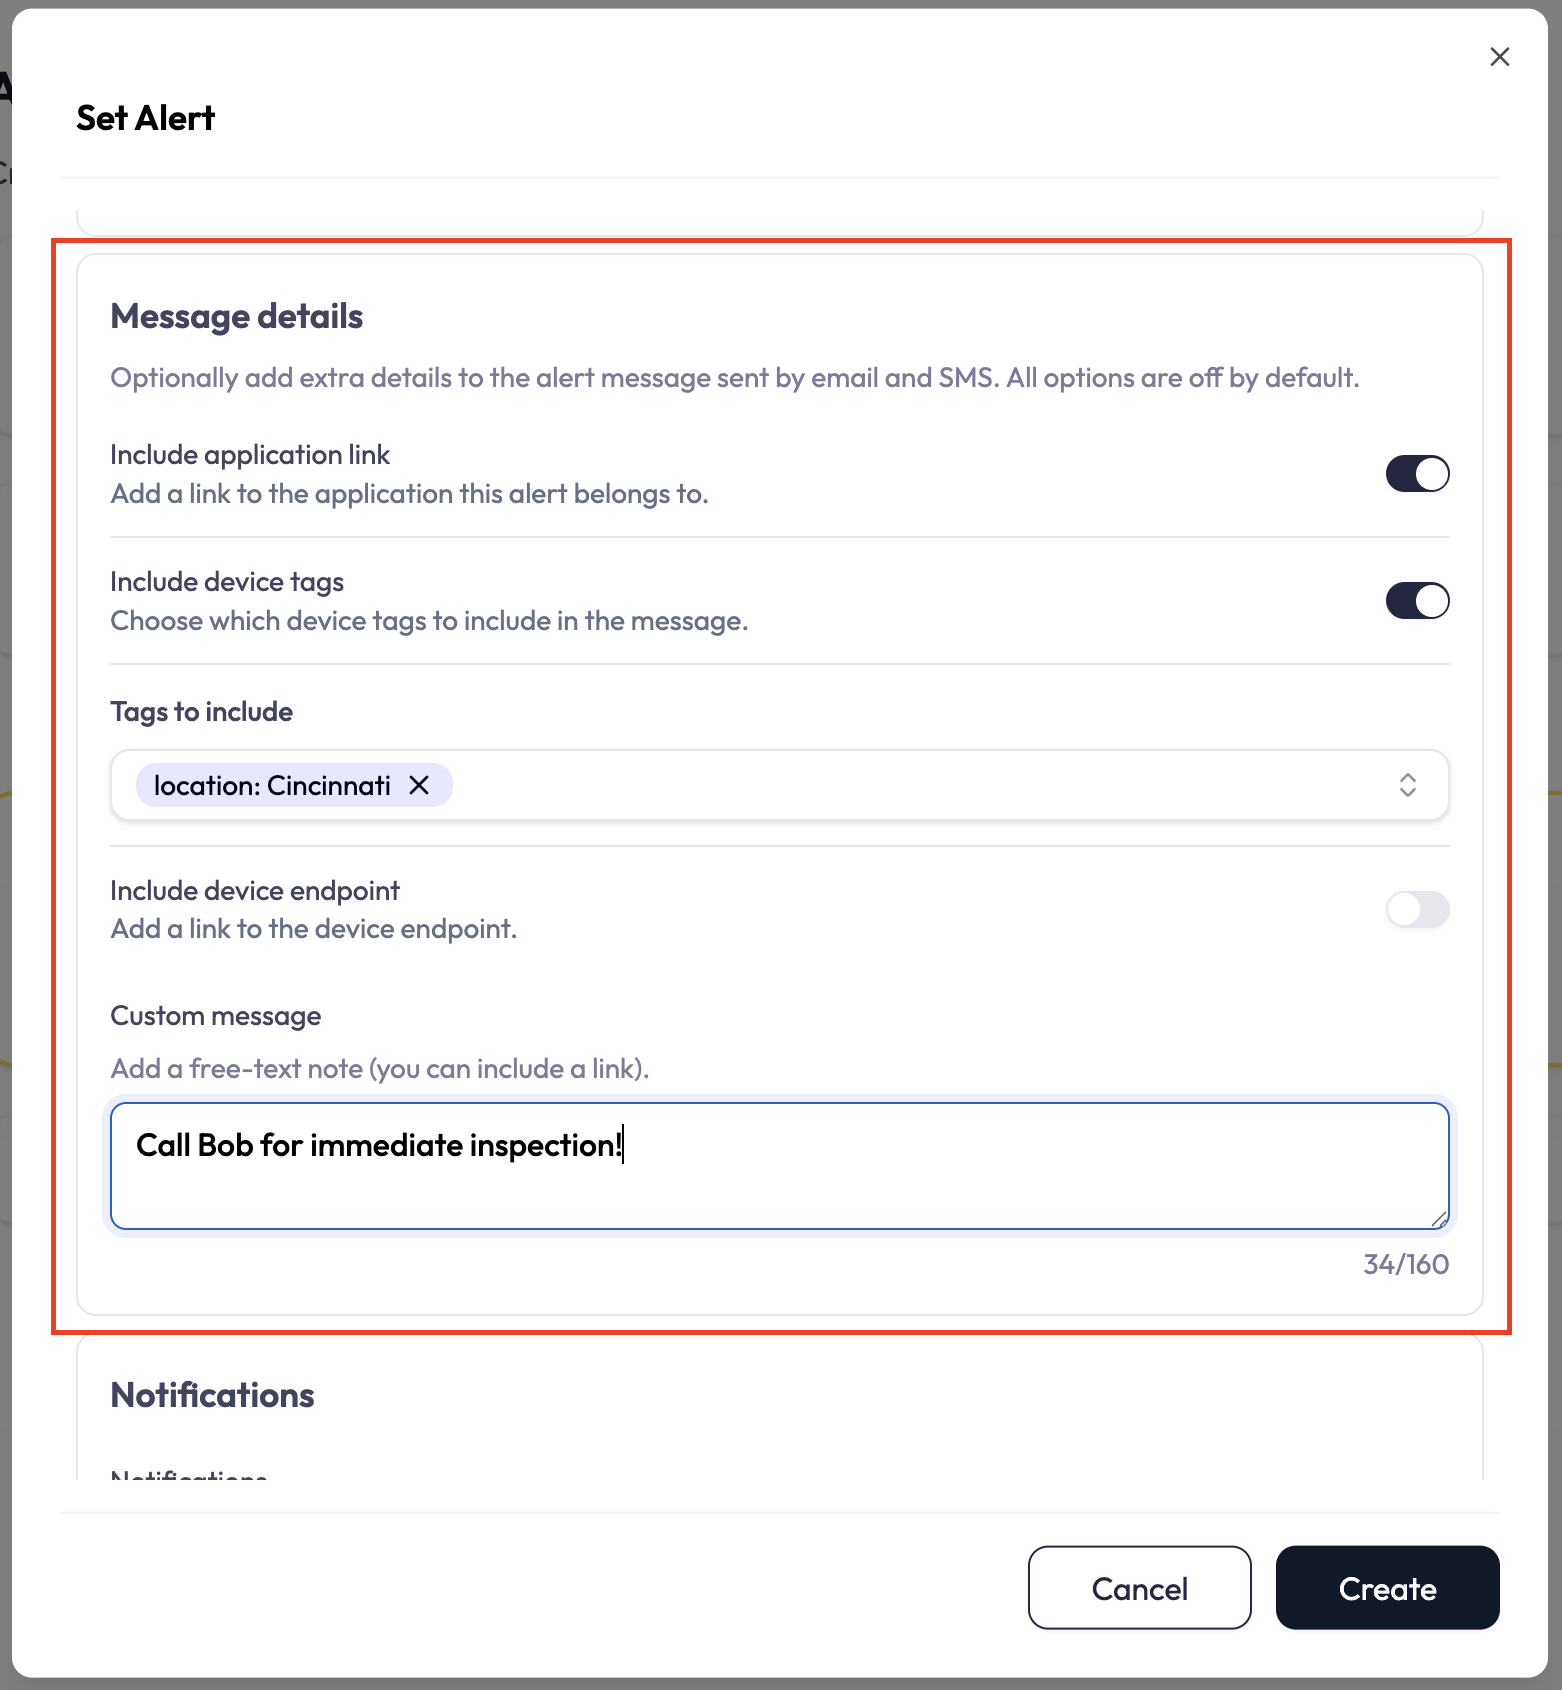
- Include application link — adds a link back to the application the alert belongs to.
- Include device tags — turning this on reveals a picker so you choose which of the device’s tags to include in the message.
- Include device endpoint — adds a link to the device’s endpoint.
- Custom message — a free-text note (up to 160 characters) added to the alert message.
Click Create to save. Editing an existing alert opens the same dialog (titled View Alert) with a Save button.
Notification Groups
A Notification Group is a reusable recipient list, so you do not re-pick the same people for every alert. Groups are scoped to an application: open an application and go to its Notification Groups page (alongside that application’s Alerts).
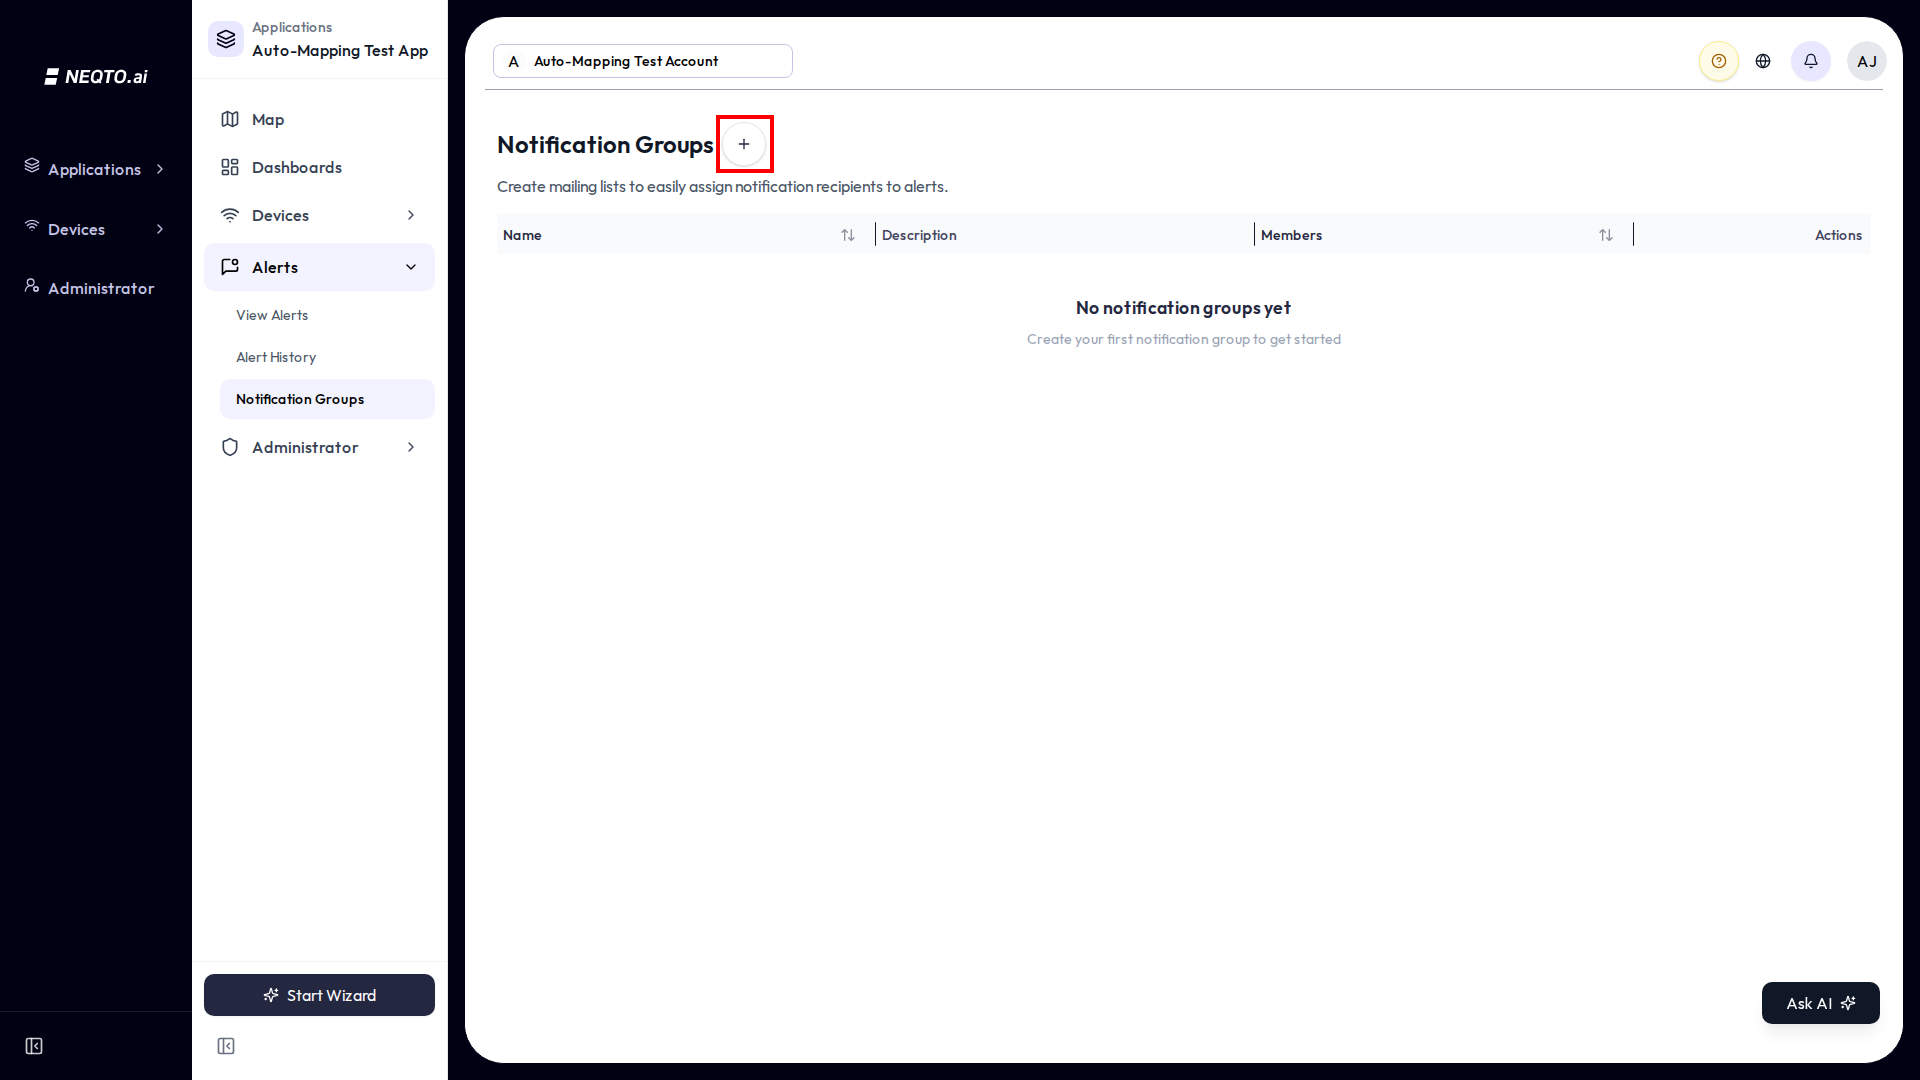
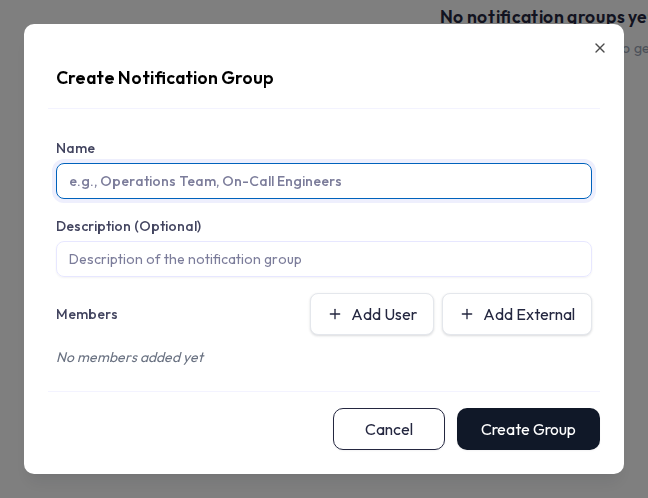
-
1Click Create Group, give it a Name and an optional Description.
-
2Add members: Add User for account users, or Add External for an email and/or phone number with per-member Email and SMS toggles.
-
3In any alert’s Notifications section, use Add Notification Group to attach the group. When the alert fires, everyone in the group is notified.
Connectivity Alerts
A connectivity alert tells you when a device stops sending data. You do not build these in the Alerts list; each device has its own Connectivity Monitoring tab in the device’s detail view, and NEQTO.ai creates the underlying alert automatically.
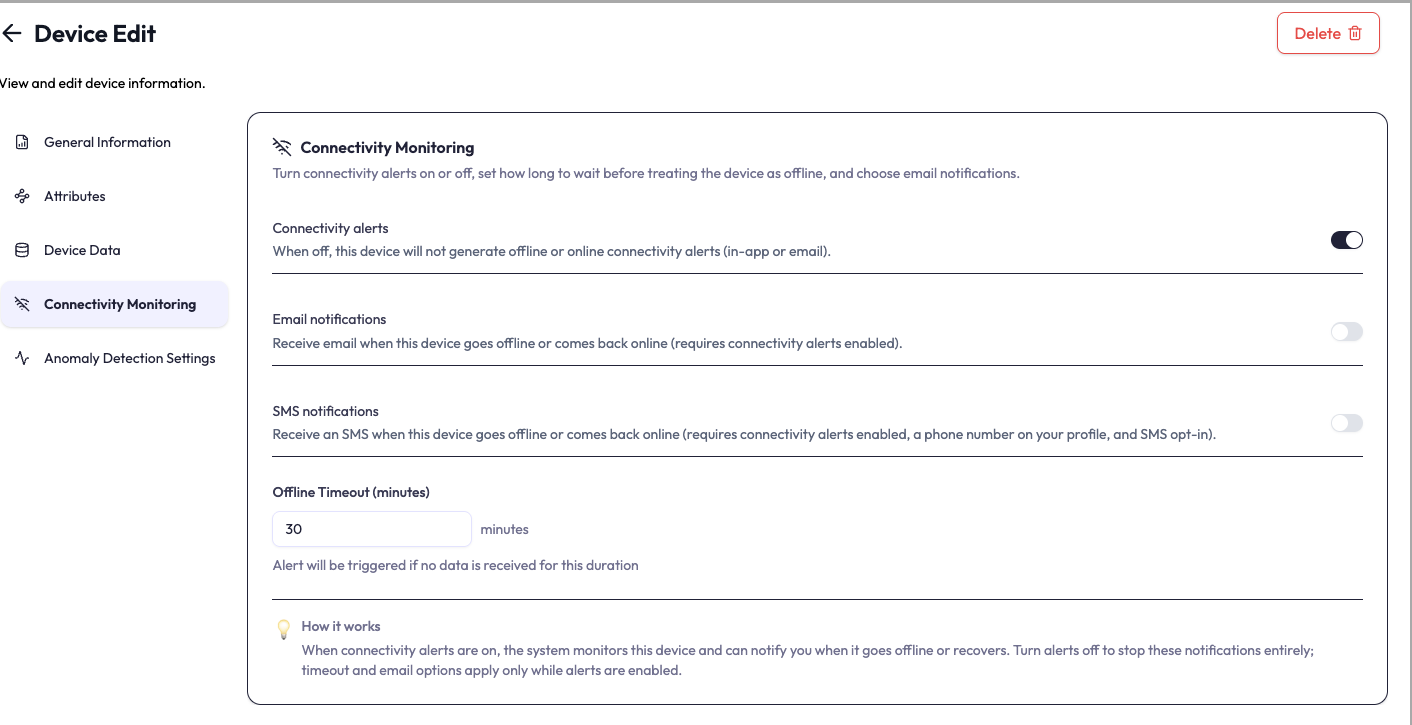
The card has four controls:
| Control | What it does |
|---|---|
| Connectivity alerts | The master switch. When off, this device raises no offline or back-online alerts (in-app, email, or SMS). |
| Email notifications | Also email you when the device goes offline or comes back online. Only applies while connectivity alerts are on. |
| SMS notifications | Also text you when the device goes offline or comes back online. Independent of the email toggle; only applies while connectivity alerts are on, and requires a phone number on your profile with SMS alerts enabled. |
| Offline Timeout (minutes) | How long to wait with no data before treating the device as offline. The minimum you can enter is 10 minutes. |
When a device that had gone offline starts sending data again, a back online recovery notification is sent (subject to the same cooldown), telling you how long it was down.
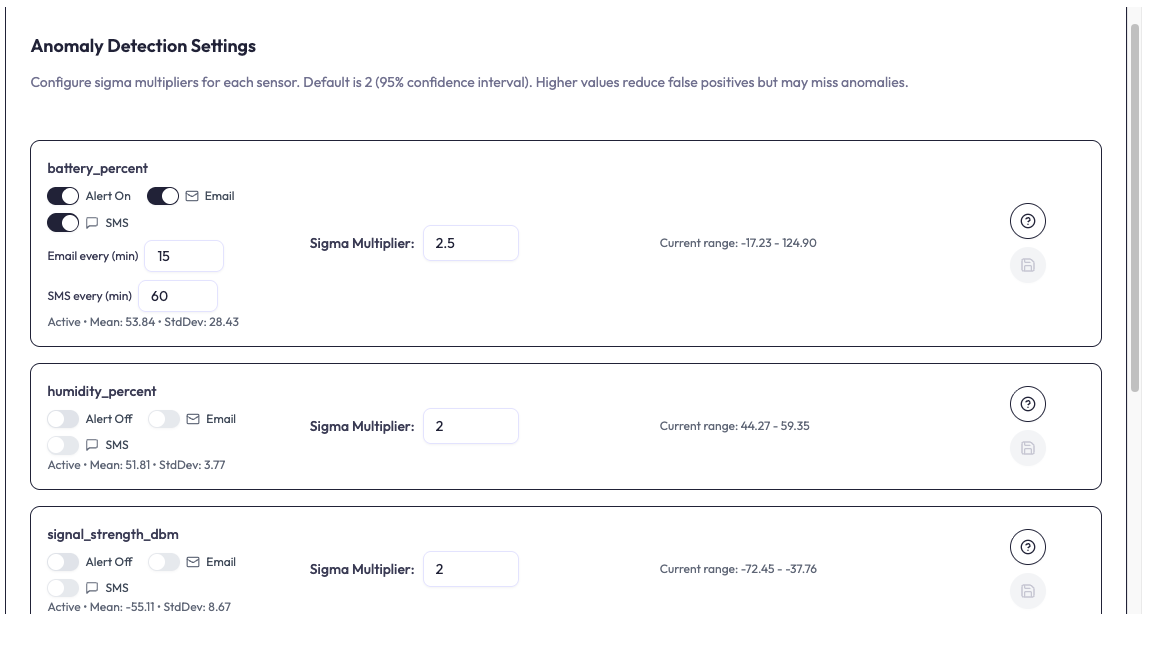
Anomaly Detection
Anomaly detection flags a single reading that is abnormal, without you setting a fixed number. It learns each sensor’s normal range from its own history. Configure it per sensor on the device’s Anomaly Detection Settings tab.
How it works
Detection has two layers:
-
Absolute limits. Hard physical bounds per sensor type: temperature in Celsius
is bounded at
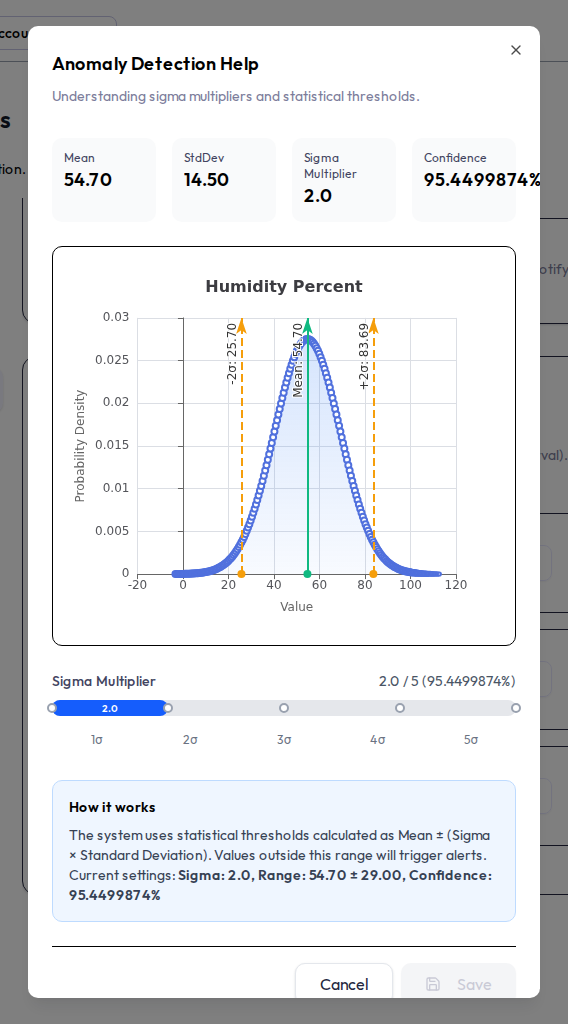
-40to85 °C(Fahrenheit-40to185 °F), humidity and battery at0to100 %, and signal strength at-100to-20 dBm. A reading outside these is always a critical anomaly. Unrecognized sensor types have no absolute limits. - Statistical range. Once a sensor has collected enough readings to finish its warm-up , NEQTO.ai computes its mean and standard deviation and flags readings outside mean ± (sigma × standard deviation). A statistical anomaly is rated warning when the reading is more than 3 standard deviations from the mean, otherwise info.
What you configure
- Sigma Multiplier per sensor, from 1 to 5 (the input steps in 0.1), default 2. It is the width of the “normal” band: 2 sigma is about a 95% confidence interval. Higher sigma means a wider band, so fewer false alarms but a higher chance of missing a real anomaly. Change it and click Save on that row.
- On / Off, Email, and SMS per sensor. These toggles appear only once that sensor has finished warm-up and its anomaly alert exists; until then the row shows a note that the controls become available after the alert is created. Email and SMS are independent of each other and only work while the sensor’s alert is on; SMS also requires a phone number on your profile with SMS alerts enabled.
- Notification interval per channel — an Email every (min) and a SMS every (min) field, each shown when that channel is on. They set how often a sensor re-notifies you while it keeps reading anomalous, from 15 minutes to 7 days. Leave a field blank to use the default (60 minutes); the value saves when you click away from the field.
Setting names match the sensor’s attribute name exactly (the raw key, such as
temperature_celsius or signal_strength_dbm), so they line up with what
you see under Device Data.
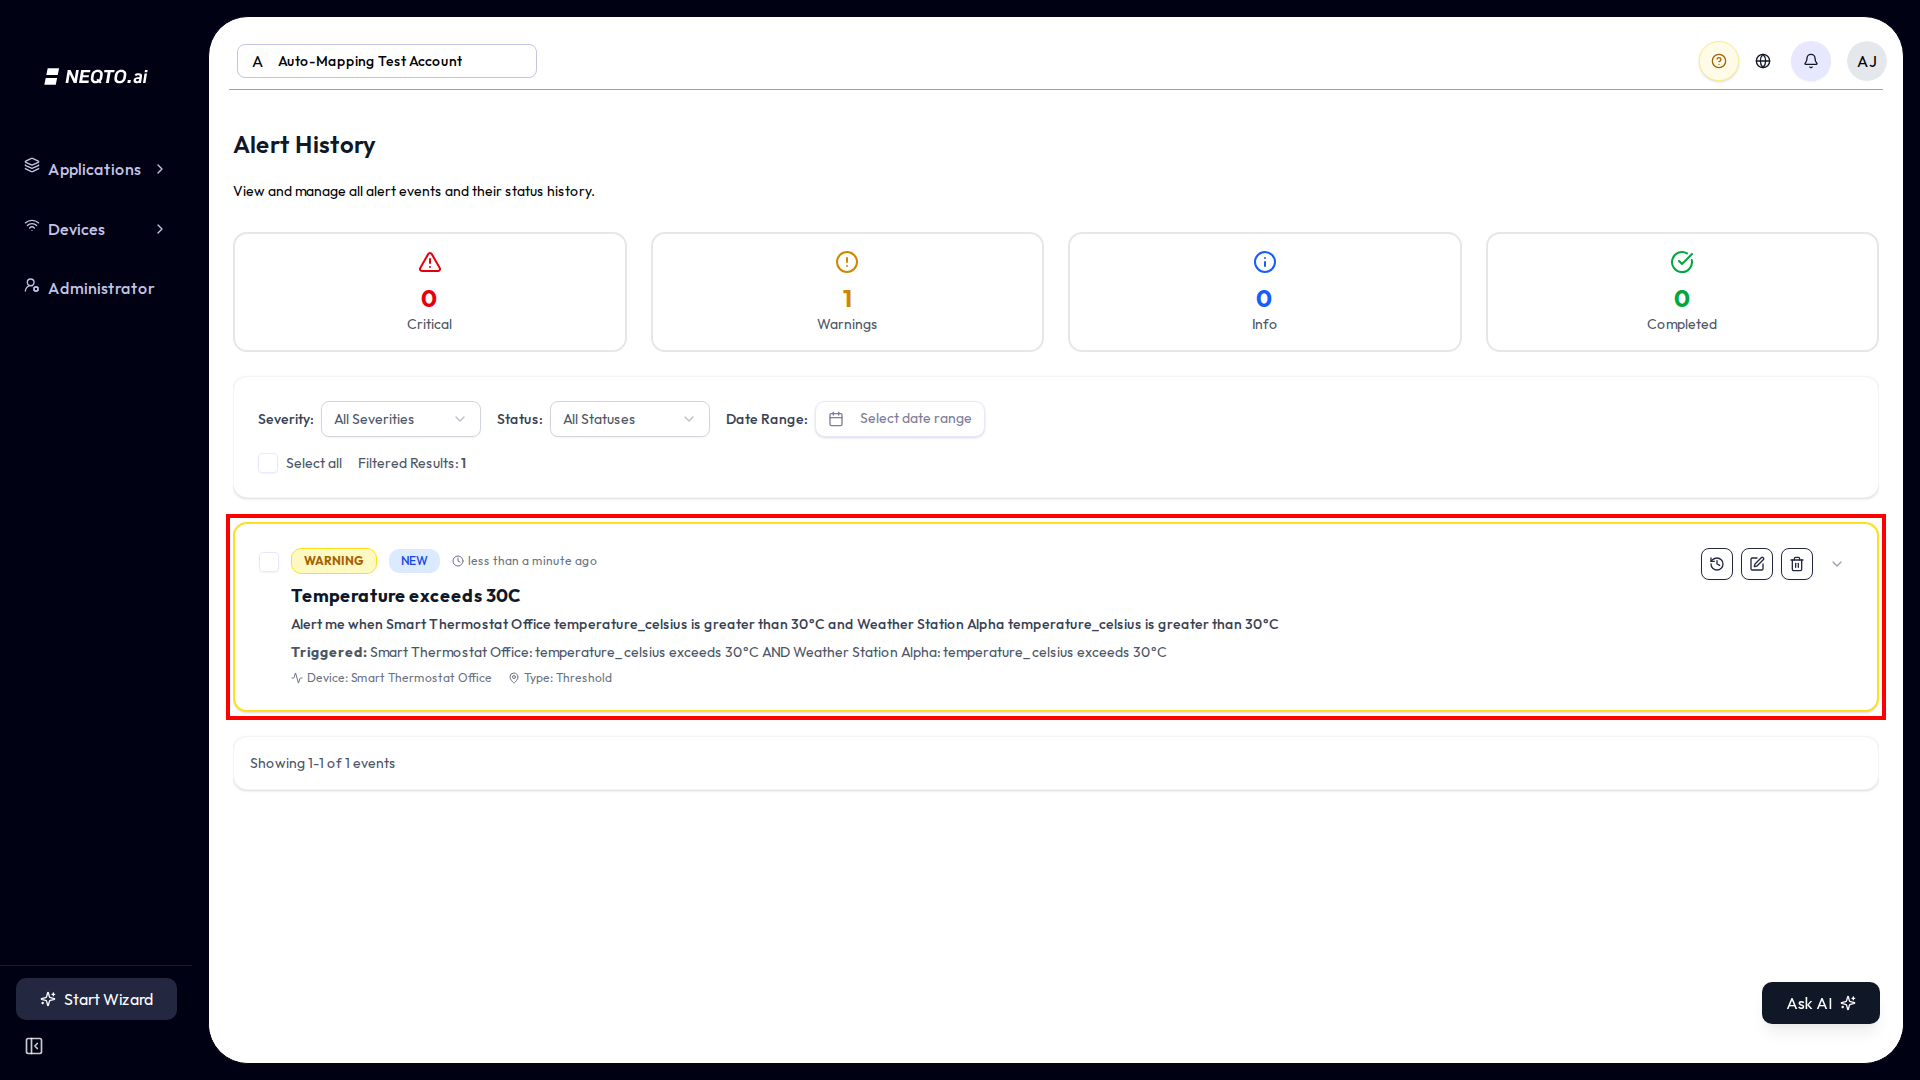
Alert History
Every time an alert fires it creates an event. The Alert History page is where you review, triage, and clean up those events.
Event status
Each event carries a workflow status you can update as you handle it:
| Status | Meaning |
|---|---|
| New | Just fired, not yet looked at. |
| In Progress | Someone is working on it. |
| Pending | Waiting on something else. |
| Completed | Resolved. |
| Dismissed | Acknowledged and set aside. |
Status changes are recorded, so each event keeps a history of who moved it where.
Filtering and cleanup
- Filter by Severity (All Severities, Info, Warning, Critical), by Status (All Statuses, New, In Progress, Completed, Pending, Dismissed), and by a Date Range picker.
- Use the select-all checkbox to pick events and Delete selected in bulk, or set a date range and Delete by date range. Both ask for a confirmation, and both need the alert-delete permission.
Muting Your Own Alert Notifications
Separately from any single alert, you can silence alert notifications to yourself across the whole platform. This is a personal preference on your own account, not a change to the alert rules other people see.
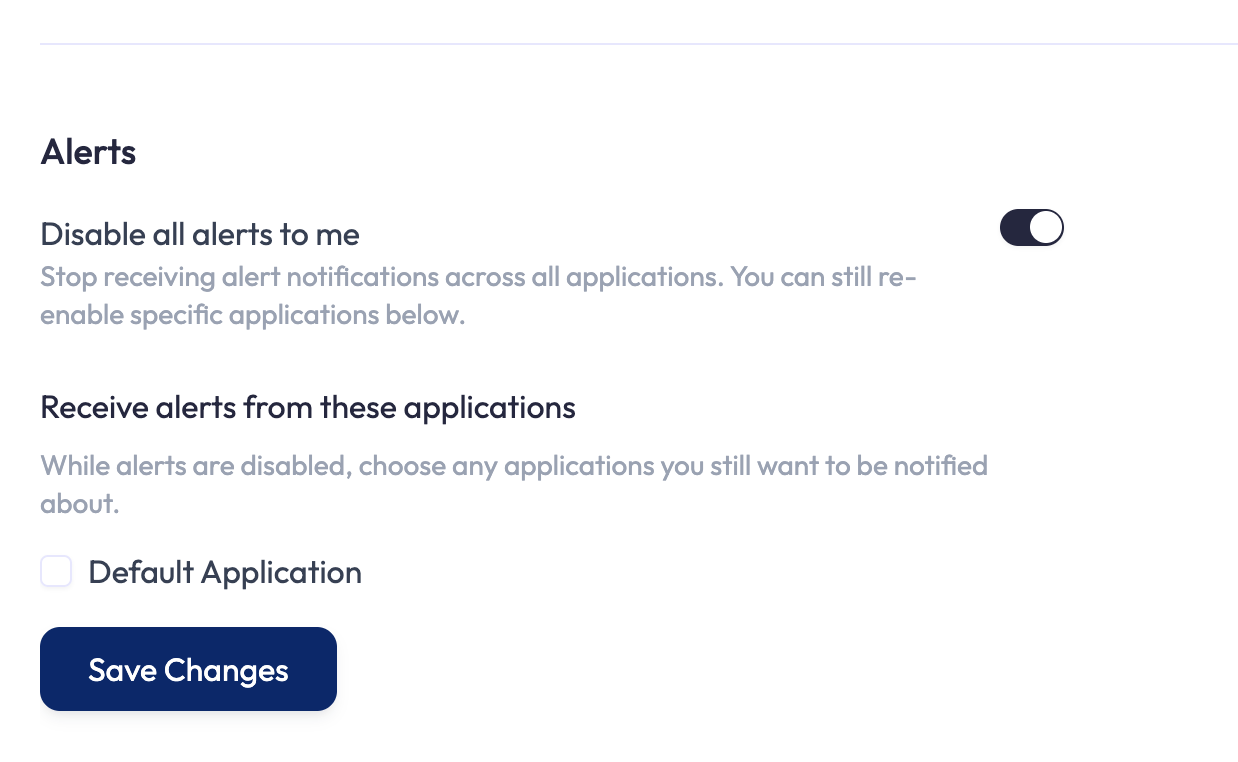
Open Settings and find the Alerts section. Turn on Disable all alerts to me to stop receiving alert notifications across every application. While it is on, a Receive alerts from these applications list lets you tick the applications you still want to hear about, so you can mute everything except the few that matter.
Limits and Good to Know
A few non-obvious facts about how alerts behave.
| Item | Value |
|---|---|
| Conditions per threshold alert | 1 to 10 |
| Unlock conditions per alert | Up to 10 |
| Unlock timer minimum | 1 minute (field defaults to 60) |
| Repeat-notification gap (older alert with no unlock set) | 24 hours per rule |
| Connectivity offline timeout | 10 minutes minimum |
| Anomaly sigma multiplier | 1 to 5 (steps of 0.1), default 2 |
- Severity is a label, not a trigger. Use it to filter and prioritize in Alert History.
- Match operators to the data. Numeric attributes get numeric operators; text attributes get Contains / Exact match / Does not match.
- Use unlock conditions to stop alert fatigue. Lock on the way up, unlock on the way down, or after a timer.
- Compare against a tag when a limit is shared. A condition’s value can be a fixed number or a tag. Point several alerts at the same tag and you can change the limit once, in the tag, instead of editing each alert.
- Owners and admins are notified by default. The Notify account owners & administrators toggle is on unless you turn it off. If you pick no individual users, everyone with account access is emailed, and external contacts or groups you add do not change that.
- SMS needs opt-in. An account user only gets SMS if they have a phone number and have opted in; external contacts are notified per the toggles you set on them.
- Connectivity and anomaly alerts are per device, configured from each device’s Connectivity Monitoring and Anomaly Detection Settings tabs rather than from the Alerts list.
