Data Push sends an arbitrary payload in real time from the NEQTO.ai server to a connected Device Endpoint. Use it to deliver commands or data to a device on demand — either directly from the Data Push screen (with a reusable send history), or from a Data Push widget placed on a dashboard for payloads you send often.

MQTT or WebSocket only: Data Push requires an active, connected communication channel, so it is available only for endpoints using the MQTT or WebSocket protocol. HTTP/HTTPS endpoints cannot receive a push.

Supported Data

Three payload formats are supported, each with its own size limit.

Format Overview Maximum size
Text Standard text data. 4,096 characters
JSON A JSON-formatted string. Formatting whitespace and line breaks are automatically removed (minified) when the data is sent. 4,096 characters
Binary Binary data entered as a hexadecimal (Hex) string. 2,048 bytes

Sending via the Data Push Screen

Open the Data Push screen

  • 1
    Open the Device Endpoints screen (under Devices), find the target endpoint, and choose Data Push from its Action menu (the three-dot menu in the Actions column).
    The Device Endpoints list with the three-dot Action menu open on a WebSocket endpoint row; the menu shows View Details, Data Push (highlighted), Delete, and Edit.
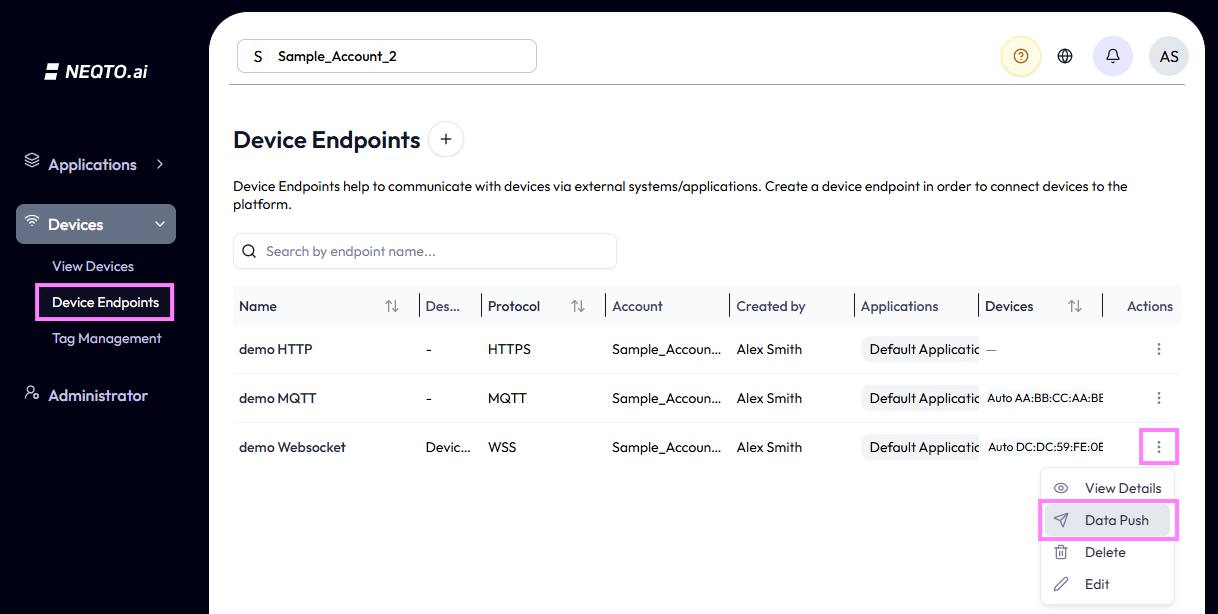
    Open Data Push from the target endpoint’s Action menu.
  • 2
    The Data Push modal opens, showing the Destination device endpoint and a Payload field with a character counter (for example 0 / 4096) and a Submit button.
    The Data Push modal for a WebSocket endpoint: a Destination device endpoint field, an empty Payload textarea with placeholder text 'String, JSON, or binary data as a hexadecimal string' and a 0 / 4096 counter, history and help icons at the top right, and Cancel and Submit buttons.
    The Data Push modal, opened for the selected endpoint.
MQTT endpoints: for an MQTT endpoint, the modal also shows the destination topic name the payload will be published to.
The Data Push modal for an MQTT endpoint, showing an additional Destination topic field (a ctrl/v1/… topic path) below the Destination device endpoint, above the Payload field.
For MQTT endpoints, the destination topic name is shown on the Data Push screen.

Enter a payload and send

Type your payload into the Payload field and click Submit. On success, a confirmation appears and the data is delivered to the endpoint.

The Data Push modal with the text 'Hello, this is a test message from NEQTO ai.' typed into the Payload field (44 / 4096), the Submit button highlighted, and a green 'Success! Data has been pushed' toast in the top-right corner.
Sending a Text payload; a success toast confirms delivery.
Whitespace is trimmed: any leading or trailing whitespace in the payload is automatically stripped before the data is sent to the endpoint.

Formats and considerations

You can send a raw JSON string or binary data, in addition to plain text.

The Data Push modal with a multi-line JSON payload typed in — an object with temperature, humidity, and mode fields (59 / 4096) — and a 'Success! Data has been pushed' toast.
Sending a JSON payload.
JSON considerations:
  • Line breaks and spaces added for readability are removed (minified) before transmission.
  • If the input has any leading or trailing whitespace, it is not recognized as JSON and is sent as plain Text instead.
The Data Push modal with a hexadecimal binary payload typed in — 010300000002C40B (16 / 4096) — and a 'Success! Data has been pushed' toast.
Sending Binary data as a hexadecimal (Hex) string.
Binary considerations: if the input has leading or trailing whitespace, it is not recognized as binary data and is sent as plain Text instead.

Viewing and reusing transmission history

The Data Push screen keeps a history of past transmissions that you can review and resend.

  • 1
    Click the History button (the clock icon at the top right of the modal).
    The Data Push modal with the History button — a clock icon at the top right, next to the help icon — highlighted.
    Open the send history from the clock icon.
  • 2
    The history list appears, in descending order (newest first). Each row shows the payload (with a TEXT, JSON, or BIN type badge), the Sent time, and the Status (Succeeded or Failed).
    The Data Push history view: a table of past transmissions with Payload, Sent, and Status columns. Rows carry BIN, JSON, and TEXT type badges and show Succeeded or Failed statuses, with pagination reading 'Page 1 of 15' at the bottom.
    Transmission history, newest first, with type badges and send status.

From the history view you can:

  • Return to the input screen — click the back (←) button at the top of the screen.
    The history view with the back arrow button at the top right highlighted, used to return to the payload input screen.
    The back button returns you to the payload input.
  • Navigate pages — pick a page number from the pagination at the bottom of the list.
    The history view with the page-number pagination at the bottom highlighted and a page selector dropdown (1 through 15) open.
    Jump to a page via the pagination controls.
  • Reuse a past payload — click a row in the history list to paste that payload back into the input field for quick resending.
    The history view with one TEXT row — 'Hello, this is a test message from …' — highlighted, ready to be clicked to reuse.
    Click a history row to reuse its payload…
    Back on the input screen, the Payload field is now pre-filled with the reused text 'Hello, this is a test message from NEQTO ai.' (45 / 4096), highlighted.
    …and it is pasted back into the Payload field, ready to resend.

Sending via a Widget

A Data Push widget lets you send pre-configured payloads straight from a dashboard — handy for commands you send frequently.

Create the widget

  • 1
    On a dashboard, click the Create Widget (+) button in the toolbar to open the widget creation screen.
    A dashboard toolbar with the Create Widget plus button highlighted, showing a 'Create Widget' tooltip, on an empty 'Start building your dashboard' dashboard.
    Open the widget creation screen from the dashboard toolbar.
    The Create Widget dialog with a Widget Title field (set to 'demo') and a 'Select widget type' dropdown, beside an empty Preview panel.
    The Create Widget dialog.
  • 2
    Under Widget Type, select Data Push.
    The Widget Type dropdown open, listing Chart, Single Status, Multi Status, and Data Push; Data Push is highlighted at the bottom of the list.
    Choose Data Push as the widget type.
  • 3
    Under Style, select Form or Button.
    The Style dropdown for a Data Push widget open, showing Form (selected) and Button options, with a Button Label field and Default Payload field below, and a form-style widget in the Preview.
    Pick the widget Style: Form or Button.
  • 4
    Select the destination Device Endpoint. Only MQTT and WebSocket endpoints are eligible — an HTTP endpoint is shown as unsupported.
    The Destination device endpoint dropdown open, listing 'demo HTTP' marked 'HTTPS not supported' and disabled, 'demo MQTT', and 'demo Websocket' (selected). The Preview shows a Form widget with a Submit button.
    Choose the destination endpoint (MQTT or WebSocket only).
  • 5
    Configure the payload for your chosen Style. For Form, optionally set a Default Payload that pre-fills the input field. For Button, add and configure the commands (payloads) to send.
    A Form-style Data Push widget being configured: the Default Payload field holds 'Hello, this is a test message from NEQTO ai' (highlighted), and the Preview shows that text in a form with a Submit button.
    Form Style: set an optional default payload.
    A Button-style Data Push widget being configured: a Batch Commands section with Command 1 set to 'Hello, this is a test message from NEQTO ai.' (highlighted) and an Add command (plus) button below; the Preview shows a large Submit button.
    Button Style: add the commands to send (up to four).
  • 6
    Click Save. The widget is created and added to your dashboard.
    The completed Form-style Data Push widget configuration with the Save button highlighted at the bottom right of the dialog.
    Save the widget.
    The dashboard with the saved 'demo' Form Data Push widget placed on the grid, showing its default payload text and a Submit button.
    The widget is added to the dashboard.
Form vs Button:
  • Form — an input-form widget for entering and sending arbitrary data on the fly, with an optional default payload.
  • Button — a one-tap widget that sends pre-configured data, with up to four commands.
For payload formats and limits, see Supported Data above.

Send from the widget

Click the Send (Submit / command) button inside the widget on your dashboard to immediately transmit the payload to the device.

A dashboard with two 'demo' Data Push widgets — a Form widget on the left and a Button widget on the right — and a green 'Success! Command pushed' toast confirming the send.
Sending from a Data Push widget; a toast confirms the command was pushed.

Leave a Reply

Your email address will not be published. Required fields are marked *

Open external link

You’re leaving Claude to visit an external link:
https://stg-app.neqto.ai/en/dashboards