Tags are simple key:value labels you attach to devices so you can group, find, and filter them. A tag like Location:Los Angeles or floor:3 turns a long device list into something you can slice by site, role, owner, or anything else you care about. You create tags once, then reuse them across many devices.
Quick Start
The short version for people who already know NEQTO.ai.
-
1Open Tag Management and click Create Tag. Enter a Tag Name (the key, for example
Location) and a Tag Value (for exampleLos Angeles). -
2Open a device (or the Add Device form) and pick the tag from the Tags field. One device can carry many tags.
-
3Go to the Devices list and use the Tags filter to narrow it down. Pick several tags and the list shows only devices that have all of them.
What a Tag Is
Every tag has a Tag Name (the key), a Type, and a Tag Value. All three are required. The Type sets how the value is stored and validated — one of String, Float, Int, Boolean, Array, or JSON — and the Value field changes to match it. Only String values are free-form text; the other types are validated when you save.
| Part | UI label | Required | Limit |
|---|---|---|---|
| Key | Tag Name | Yes | Up to 25 characters. |
| Type | Type | Yes | One of String, Float, Int, Boolean, Array, JSON (default String). |
| Value | Tag Value | Yes | Depends on Type: up to 25 characters for String/Int/Float/Boolean, up to 500 for Array/JSON. |
- Free-form text. The Tag Name and String values accept any text up to the limit; the other Types are validated (see below). Leading and trailing spaces are trimmed.
- Uniqueness. You cannot create two identical tags in the same scope. A tag is a duplicate when its Tag Name, Type, and Tag Value all match an existing one within the same account (and same application, if you are working inside an application) — so the same name and value can coexist as different Types (for example
Reading:1as an Int and as a String). Try it and you get a “Tag with this key and value already exists for this organization.” error. - Reuse the same key. Because the Tag Value is part of a tag’s identity,
Location:Los AngelesandLocation:Tokyoare two separate tags. That is the intended way to build out a dimension like “Location”.
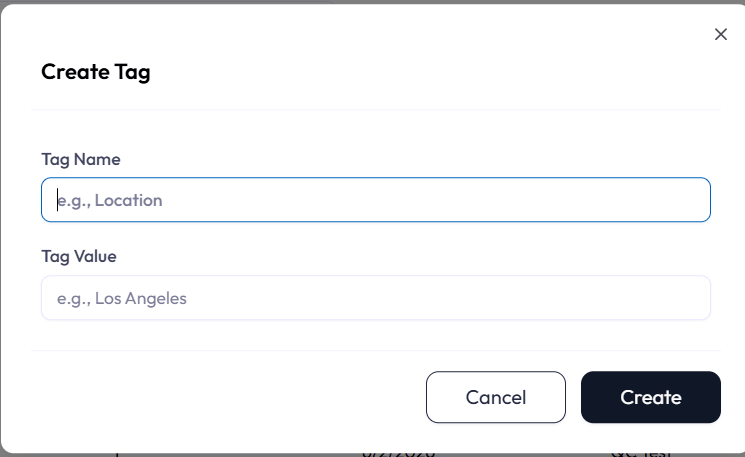
e.g., Location and e.g., Los Angeles. Tag Name is required and limited to 25 characters. The Tag Value is validated against the chosen Type: String is free-form text up to 25 characters; Int and Float must be numbers; Boolean is a true/false toggle; Array and JSON must be valid JSON (up to 500 characters, nested at most 10 levels deep, with unsafe keys such as __proto__ rejected). Spaces and other characters are fine in Tag Name and String values. Keep names short and consistent anyway.Tag Management
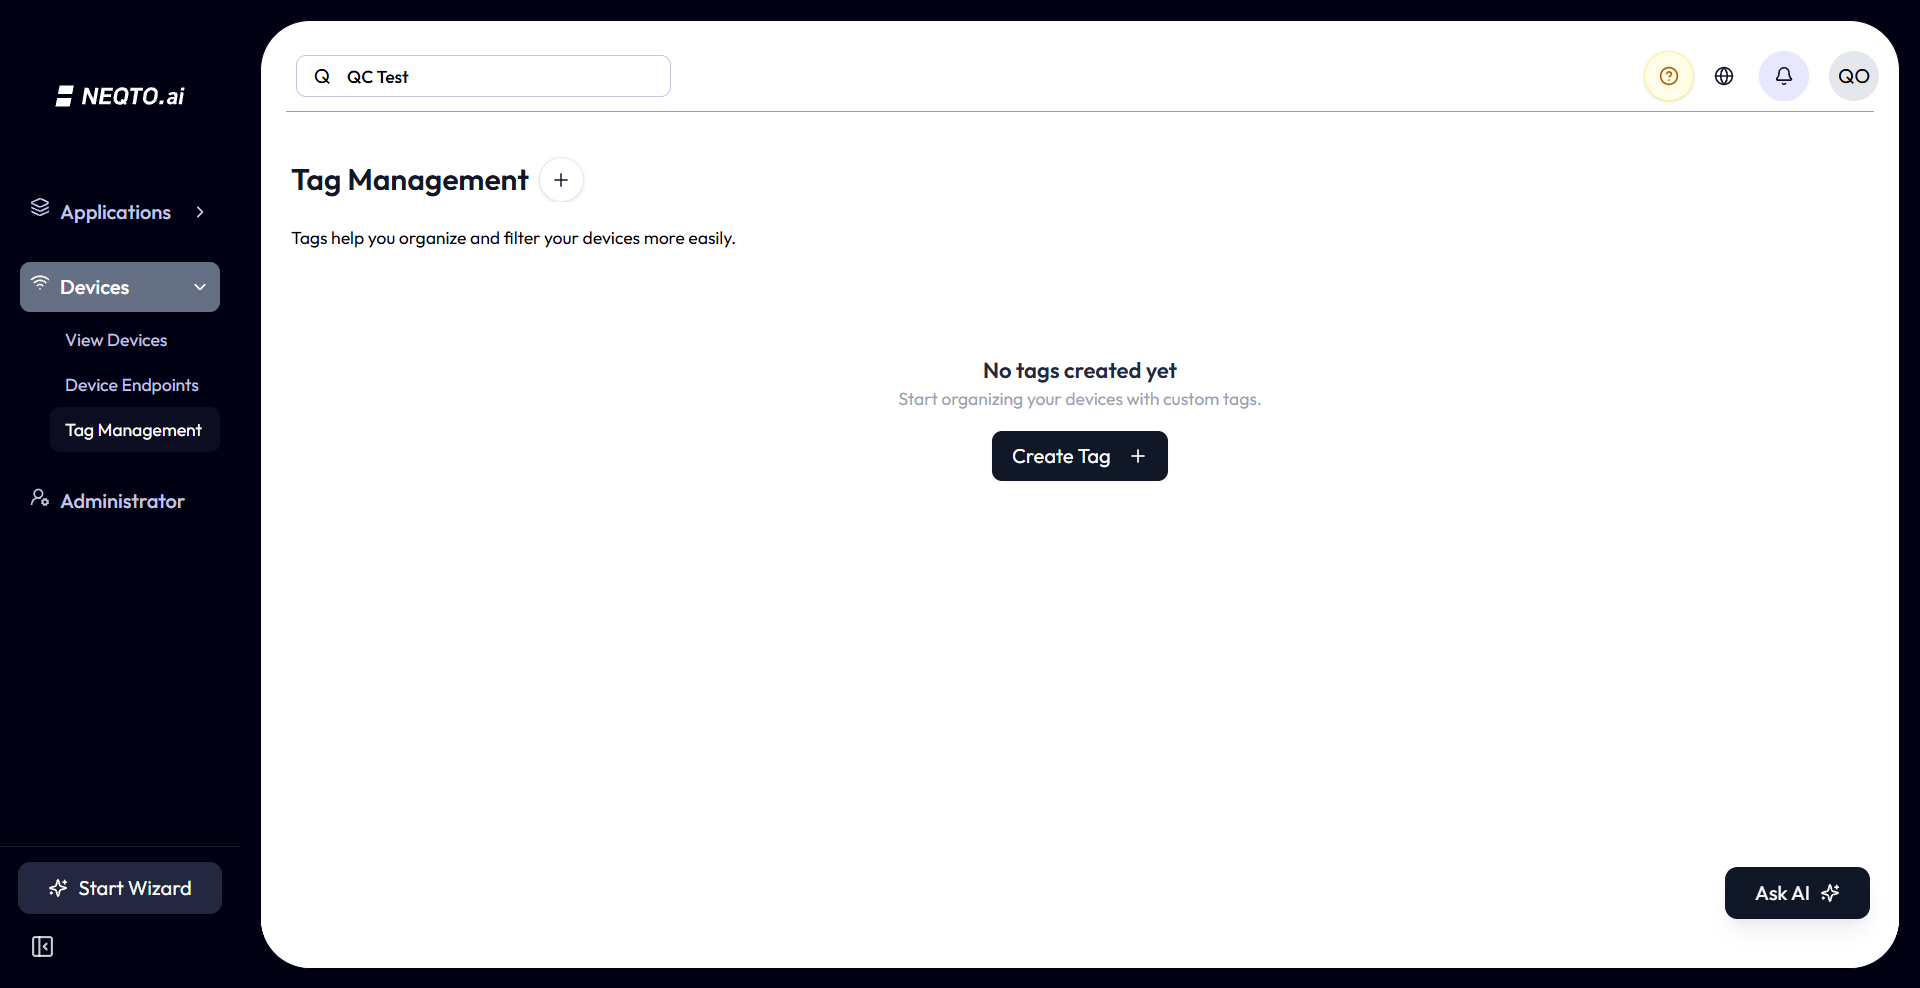
Tag Management is the dedicated screen for creating, editing, and deleting your tags. The page title is Tag Management and it explains itself: “Tags help you organize and filter your devices more easily.”
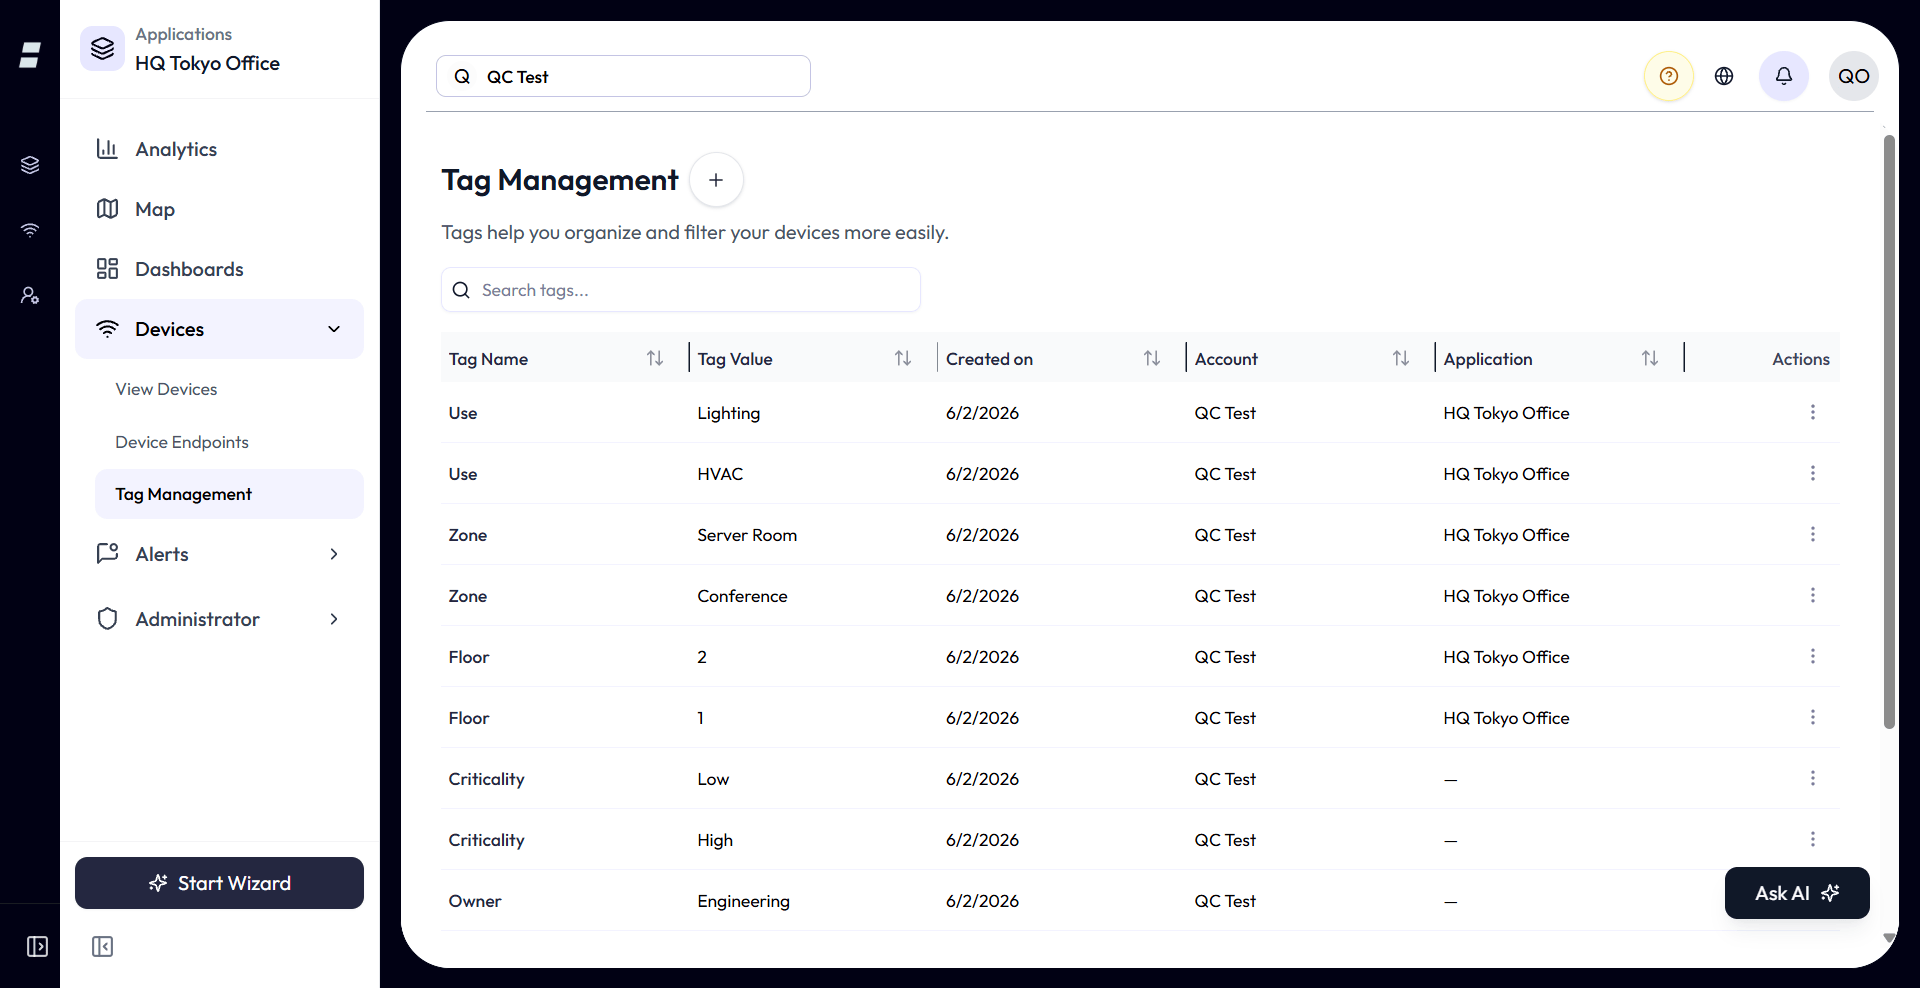
The list view
| Column | What it shows |
|---|---|
| Tag Name | The key, shown in the highlight colour. |
| Tag Value | The value. |
| Type | The value’s data type: String, Float, Int, Boolean, Array, or JSON. |
| Created on | The date the tag was created. |
| Account | The account the tag belongs to. |
| Application | The application the tag is scoped to, or a dash for account-level tags. |
- Search filters the list by Tag Name or Tag Value (case-insensitive, matches anywhere in the text).
- Sort by any column, including Created on, Account, and Application.
- Paginated at 10 rows per page by default.
- Column widths are resizable and your choice is remembered.
Account-level vs. application tags
Tag Management appears in two places, and the list is scoped differently in each:
| Where you open it | What you see | New tags are |
|---|---|---|
| The top-level Tags page | Only account-level tags (not tied to any application). | Account-level. |
| Inside an application | That application’s tags plus the account-level tags. | Scoped to that application. |
Create a tag
-
1Click Create Tag.
-
2Enter a Tag Name, choose a Type (String by default), and enter a Tag Value. The Value field adapts to the Type — a number field for Int/Float, a true/false toggle for Boolean, a JSON editor for Array/JSON. Tag Name is limited to 25 characters; scalar values to 25, Array/JSON values to 500.
-
3Click Create. A “Tag created successfully” confirmation appears and the tag joins the list.
Edit a tag
Use the row’s actions menu and choose Edit. You can change the Tag Name, Type, and Tag Value; the same length and uniqueness rules apply. Editing a tag updates it everywhere it is assigned, so a single change re-labels every device that carries it.
Delete a tag
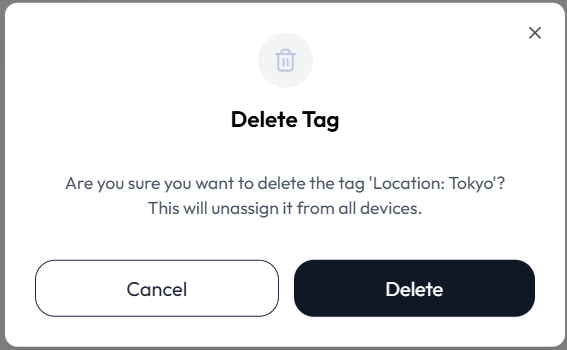
From the actions menu choose Delete. The confirm dialog spells out the consequence: “This will unassign it from all devices.” Deleting a tag detaches it from every device that had it. The devices themselves are untouched; they simply lose that one label.
Assigning Tags to Devices
Today, you assign tags to a device from its General Info section, not while creating it. The Add Device wizard focuses on choosing a device endpoint and detecting the device; the Tags field appears once the device exists.
When adding a device
The current Add Device wizard does not include a Tags step. It walks you through picking a device endpoint and detecting the device; tagging happens on the device itself, once it exists.
On an existing device
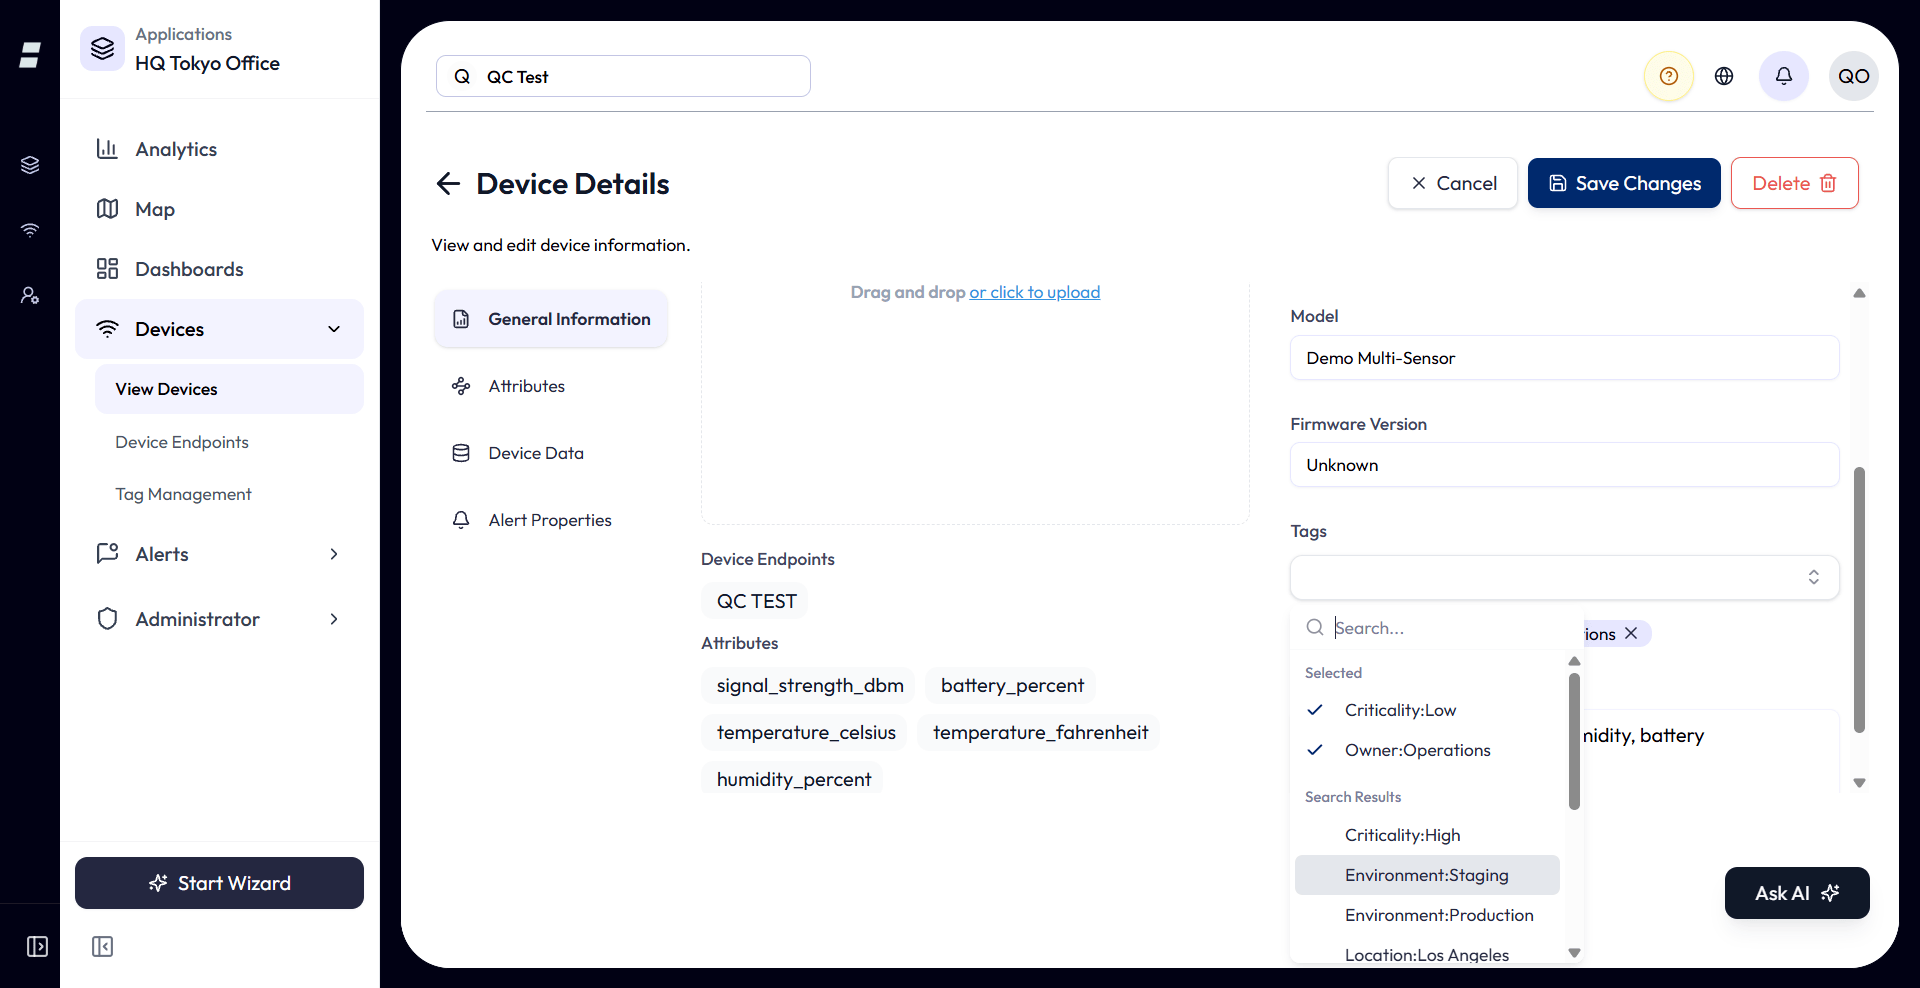
Open a device and go to General Info. The Tags field shows what is assigned and lets you add or remove tags. If none are assigned it reads “No tags assigned”.
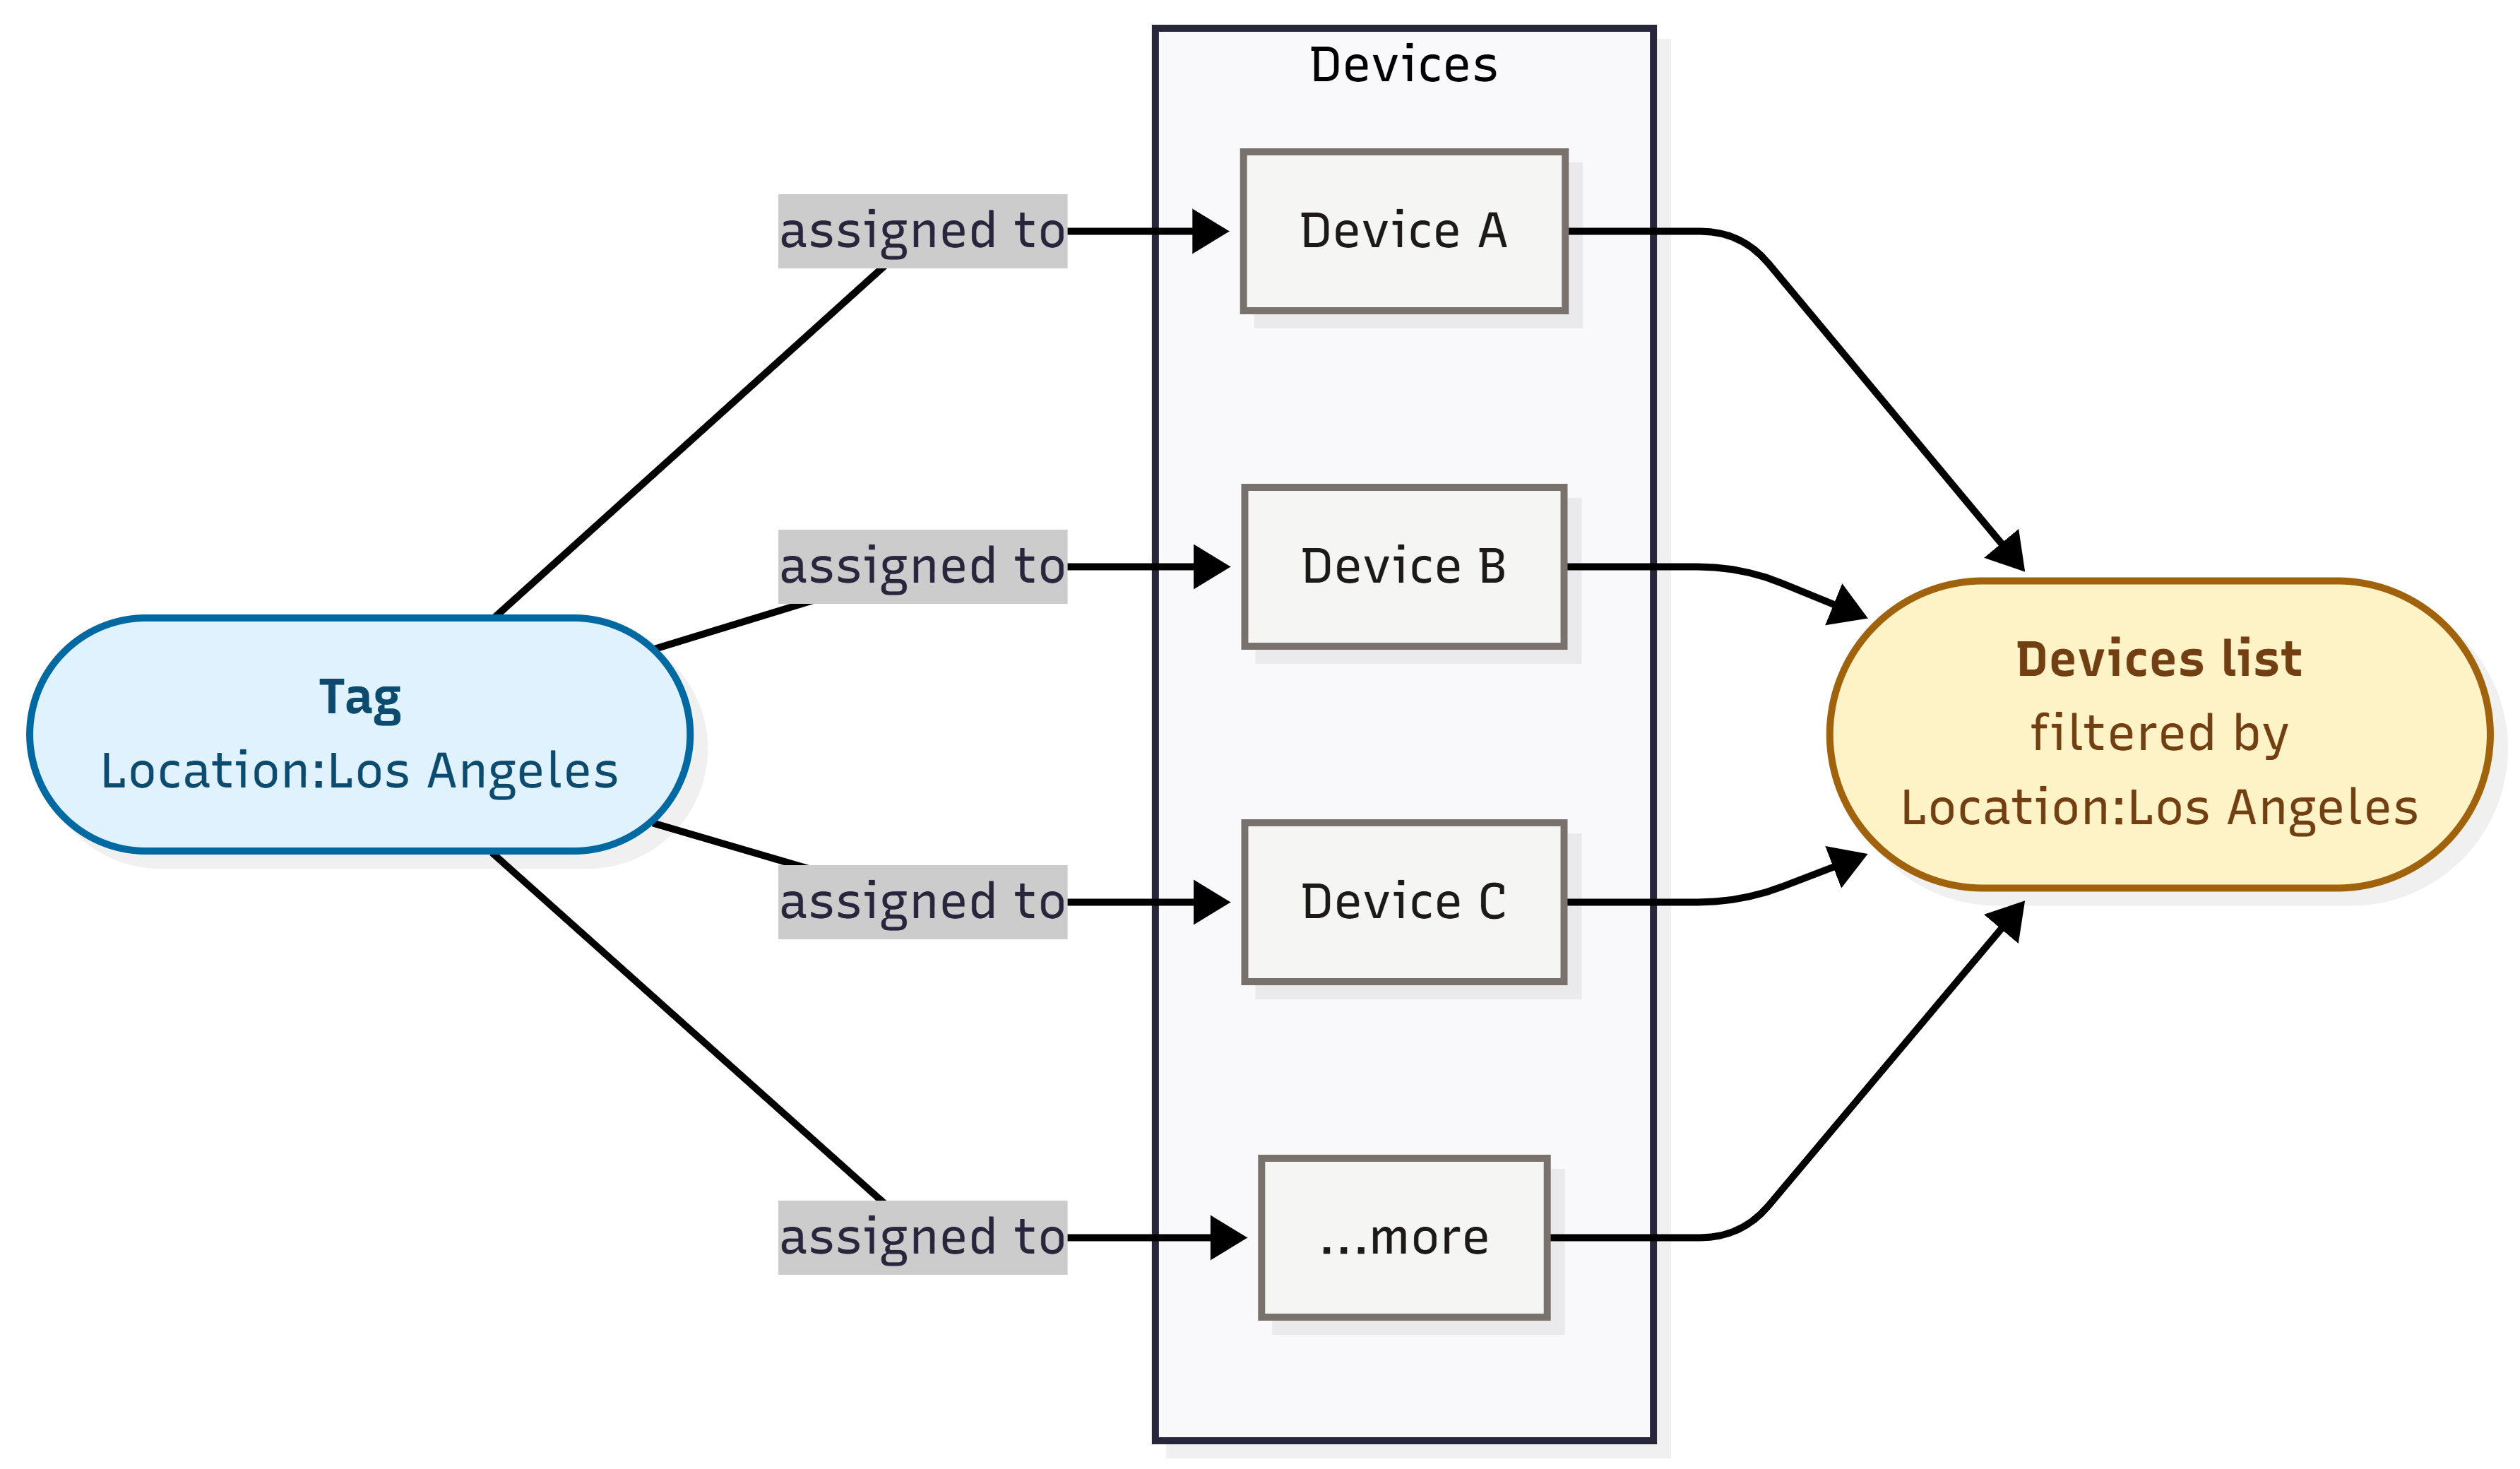
- Many-to-many. A device can have many tags, and a tag can be on many devices. The same tag is shared, not copied, so editing it updates every device at once.
- One assignment per pair. A given tag can be on a device only once; you cannot add the same tag twice to one device.
- Removing a tag from a device only detaches it from that device. The tag itself stays in Tag Management for reuse.
Filtering Devices by Tag
This is the payoff. Once devices are tagged, the Devices list can be narrowed to just the ones you want.
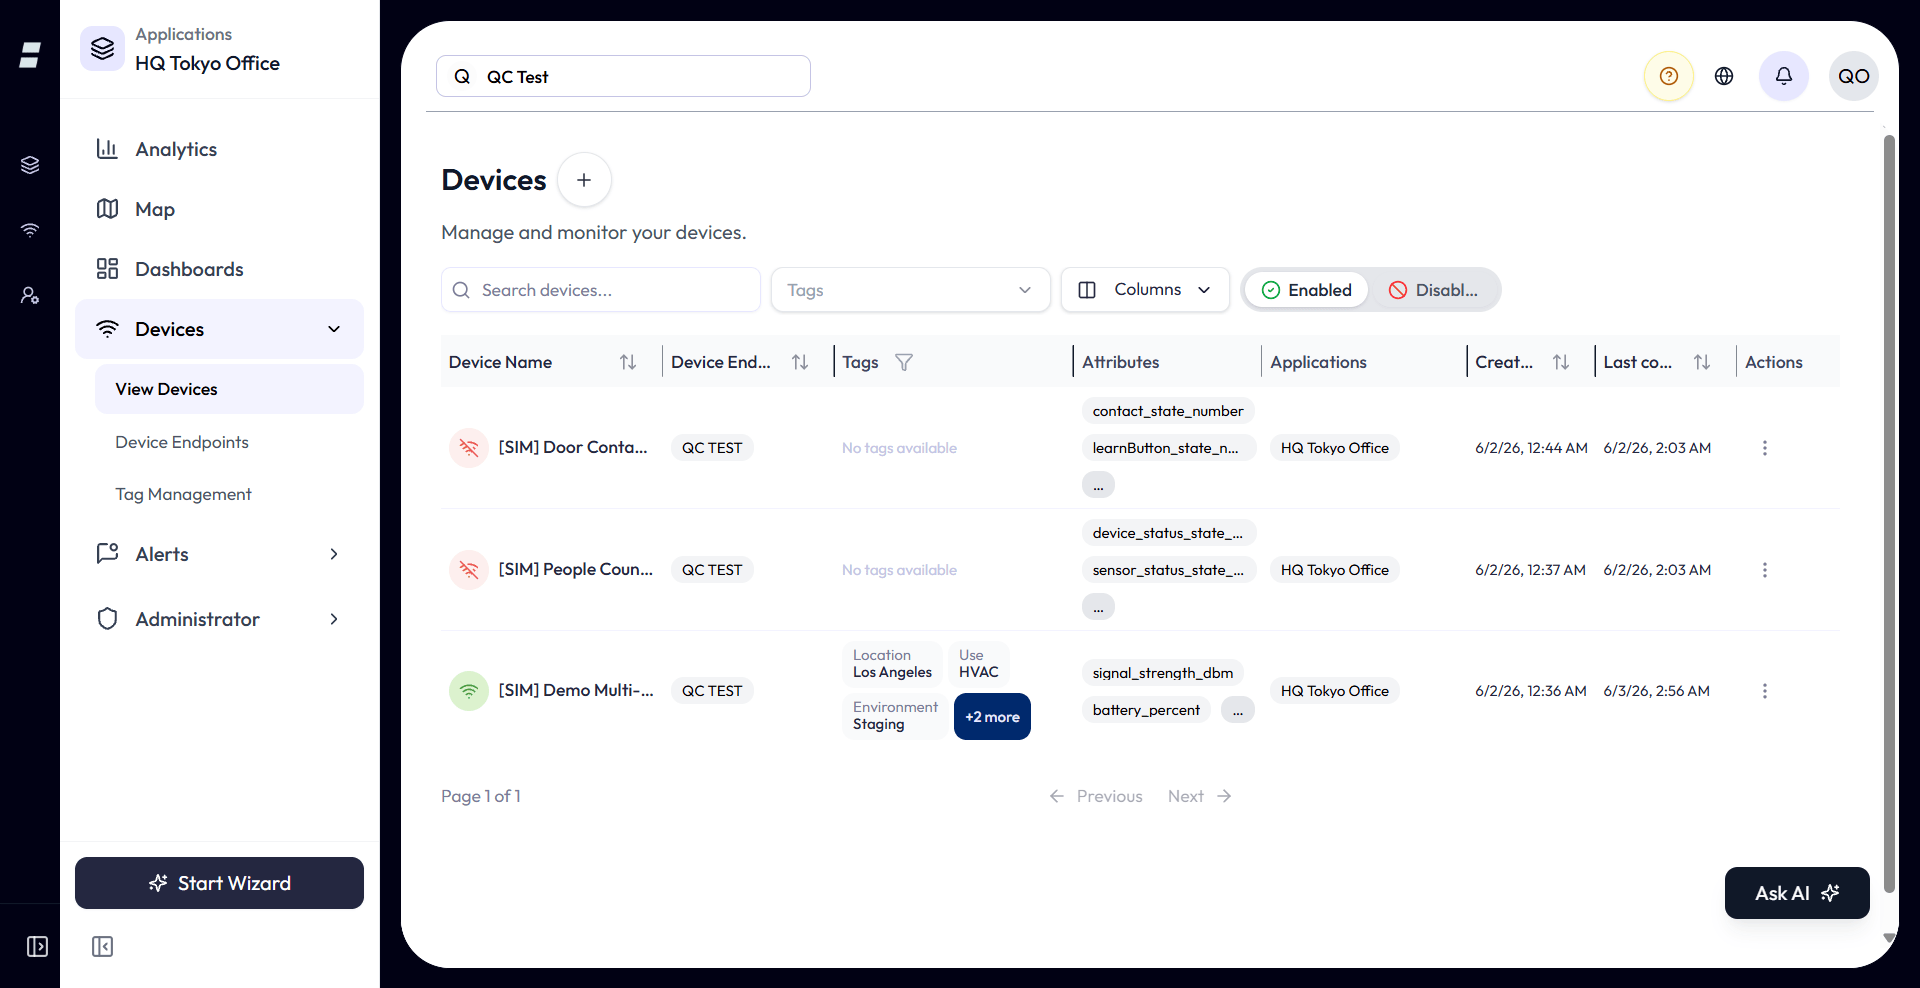
- Tags column. Each device row shows its tags as badges (key above value). If a device has more than three, the extras collapse into a +N more indicator.
- Tags filter. A filter control above the list lets you choose one or more tags. The options are your existing tags, shown as
key:value. - Multiple tags use AND. Select several tags and the list shows only devices that have every selected tag, not any of them. To see devices matching either tag, filter one at a time.
- Shareable URL. The active tag filter is written into the page address (a
tagsparameter), so a filtered Devices view can be bookmarked or shared and it reopens already filtered.
What Tags Do and Don’t Drive
Tags are deliberately focused. Here is what they currently affect.
| Area | Do tags apply? |
|---|---|
| Tagging devices | Yes. Devices are the only entity you can tag. |
| Filtering the Devices list | Yes. The main use of tags. |
| Endpoints, dashboards, alerts, maps, analytics | No. These are not tagged and are not grouped or scoped by tags today. |
| Application scoping | Indirect. A tag can be account-level or scoped to one application, which controls where it is offered, but a tag does not assign a device to an application. |
site:warehouse-A, site:warehouse-B).Limits and Good to Know
| Limit / behavior | Detail |
|---|---|
| Tag Name length | 1 to 25 characters, required. |
| Value type | One of String, Float, Int, Boolean, Array, JSON (default String). Int/Float must be numbers; Array/JSON must be valid JSON. |
| Tag Value length | Depends on type: String/Int/Float/Boolean up to 25 characters; Array/JSON up to 500 characters (max 10 levels deep). Required. |
| Uniqueness | The full Tag Name + Type + Tag Value must be unique within its scope (account, and application when set). |
| Tags per device | No fixed cap; the list view shows the first three and folds the rest into “+N more”. |
| Scope | Account-level (visible everywhere) or application-scoped (visible inside that application plus account-level tags). |
| Delete behavior | Unassigns the tag from all devices. Devices are not deleted. |
- Plan it like a dimension. Decide your Tag Names up front (Location, Site, Owner, Role) and keep values consistent. Tidy tags make the Devices filter genuinely useful.
- Account-level for shared labels. Create tags you want everywhere from the top-level Tags page; create app-specific ones from inside the application.
- Editing is global. Renaming a tag re-labels every device that carries it, in one move.
- Filtering is AND. More selected tags means fewer matching devices, not more.
