
Add a Blues Device
Send temperature and humidity readings from a Blues Notecard through
Notehub to NEQTO.ai. This guide creates a Notehub MQTT route using TLS,
transforms each event into the recommended neqtoai-std envelope, and checks that
the readings appear as Device Attributes.
Check each part of the path. Your controller writes sensor readings to the Notecard. The Notecard uploads them to Notehub. A Notehub route transforms and publishes them to a NEQTO.ai Device Endpoint. Verify both the route result and the stored Device readings; a successful MQTT send alone does not prove ingestion.
Requirements
Have these accounts, permissions, and devices ready before starting.
- A Notehub account with access to your project and permission to create routes.
- A cellular or Wi-Fi Notecard that can connect to Notehub.
- A host microcontroller, the controller running your sensor firmware, connected to the Notecard.
-
A sensor and firmware that write temperature and humidity values. The examples use
tempandhumidity; adjust the transformation if your firmware uses other field names. - A NEQTO.ai Account with permission to create and view Device Endpoints and available capacity for the Device.
Before You Begin
First confirm that the Notecard sends sensor events to Notehub. If this already works, continue to the route setup.
1. Provision the Notecard to Notehub
-
1
Create or open a Notehub project and copy its ProductUID.
-
2
Connect to the Notecard through the in-browser terminal or your host controller. Set the ProductUID with
hub.set, replacing the example product string below with your own:
{"req":"hub.set","product":"com.your-co.you:project"}-
3
Run
{"req":"hub.sync"}. Confirm that the Notecard appears under Devices in your Notehub project. See the Notehub walkthrough if provisioning or synchronization fails.
2. Write sensor data into a notefile
Send this
Blues Notecard API request
to the Notecard through its terminal or your host controller. note.add stores a
note in sensor.qo, an outbound queue file for upload to Notehub. The
body contains your sensor readings. This example uses temperature in Celsius and
humidity in percent:
{
  "req": "note.add",
  "file": "sensor.qo",
  "body": {
    "temp": 22.4,
    "humidity": 47.1
  }
}
After writing the note, send {"req":"hub.sync"} to request synchronization with
Notehub. In Notehub, open Events and confirm that the event has
body.temp and body.humidity with the expected numeric values. Use the
same notefile name in the route filter later.
The NEQTO.ai payload is created later, in the Notehub route. The
JSONata expression below reads the event’s sensor values, timestamp, and
Device identifier, then builds the recommended neqtoai-std envelope. Configure that
transformation before sending the event to the NEQTO.ai MQTT Endpoint.
High-Level Instructions
Use this checklist once the Notecard is sending events to Notehub. The detailed steps follow.
-
1
Create an MQTT with TLS Device Endpoint in NEQTO.ai and save its connection details securely.
-
2
Create an MQTT route in your Notehub project.
-
3
Copy the Endpoint’s broker, port, topic, username, and password into the route. Use
mqtts://in the broker URL and check certificate trust if TLS fails. -
4
Restrict the route to your sensor notefile, such as
sensor.qo. -
5
Select JSONata Expression under Data > Transform Data. Paste and test the expression below.
-
6
Enable and save the route. Send a new sensor event, check its Notehub route log, and confirm the resulting Device readings in NEQTO.ai.
Video Walkthrough
Use the video for an overview. Follow the written instructions for the current payload example, credential recovery, and verification steps.
Detailed Instructions
Create the receiving Endpoint, inspect one Notehub event, and use its fields to configure the route.
Part A: create the Device Endpoint in NEQTO.ai
-
1
Open Devices > Device Endpoints at Account or Application level.
-
2
Select Add Device Endpoint > Create Device Endpoint. Choose MQTT with TLS (Recommended), enter an Endpoint name, and continue with Next. Use the username/password connection details for the route in this guide.
-
3
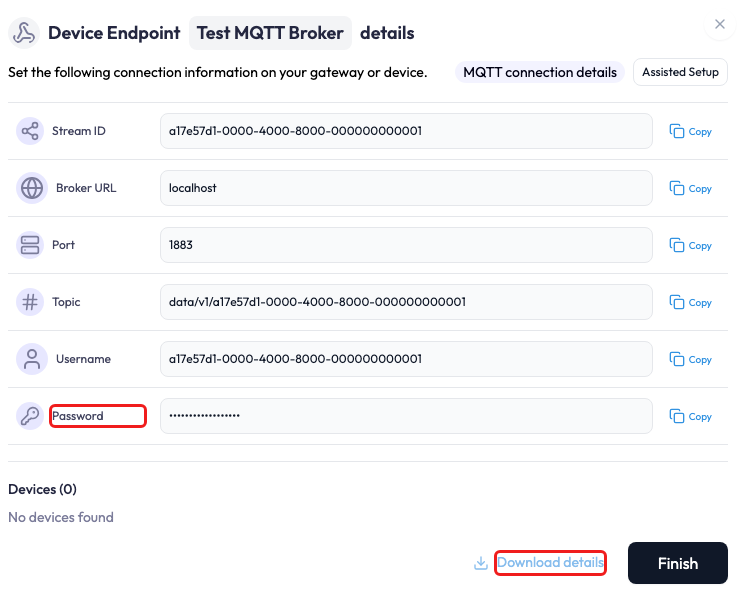
On the connection-details screen, locate Broker URL, Port, Topic, Username, Password, and the certificate information. Copy the values or select Download details. Store the downloaded file securely.
You can retrieve the password again. After closing setup, open the Endpoint’s Actions > View Details. The password stays masked there, but with the required permission you can copy it or download the details again. Closing the dialog does not require you to recreate the Endpoint or regenerate credentials.
Part B: inspect a sensor event in Notehub
-
1
Open your project’s Events page in Notehub and select a recent event from the sensor notefile.
-
2
Inspect the event body. Confirm that
tempandhumiditycontain the expected readings and units. If your firmware uses other names, note the exact paths for the transformation. -
3
Record the notefile name, the event’s
whentimestamp, and itsbest_id. Use a stable Device identifier across sends.
Notehub resolves best_id from the Device serial number when one is set, otherwise
from the Notecard Device UID. If you change that identifier after ingestion, NEQTO.ai may treat
subsequent readings as a different Device. Choose the identifier before sending production data.
Part C: create the MQTT route in Notehub
-
1
Open Routes in your Notehub project and select Create Route.
-
2
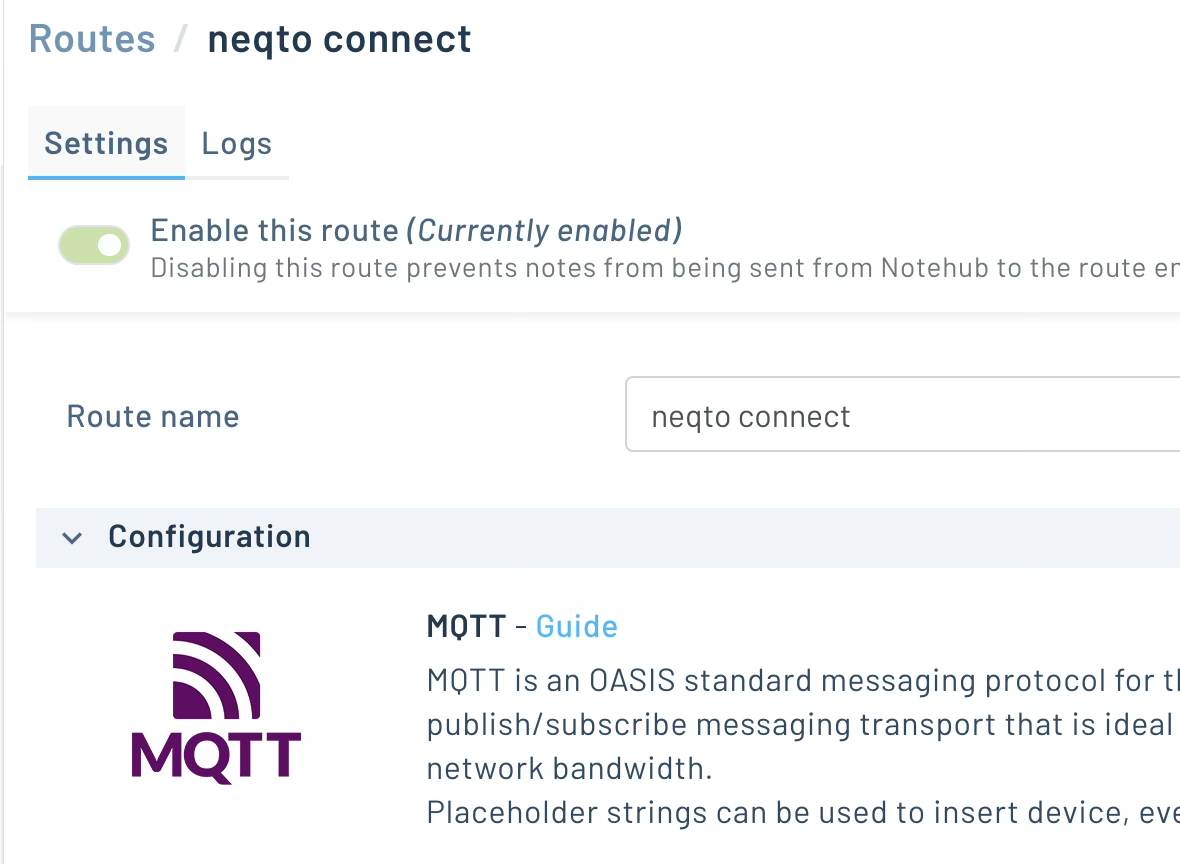
Choose MQTT. Enter a recognizable route name, such as
NEQTO.ai production. -
3
Copy your NEQTO.ai connection details into the corresponding Notehub fields, using the table below.
| NEQTO.ai field | Notehub field | What to enter |
|---|---|---|
| Broker URL | Broker URL or URL |
Use your Endpoint’s host with the mqtts:// scheme, for example
mqtts://your-broker.example.com. This is an illustrative address; copy your
actual host. Do not add the prefix twice.
|
| Port | Port |
Copy the displayed Endpoint port. MQTT with TLS commonly uses 8883; use the
value supplied for your Endpoint.
|
| Topic | Topic | Copy exactly, without leading or trailing whitespace. |
| Username | Username | Copy the Endpoint username exactly. |
| Password | Password | Copy the Endpoint password exactly. |
| CA certificate | Additional self-signed certificate, when needed | Supply the appropriate trusted certificate if Notehub cannot validate the broker’s certificate chain. An additional certificate is unnecessary only when Notehub already trusts that chain. |
Set route filters and check TLS
TLS checks the broker’s identity and encrypts the connection. Sharing a cloud hosting provider does not establish certificate trust. A trusted CA certificate is separate from a client certificate and private key used for client authentication. This guide uses the Endpoint’s username and password. See the official Blues MQTT routing guidance for the route fields and certificate options.
-
4
Under Filters > Notefiles, select the sensor file your firmware writes, such as
sensor.qo. Keep unrelated files such as_health.qoand_session.qoout of this sensor route. -
5
Set Fleets or Fleets to Exclude if only part of your Notehub project should use this route.
-
6
Under Data > Transform Data, choose JSONata Expression and enter the expression below. Preview it with a real sensor event.
-
7
Keep the route Enabled and save it with Create Route or Apply Changes, depending on whether you are creating or editing the route.
JSONata Expression
This expression reads a Notehub event and produces the recommended NEQTO.ai envelope with explicit Device identity, time, values, and units.
Paste it into the JSONata Expression field. Names such as when and
body.temp are references to fields in the incoming event; they are not quoted
strings or literal JSON values.
{
  "payload_format": "neqtoai-std",
  "timestamp": when,
  "device_id": best_id,
  "data": {
    "temperature_celsius": { "value": body.temp, "unit": "c" },
    "humidity_percent": { "value": body.humidity, "unit": "%" }
  }
}
Field-by-field reference
| Source field | How the expression uses it |
|---|---|
when
|
Sets timestamp from the Notehub event time in Unix seconds, UTC. |
best_id
|
Sets device_id. It uses the serial number, if configured with
hub.set and sn, or the Notecard UID. If your firmware supplies
a stable identifier such as body.uid or body.mac, you can use
that verified field instead.
|
body.temp
|
Sets data.temperature_celsius.value. The example assumes Celsius and
supplies unit: "c". Convert the value first if your sensor uses another
unit.
|
body.humidity
|
Sets data.humidity_percent.value. The example assumes relative humidity in
percent and supplies unit: "%".
|
If your event uses another field name, change the source path to match it. Keep the output reading names consistent with the verification steps. NEQTO.ai also accepts other supported JSON shapes; this envelope makes the mapping explicit. See Endpoints & Devices.
Check the transformation
Preview the expression using a sensor event that contains when,
best_id, body.temp, and body.humidity. For example, an
event with time 1716806400, identifier dev:example-notecard,
temperature 22.4, and humidity 47.1 produces:
{
  "payload_format": "neqtoai-std",
  "timestamp": 1716806400,
  "device_id": "dev:example-notecard",
  "data": {
    "temperature_celsius": { "value": 22.4, "unit": "c" },
    "humidity_percent": { "value": 47.1, "unit": "%" }
  }
}
Check that the identifier and timestamp are present and that both readings contain numeric values and the intended units. A missing source field can leave a missing value in the transformed result. Fix the field path or incoming note before using the route.
Verify End-to-End
Check the Notehub route result, then the stored readings in NEQTO.ai. Complete all three checks before treating the connection as working.
1. Notehub route test
If the route screen offers Test Route, run it with a representative event and inspect the result. A successful route test is evidence about the route operation; it does not confirm that NEQTO.ai has mapped and stored the Device readings. Continue with a real sensor event.
2. Notehub route log
Write a new sensor note and synchronize the Notecard. Open the event in Notehub and inspect its Route log. Find the route you created, check the success indicator or error details, and verify that it processed the intended sensor event. You can also select an existing event and manually route it. Events that arrived before the route was created are not automatically sent through the new route.
If Notehub reports an authentication, connection, or TLS error, correct that error before
checking the Device data. MQTT routing is not an HTTP request to NEQTO.ai, so do not require a
literal 200 OK message as the only sign of route success.
3. NEQTO.ai inbound data
-
1
Open the target Device Endpoint and check its ingestion feedback for the new payload.
-
2
Find the Device identified by the transformed
device_id. Open its data view and confirm recenttemperature_celsiusandhumidity_percentreadings, with the expected values, units, and time. -
3
If the Device is missing, check the identifier, Account Device allowance, and feedback about rejected or unmapped payloads. Confirm that you are viewing the correct Account, Application, and Endpoint.
-
4
Select Finish if the Endpoint setup dialog is still open. You can retrieve its connection details later through View Details.
Devices register automatically after a valid payload is processed. You do not need to pre-register the Notecard in NEQTO.ai. Use a stable identifier and leave capacity for a new Device. A successful Notehub route log alone cannot diagnose a missing Device; inspect ingestion feedback as well.
Tips & Troubleshooting
Use the error message to identify the failing stage before changing credentials or identifiers.
| Symptom | What to check |
|---|---|
| Connection or TLS error |
Use mqtts://, the displayed broker host and port, and a complete trusted
certificate when one is required. Check broker reachability and certificate validity.
|
| Authentication error | Re-copy the Username and Password from Endpoint View Details. Remove accidental leading or trailing whitespace. Check the Topic as well. |
| Missing or null reading |
Inspect the real Notehub event and correct body.temp or
body.humidity in JSONata. Confirm that the source values use the units
stated in the expression.
|
| Successful route, no stored reading | Check the target Endpoint, stable Device identifier, Account Device capacity, processing feedback, and Application assignments. A newly detected Device may not belong to an Application unless its Endpoint or the Device is assigned there. |
| Unrelated events arriving | Restrict the Notefiles filter to your sensor queue and review Fleet filters. |
| Password hidden or dialog closed | Open Actions > View Details. The password stays masked; with the required permission you can copy it or select Download details again. |