Integrations
Integrations connect NEQTO.ai to external APIs and brokers. NEQTO.ai opens the connection using the service URL and credentials you provide. A pull integration brings data into NEQTO.ai, while a push integration sends data out. Custom integrations support TLS-secured HTTPS, WSS, and MQTTS connections.

Where to find integrations
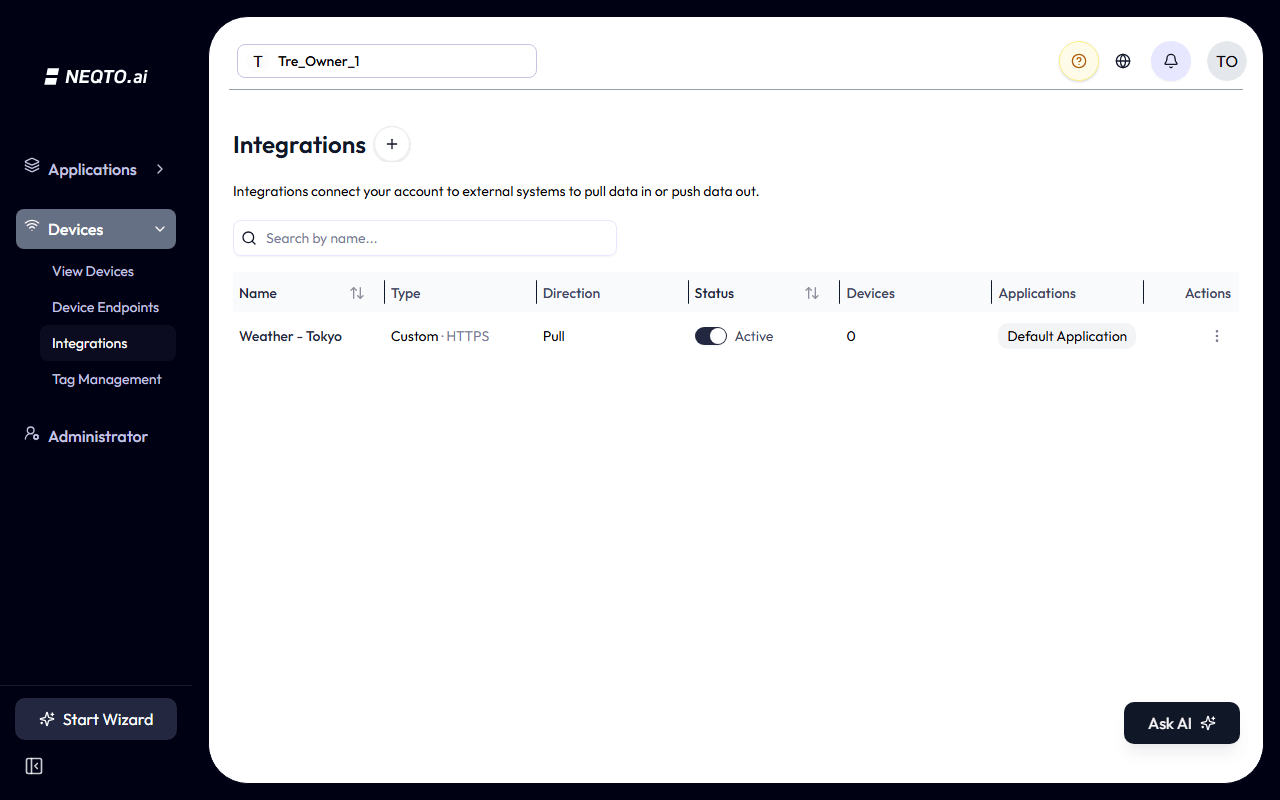
Open Integrations from the account navigation or from an application’s sidebar. The default application shows every integration in the account. A non-default application shows only the integrations linked to it. You also need the appropriate View Integrations permission for that account or application.
Create a custom integration
A Custom integration is the one you configure yourself. Its wizard walks five screens: Type, Protocol, Credentials, Settings, and Verify.
-
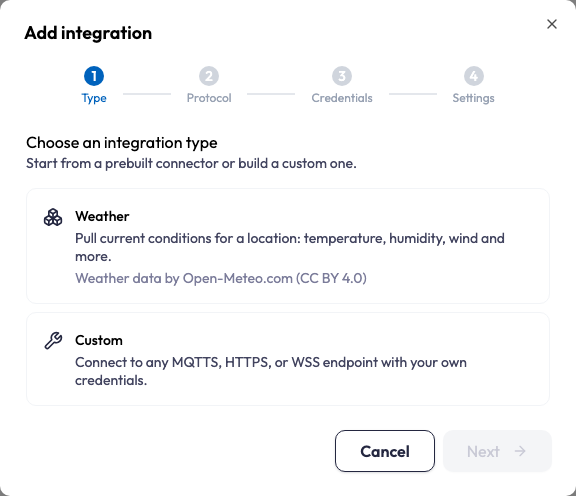
1Open Integrations and select the + (Add Integration) button. On the Type screen, choose Custom to enter your own service URL and credentials. For a service listed on its own card, use the instructions under Prebuilt connectors instead. With Custom you own the provider’s contract, so if their API changes the integration is yours to adjust.
A ? sits beside the choices that need explaining: each connector card, each protocol, Direction, Authentication method and Name. Select it for a short explanation of what the option does and when to pick it.
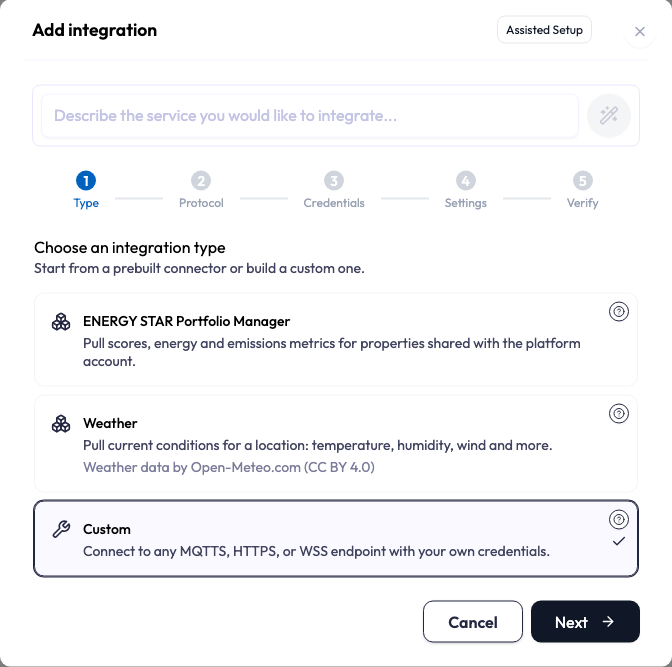
Step 1, Type: choose the integration type. -
2On the Protocol screen, choose the TLS transport. Match it to what the provider documents:
- MQTTS holds a connection open and exchanges messages on topics, which suits a broker or gateway that streams continuously. Choose it when the other service speaks MQTT.
- HTTPS makes one request per exchange. It is the simplest to configure and to debug, and it is what most provider APIs offer. Choose it for a REST or webhook API.
- WSS keeps one connection open and carries messages in both directions. Choose it when the provider documents a WebSocket endpoint.
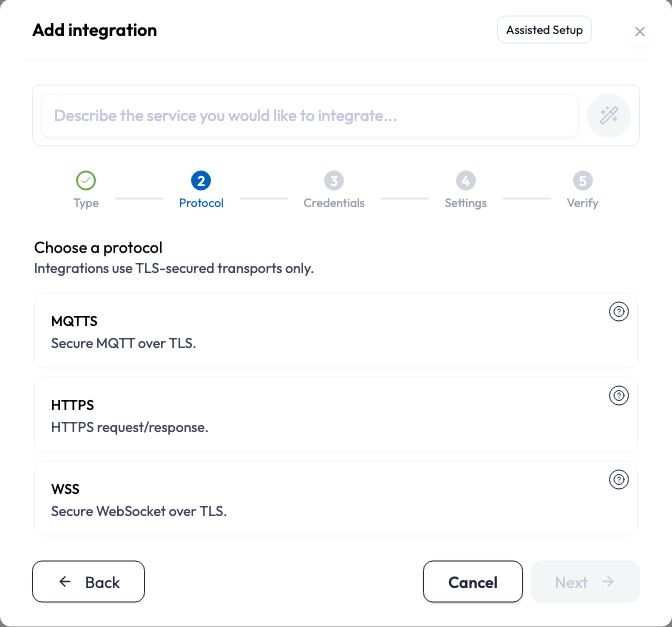
Step 2, Protocol: pick how NEQTO.ai connects. -
3On the Credentials screen, set the direction (Pull, Push, or Pull & Push), enter the pull and/or push URL, optionally add custom headers, then pick an authentication method and enter its credentials. Pull and Push use separate URLs when you choose both directions. See the table below for the fields required by each authentication method.
Pull means NEQTO.ai calls your service and asks for data: on a schedule when the integration has a pull interval, and whenever you pull a sample. A Custom integration starts without an interval; set one in its Edit settings to pull on a schedule. See Custom pull schedules below. Push means NEQTO.ai sends data out to your service. Both need an endpoint NEQTO.ai can reach on the public internet. The authentication method is how NEQTO.ai proves who it is to that service, so the provider decides which one to use: check their API documentation. A wrong choice fails at the connection test rather than silently.
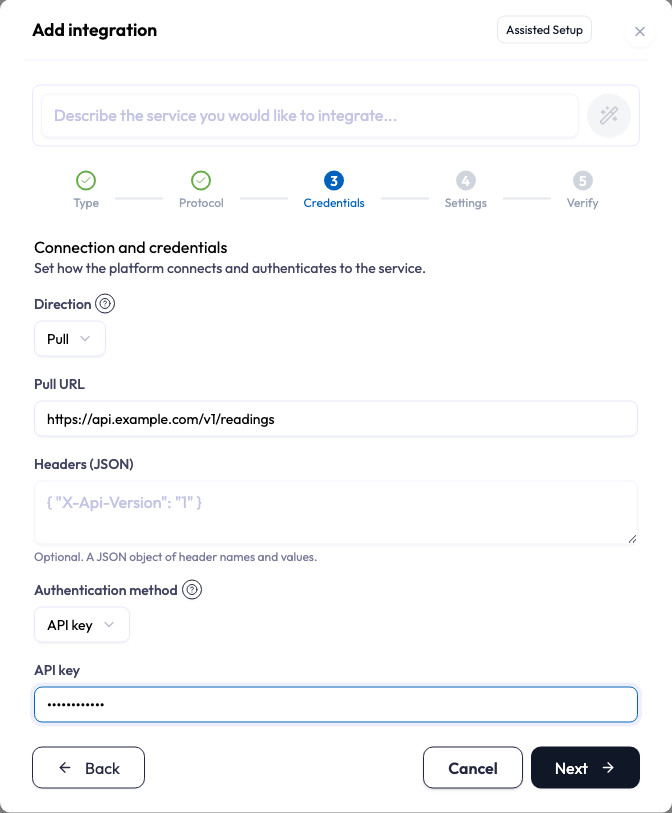
Step 3, Credentials: direction, endpoints, and authentication. Saved credentials are encrypted and are not displayed again. -
4On the Settings screen, give the integration a name and an optional description, then choose Create. Integration names must be unique within the account, and the name identifies this connection in the list, in alerts, and wherever its devices appear, so one that says which system and which site it serves saves guessing later. It can be changed at any time.
The integration starts in Draft status: you can pull a manual sample while it is a draft, but scheduled pulls and pushes do not run until you turn it on.
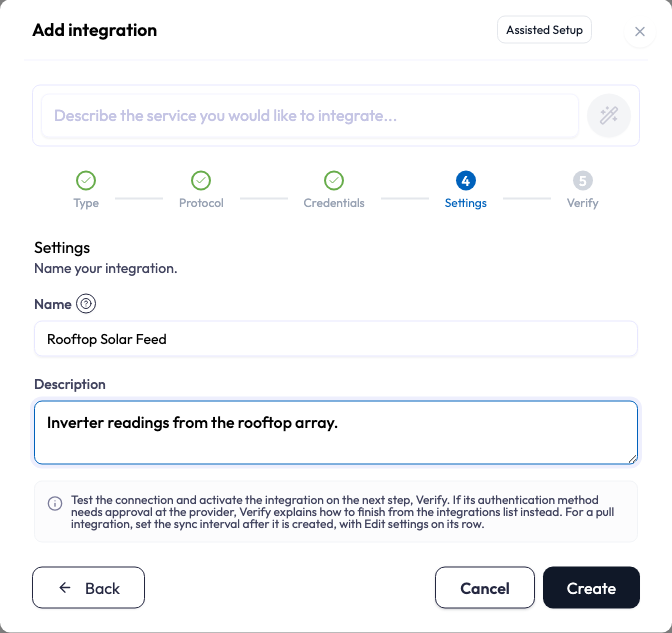
Step 4, Settings: name and describe the integration. -
5The wizard moves to Verify. See Verify: test and activate.
Draft an integration with AI
The wizard opens with a field reading Describe the service you would like to integrate. Describe the service you want to connect and the assistant fills the screens it can work out, leaving you to check them and continue. Fields it inferred are marked, and anything you typed yourself is kept. See the Ask AI guide for how drafting behaves everywhere it appears.
Authentication methods
Six methods are available. The choice changes what you enter and how NEQTO.ai sends it, and every secret is encrypted on save and never shown again.
| Method | What you enter | How it is sent |
|---|---|---|
| API key | Your API key. | An X-API-Key header on every request. |
| Bearer token | Your token. | An Authorization: Bearer header on every request. |
| Basic auth | Username and password. | An Authorization: Basic header on every request. |
| OAuth2 (client credentials) | Client ID, client secret, and the provider’s token URL. | NEQTO.ai obtains an access token from the provider automatically and refreshes it as it expires. No sign-in is required. |
| OAuth2 (authorization code) | Client ID, client secret, token URL, and the provider’s authorization URL. | After creating the integration, choose Connect on its row and sign in at your provider once. NEQTO.ai then manages and refreshes the tokens automatically. |
| Mutual TLS (mTLS) |
In the wizard, a Certificate URL that NEQTO.ai fetches the service’s CA
certificate from. After creating the integration, add your client certificate and
private key (PEM) through the row’s Edit credentials action, in the
Credentials (JSON) field, as clientCertPem and
clientKeyPem (optionally caPem, which overrides the fetched
CA). The integration cannot connect until these are set.
|
The client certificate authenticates the TLS connection itself. |
Authorization header replaces the Bearer or Basic header.
MQTT username for token-based authentication
Over MQTTS, the broker asks for a username when the connection opens. A token can serve as the password, but not the username. So when the protocol is MQTTS and the authentication method is API key, Bearer token, OAuth2 (client credentials) or OAuth2 (authorization code), the Credentials screen adds an MQTT username field. Enter the username the broker expects. The token becomes the password. The field is required, and it appears both in the create wizard and in the row’s Edit credentials action, so you can add one to an existing integration without rebuilding it.
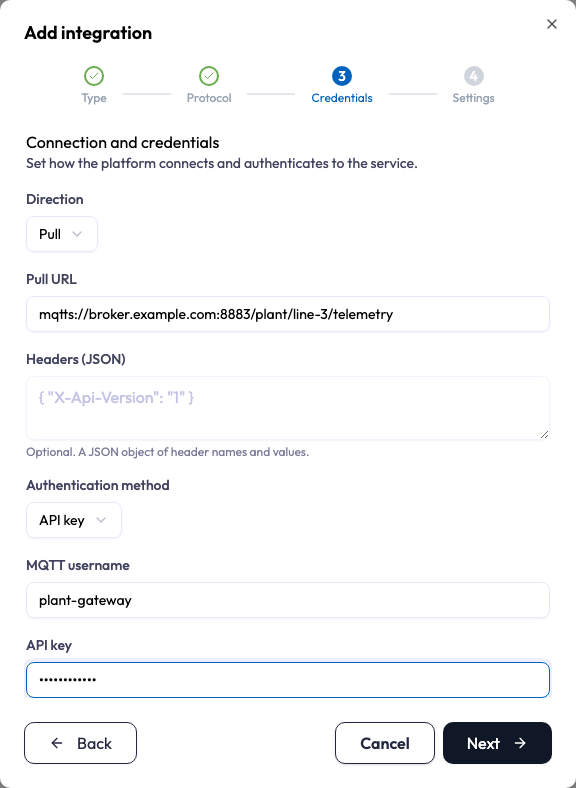
Basic auth is unaffected: it already collects a username and password, and those are what the broker receives. Mutual TLS (mTLS) authenticates the connection itself and asks for no username.
caPem in Credentials (JSON), but that field replaces the complete
saved secret. Include the authentication method’s other required fields in the same object. For
OAuth2 authorization code, replacing the secret also removes its tokens, so use
Connect again afterward. Integrations can reach only publicly resolvable hosts;
private and internal network addresses are blocked.
Prebuilt connectors
A prebuilt connector appears on the Type screen as its own card. NEQTO.ai supplies its protocol, request format, and platform credentials. The wizard asks only for the account, authorization, or location that the provider needs.
The prebuilt connectors are ENERGY STAR Portfolio Manager and Weather. Use Custom for other services.
Free and Starter do not include prebuilt connectors such as ENERGY STAR Portfolio Manager and Weather. Custom integrations are available on every plan.
ENERGY STAR Portfolio Manager
This connector pulls annual ENERGY STAR scores, energy, emissions, and water metrics for properties shared from your Portfolio Manager account. NEQTO.ai uses a platform-managed Portfolio Manager account, so you do not enter that account’s username or password in the integration. Setup has three parts: prepare the property in Portfolio Manager, connect your Portfolio Manager account to NEQTO.ai, then share the property with the platform account.
Prepare the property in Portfolio Manager
NEQTO.ai reads the metrics Portfolio Manager has already calculated. Portfolio Manager only calculates them for a property that has a meter with 12 full calendar months of bills, ending with the most recently completed month. A property without that data connects and shares normally but produces no values, so finish this part first.
-
1Sign in to Portfolio Manager. On MyPortfolio, choose Add a Property.
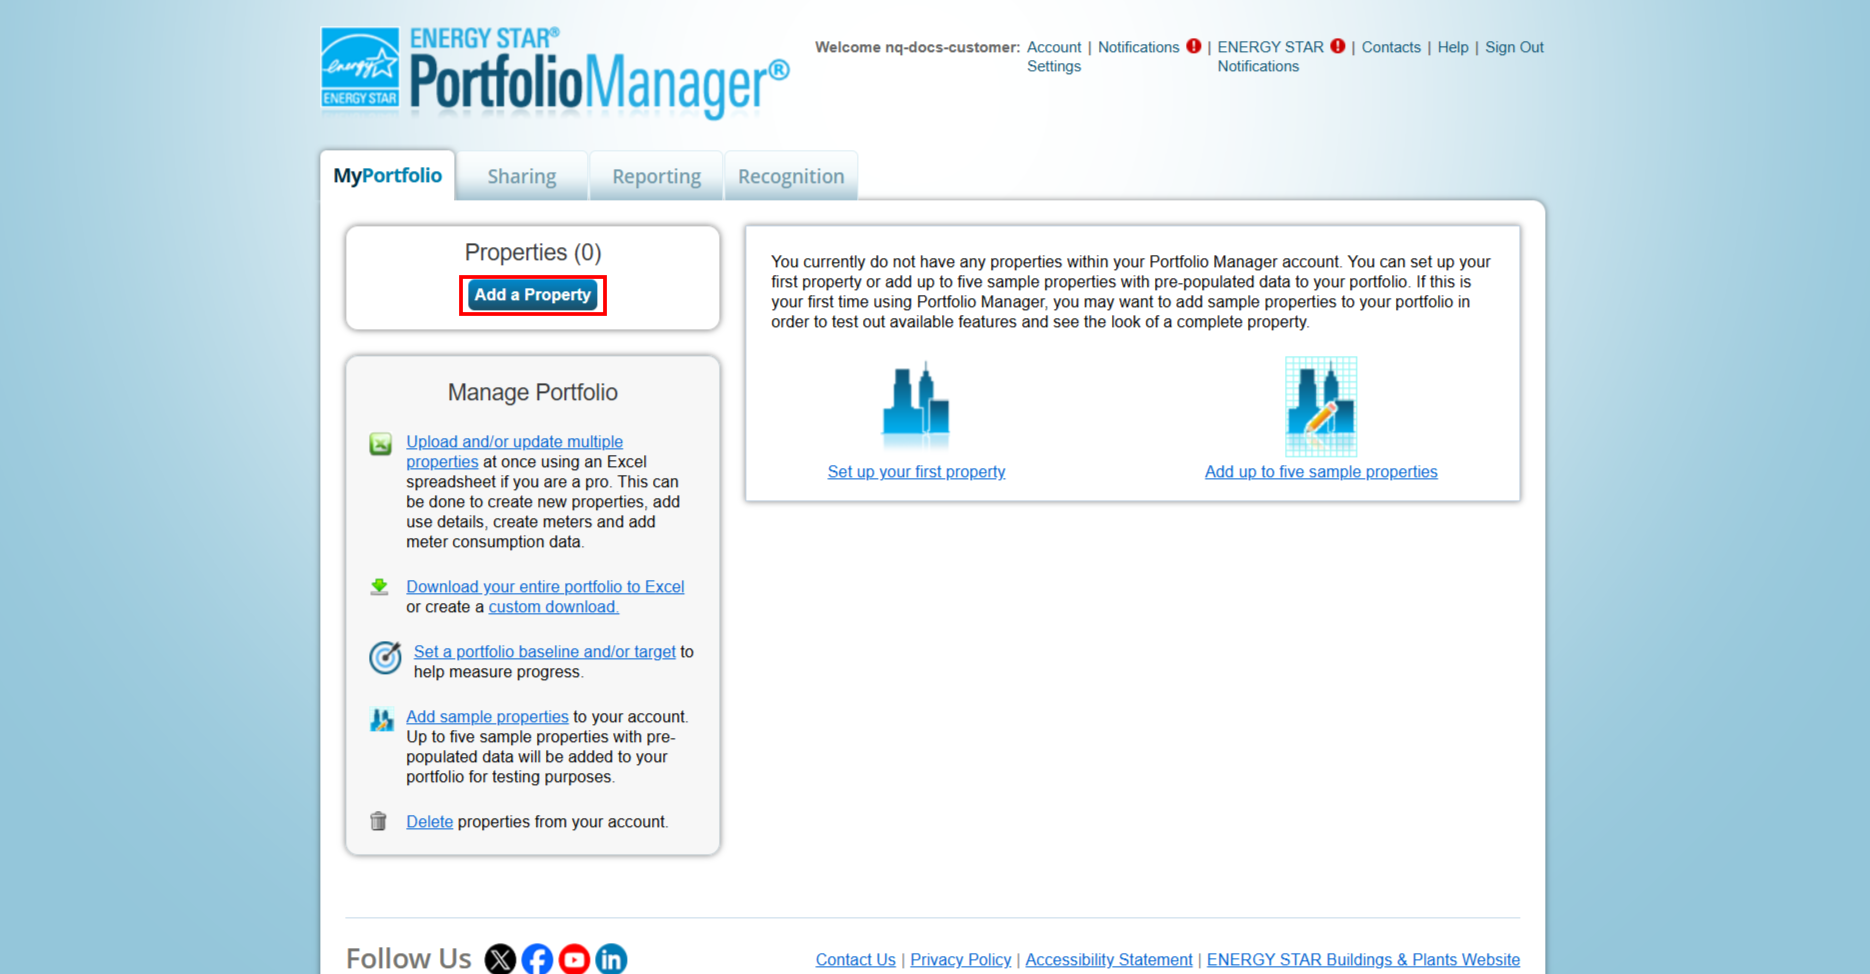
If you already benchmark your buildings in Portfolio Manager, skip to the connection part. Any existing property with 12 months of data works as is. -
2Pick the property type, the number of buildings, and whether the building is existing or still under construction, then choose Get Started. On Basic Property Information, enter the name, address, year built, Gross Floor Area, and the percentage of floor space that is occupied.
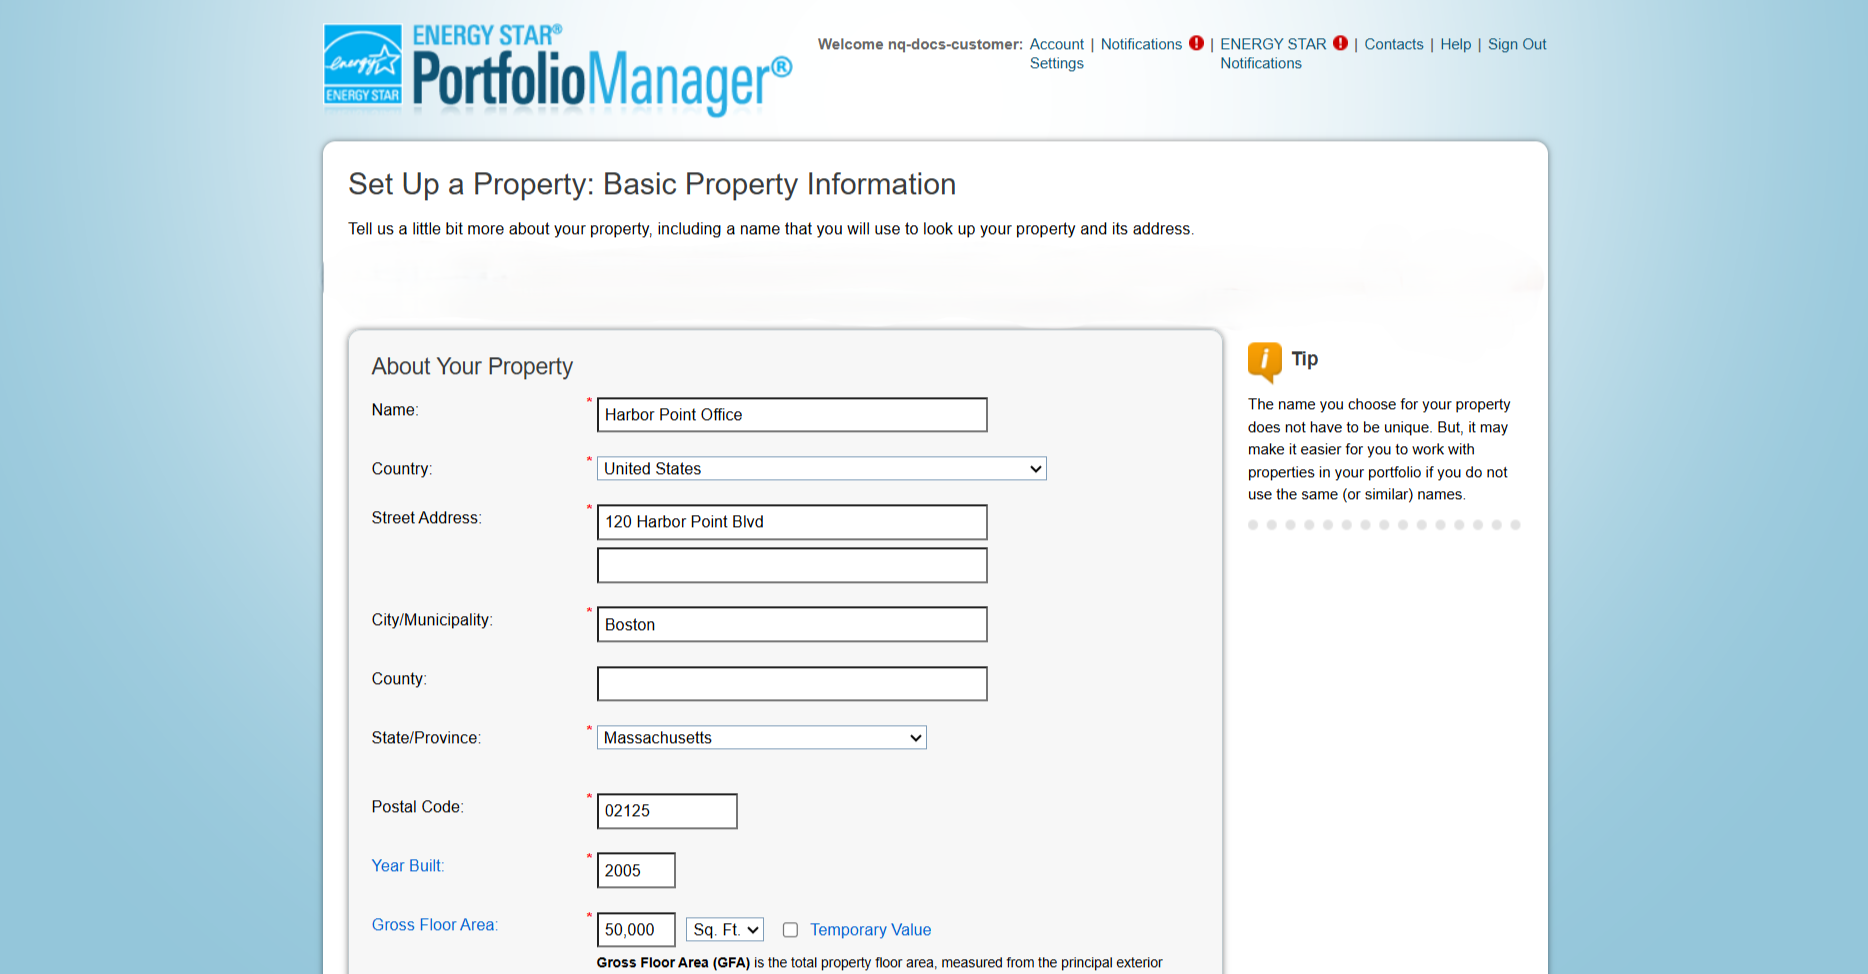
Gross floor area and occupancy are required. The ENERGY STAR score also depends on them, so use real figures. -
3On How is it used?, fill in the property use details for the building type and choose Add Property. Fields marked with a star feed the 1 to 100 ENERGY STAR score. Use a default is acceptable for values you do not know.
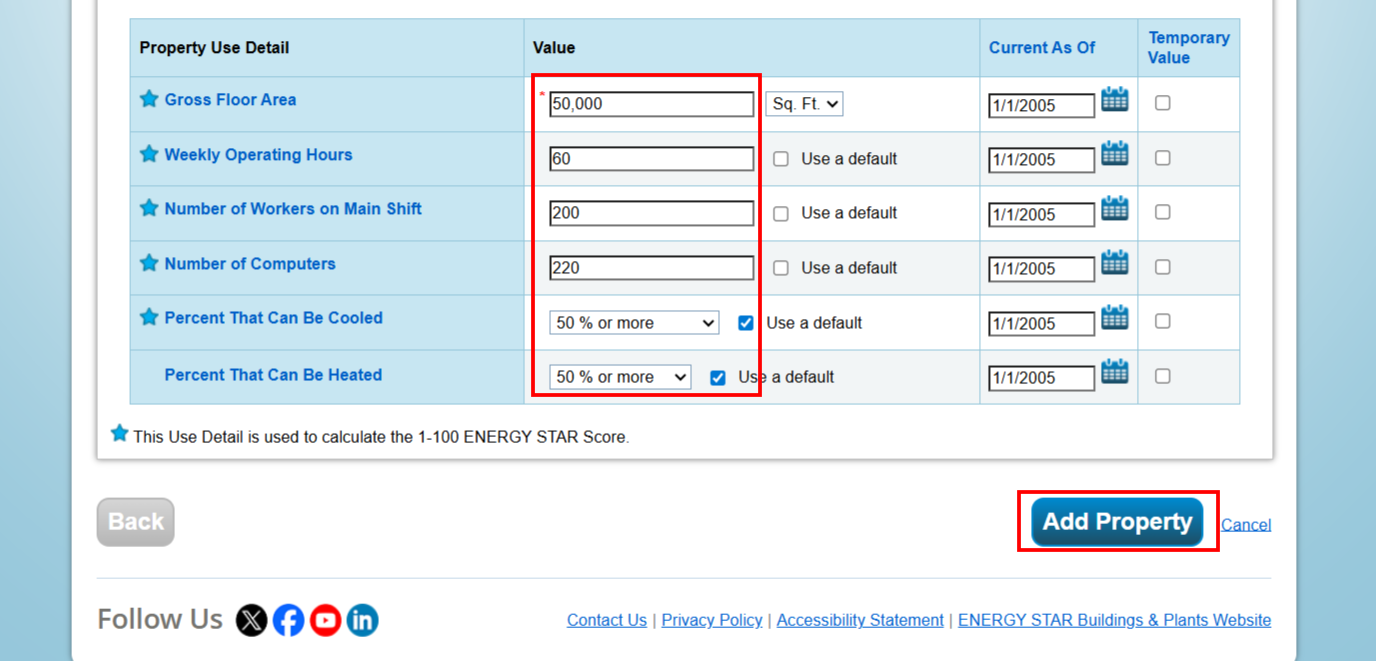
Without these details Portfolio Manager still reports energy and emissions metrics, but not the score. -
4Open the property’s Energy tab and choose Add energy use information. Tick each energy source the building uses and how many meters it has, then choose Get Started. For each meter set the Units and the Date Meter became Active, then Create Meters. Confirm that the meters account for the property’s total energy use.
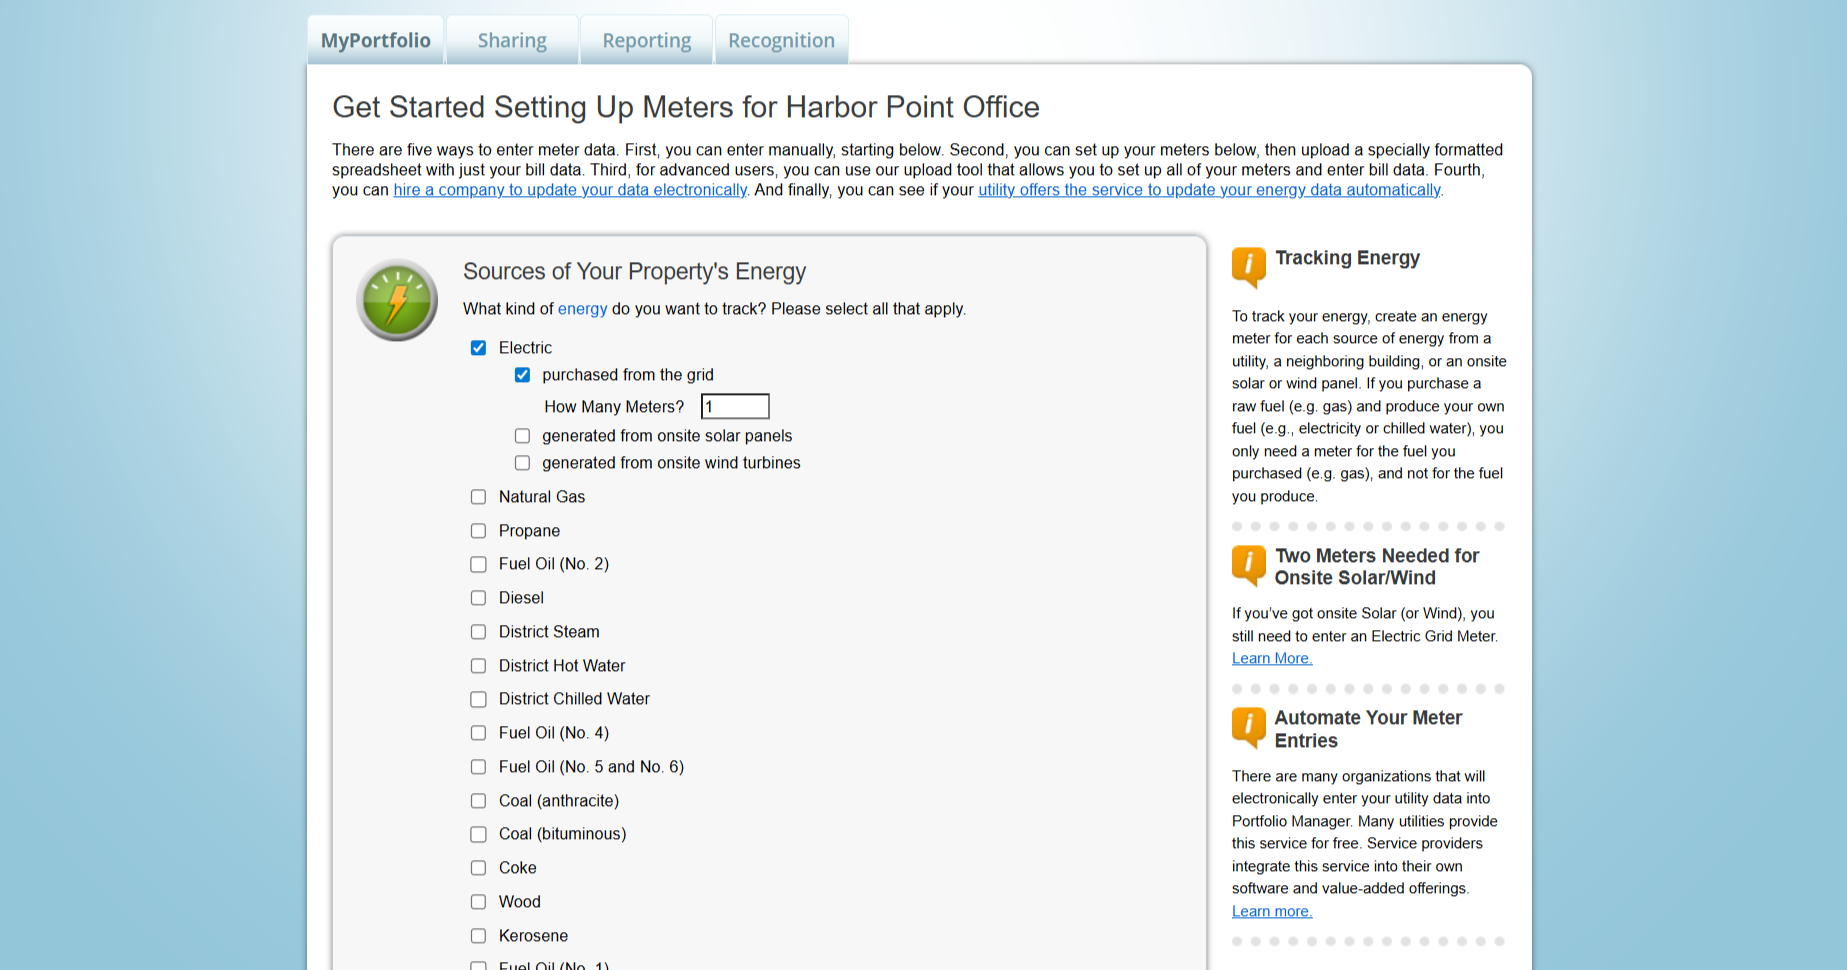
One meter per energy source is enough. Portfolio Manager combines them into the site and source totals. -
5On Manage Bills, add one entry per month for at least the last 12 full calendar months and choose Save Bills. Each entry runs from the first to the last day of a month, and the newest entry ends on the last day of the previous month. Bills that run mid-month to mid-month need 13 entries to cover 12 full months.
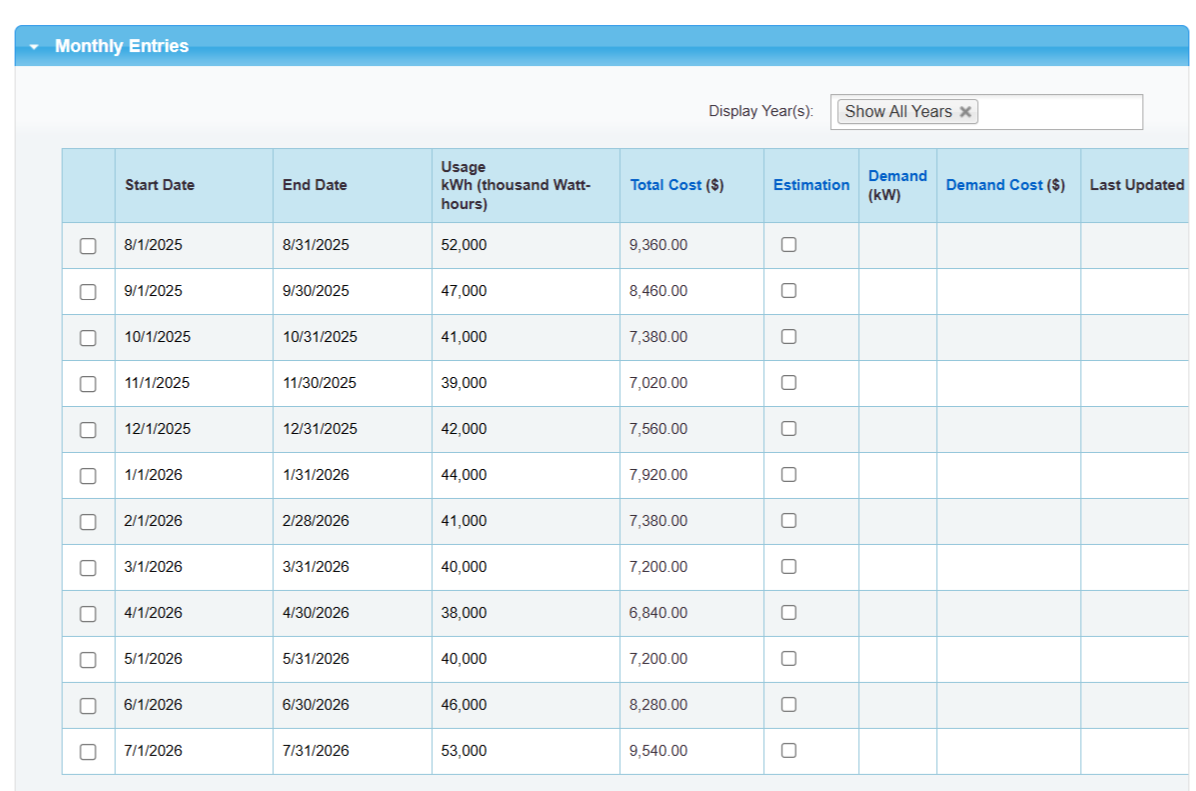
Portfolio Manager marks a metric as not available until every meter covers the full period. The property’s Summary tab shows the values once they exist.
Connect your Portfolio Manager account
-
1In NEQTO.ai, on the Type screen, choose ENERGY STAR Portfolio Manager. The Connect step displays a one-use connection code and its expiration time.
-
2Follow the link to your own Portfolio Manager account. Open Contacts, choose Add New Contacts/Connections, search for the platform account named in the wizard, and select Connect. Paste the code into the
Neqto Connection Codefield and send the request. The wizard detects and accepts the connection automatically. If the code expires, generate a new one.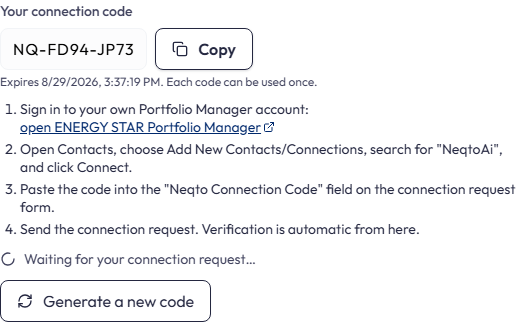
The wizard waits on this step and moves on by itself once Portfolio Manager sends the request. Nothing needs to be pasted back into NEQTO.ai. 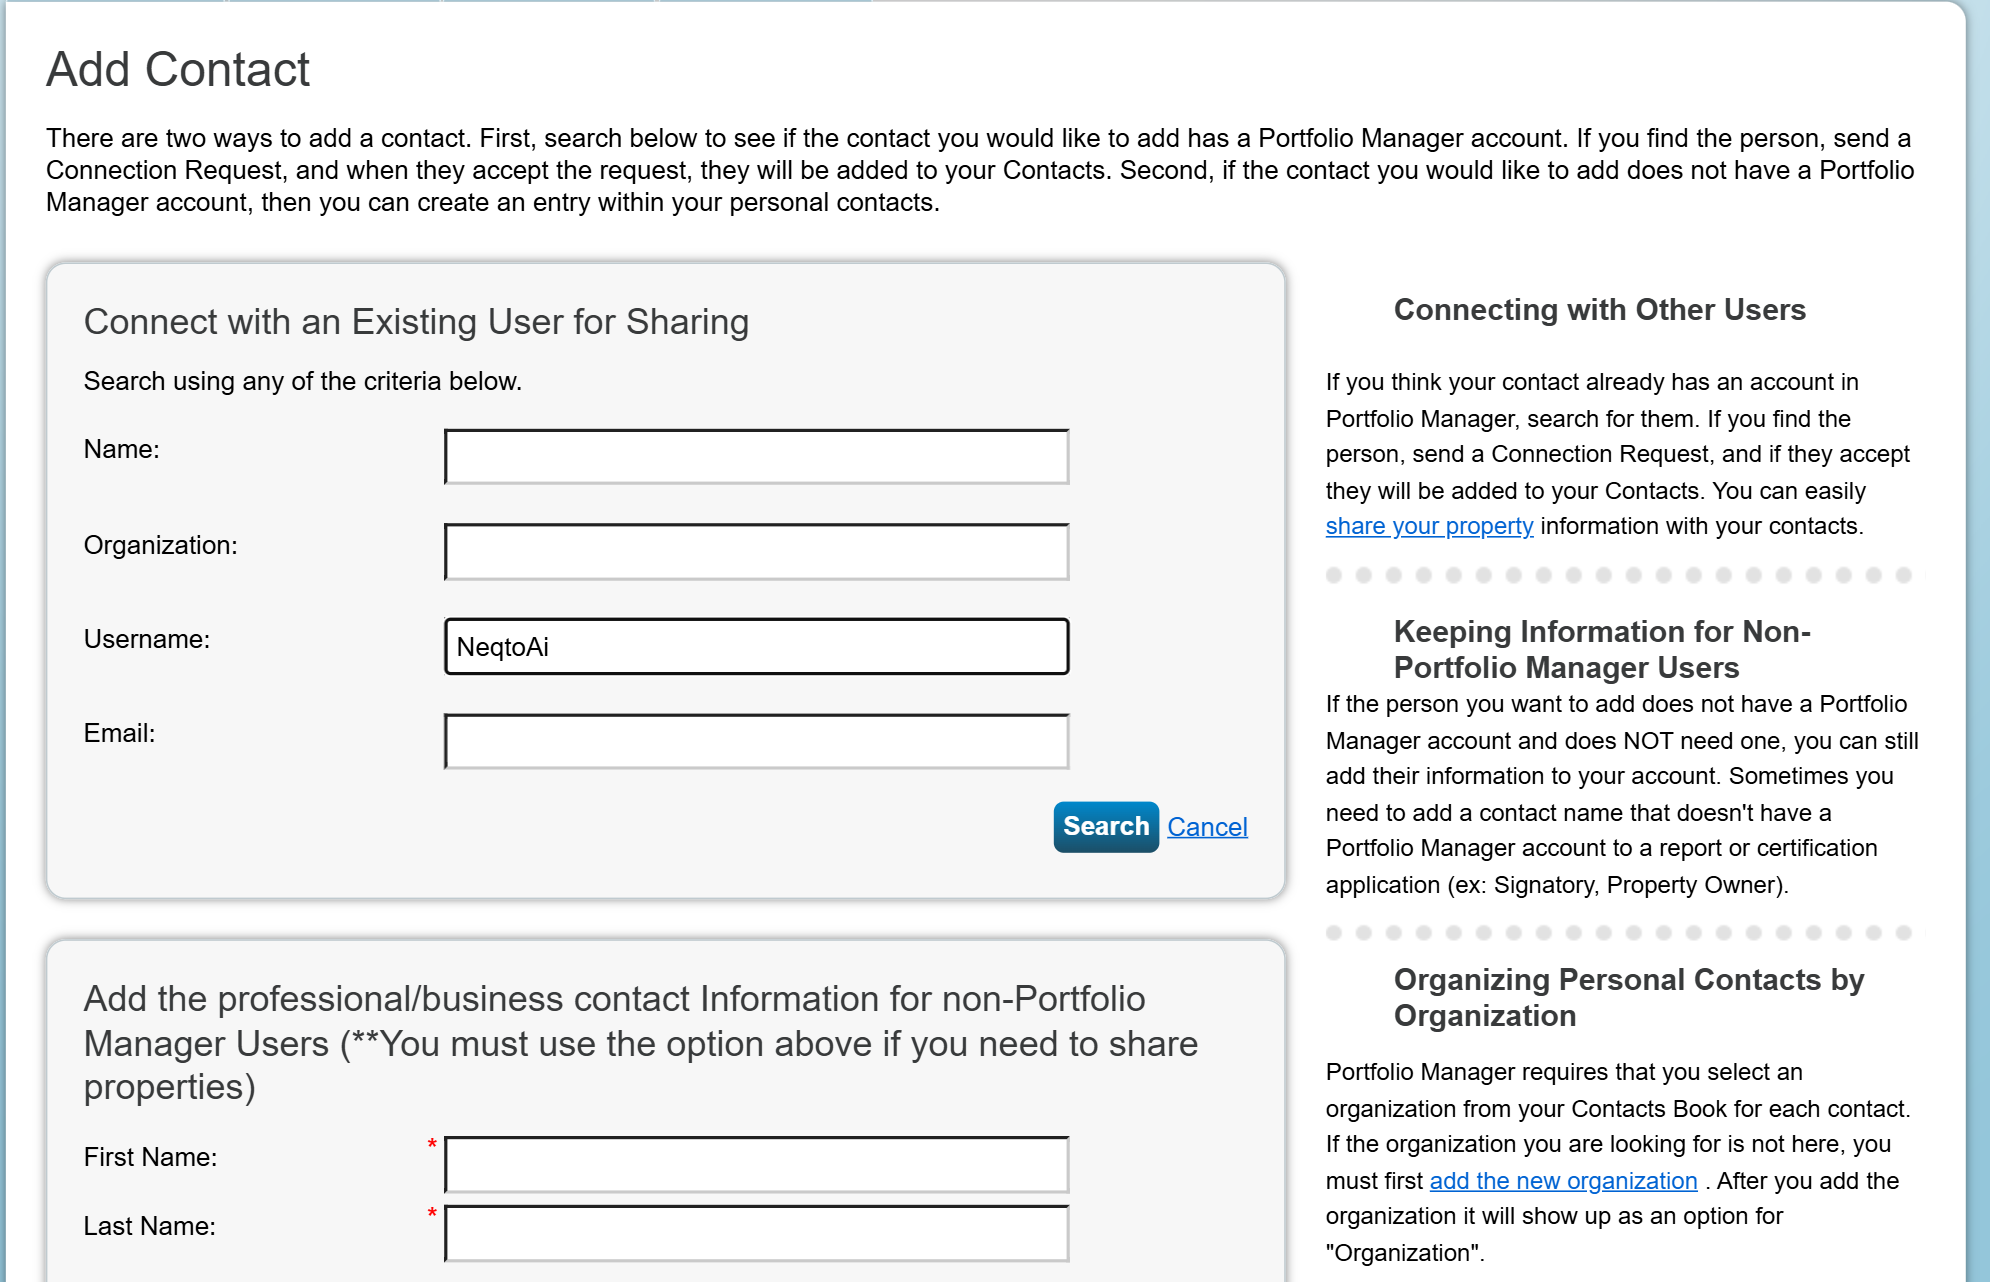
Search by Username. The platform account name is shown in the NEQTO.ai wizard, on the Connect step. 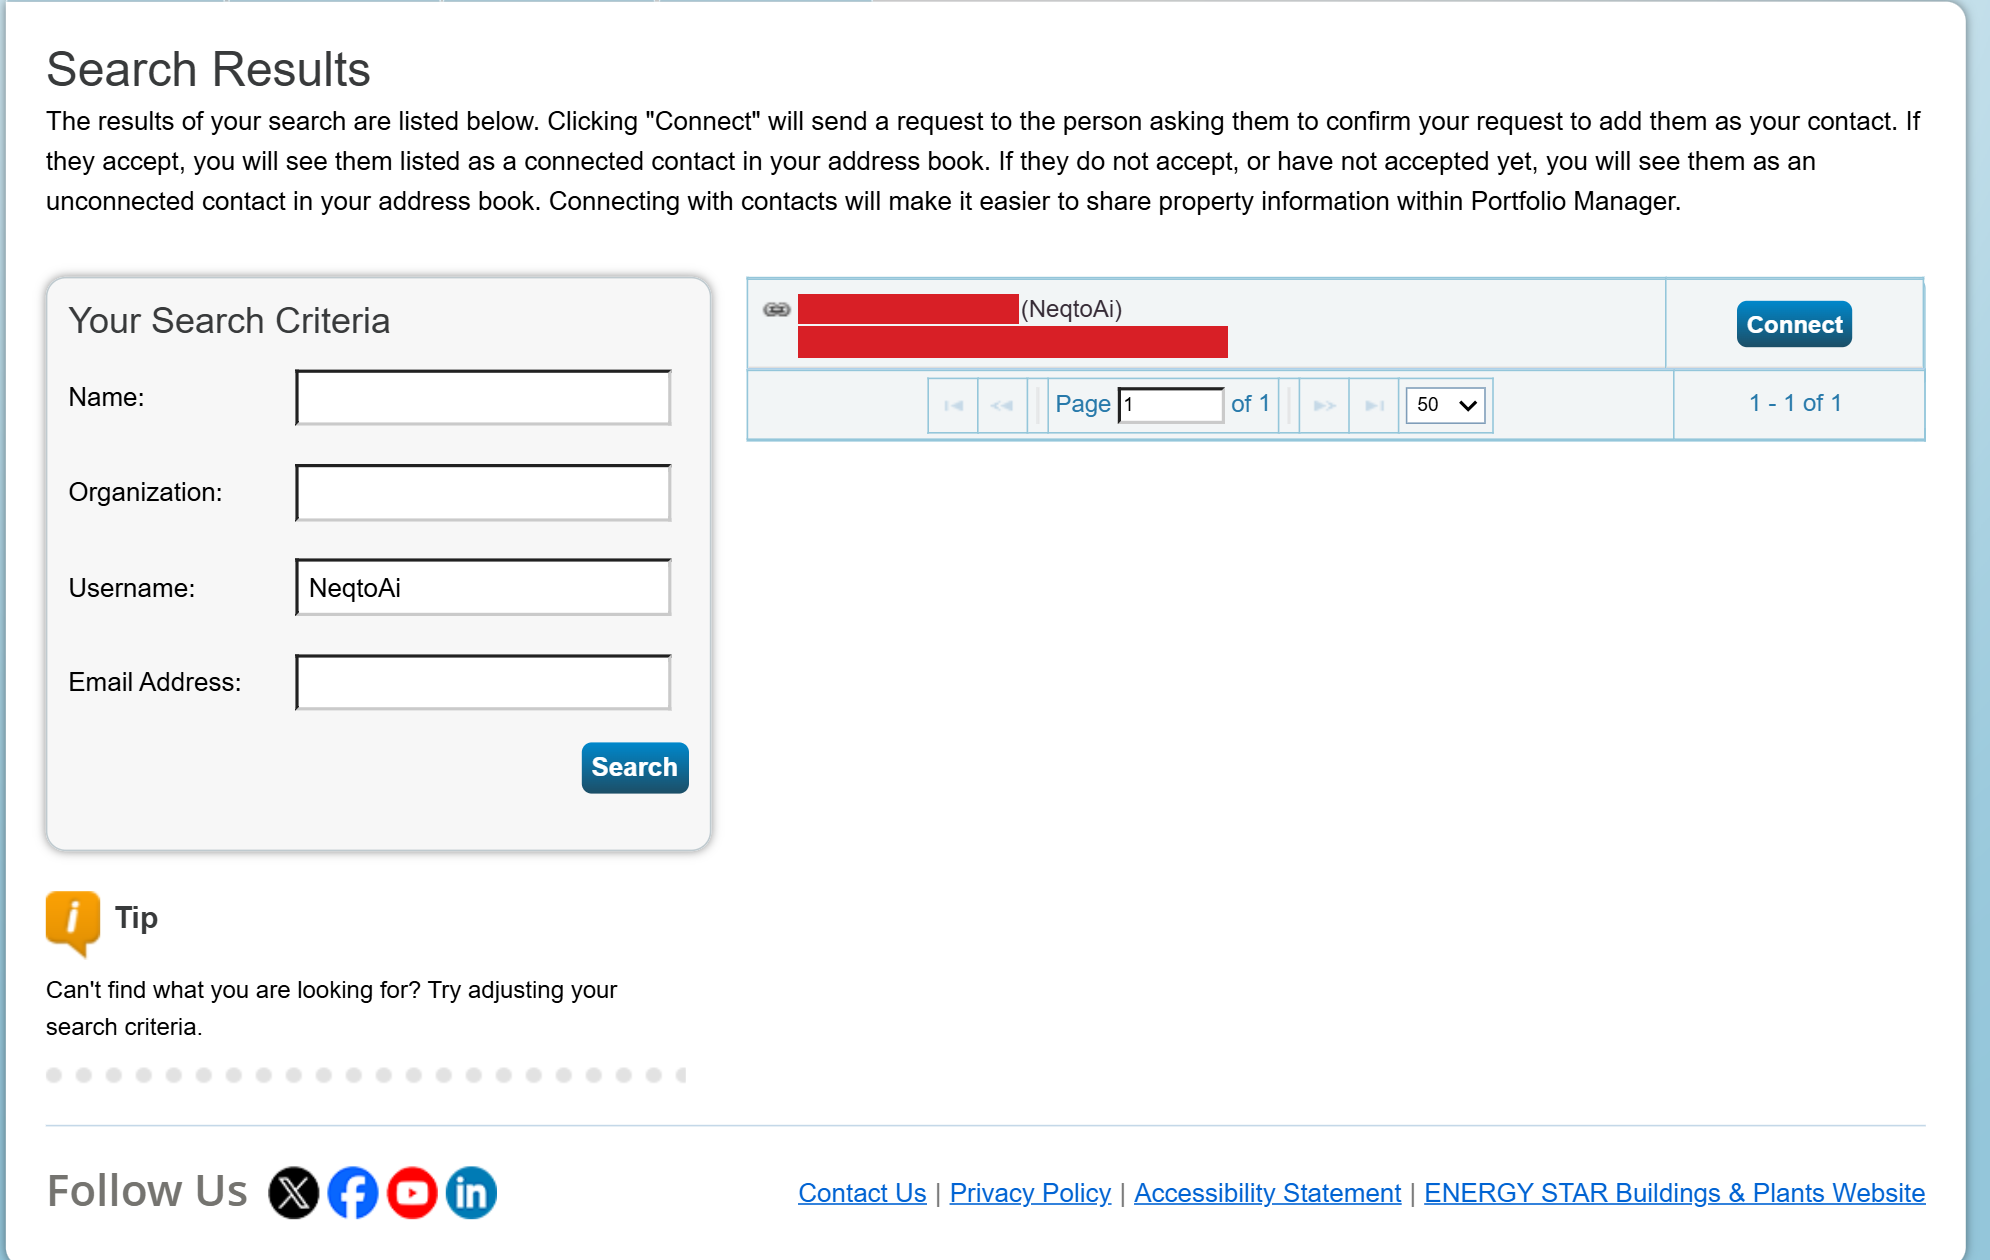
One result, with Connect beside it. Choosing it opens the connection request form. 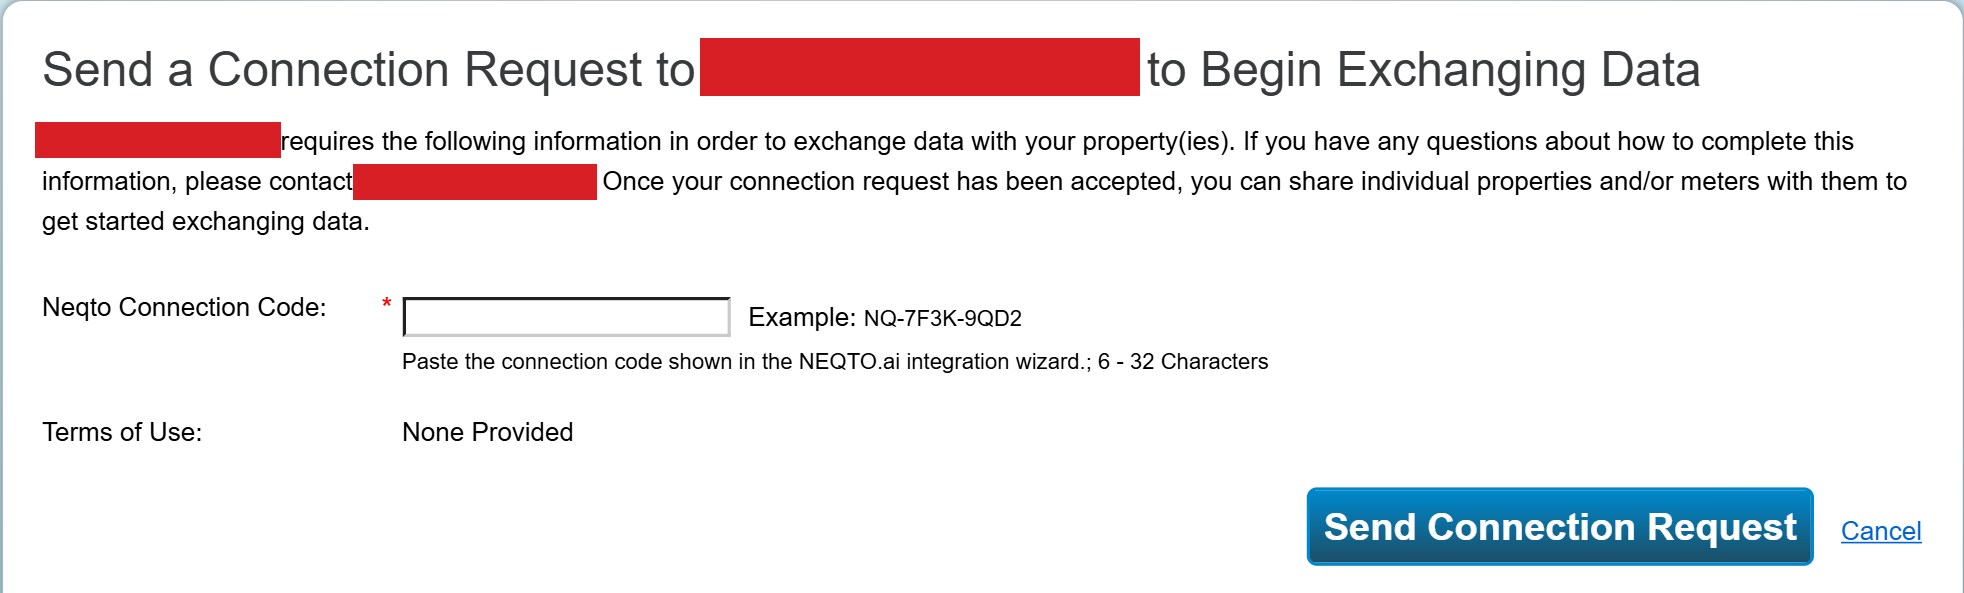
The code goes in the Neqto Connection Codefield on the Portfolio Manager request form, not anywhere in NEQTO.ai. -
3If your organization has already verified a Portfolio Manager account, the Connect step lists it instead of issuing a code. Select the account whose properties you want, or choose Connect another account. A Portfolio Manager account can belong to only one NEQTO.ai organization.
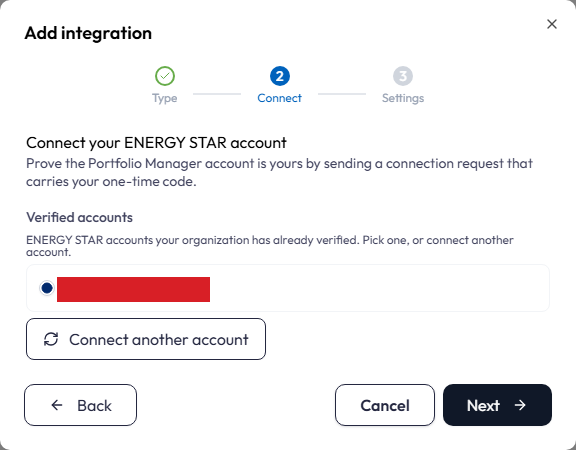
Once an account is verified, the Connect step lists it instead of issuing a new code. -
4The Settings step opens with the verified account shown as a read-only line. Until that account has shared a property, the Properties section shows a waiting notice instead of a list. Leave the wizard open and share the property in Portfolio Manager, as described next.
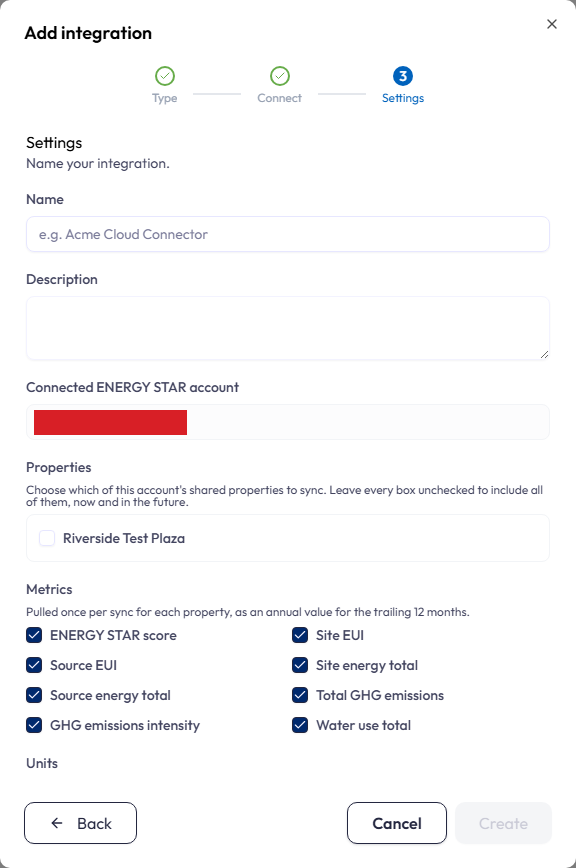
Connecting proves the account is yours. It does not, by itself, give NEQTO.ai access to any property.
Share the property with the platform account
Each property you want to sync is shared from inside Portfolio Manager at the Exchange Data permission level. Read-only access is enough: NEQTO.ai only reads metrics and never writes to your property or meters.
-
1In Portfolio Manager, open the Sharing tab and choose Share with your Utility or Service Provider for exchanging data. Do not use Share (or Edit Access to) a Property, which is for sharing with other Portfolio Manager users.
-
2Under Select Web Services Provider, choose the platform account. Only connected contacts appear in that list, so finish the connection first. Under Select Properties, tick the properties to sync and apply the selection.
-
3Under Choose Permissions, select Bulk Sharing, then Exchange Data Read Only Access, and choose Authorize Exchange.
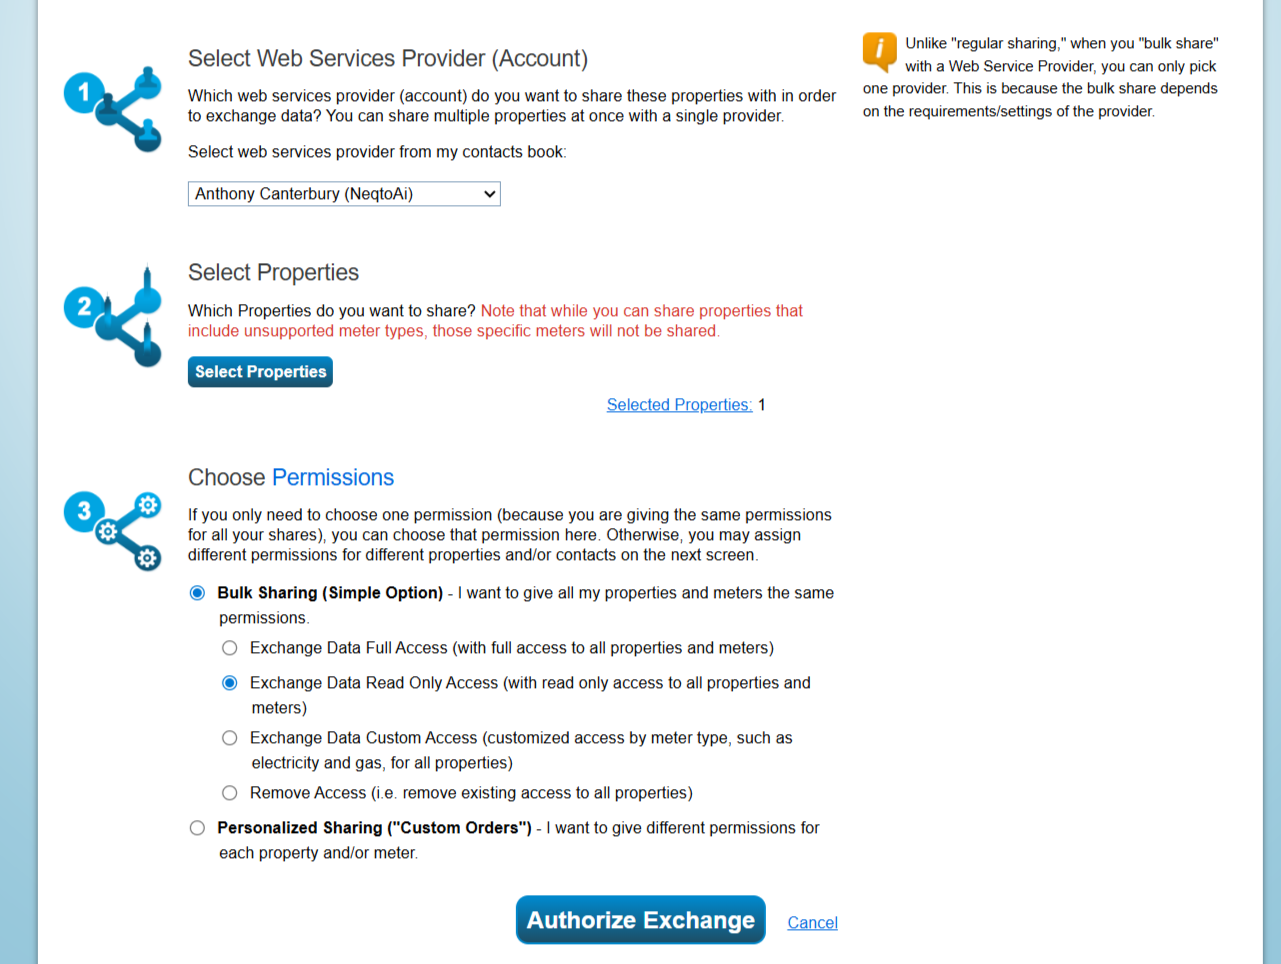
Bulk Sharing applies the same permission to every selected property and its meters in one step. -
4NEQTO.ai accepts the share automatically, usually within seconds. Portfolio Manager records it on the Sharing tab as accepted by the platform.
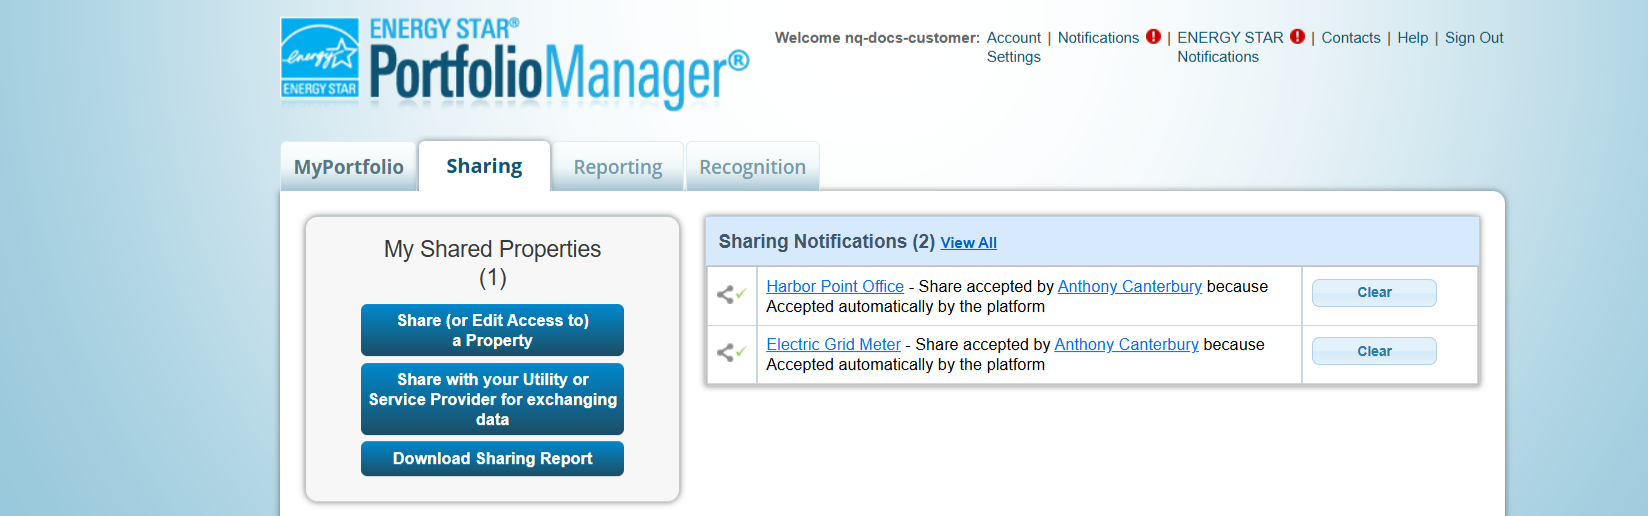
Both the property and its meters show as accepted. Nothing else is needed on the Portfolio Manager side.
Finish the integration in NEQTO.ai
-
1Back in the wizard, step Back and Next to refresh the Settings step. The shared property now appears under Properties. Name the integration and tick the properties to sync. Leaving every property unchecked includes every property this account shares now or later. You can select up to 200 specific properties instead.
-
2Choose at least one metric, select US customary (EPA) or Metric units, and set the sync interval in whole minutes. The default is 1,440 minutes. Your plan may require a longer interval. Each reported value keeps the unit supplied by ENERGY STAR. Choose Create.
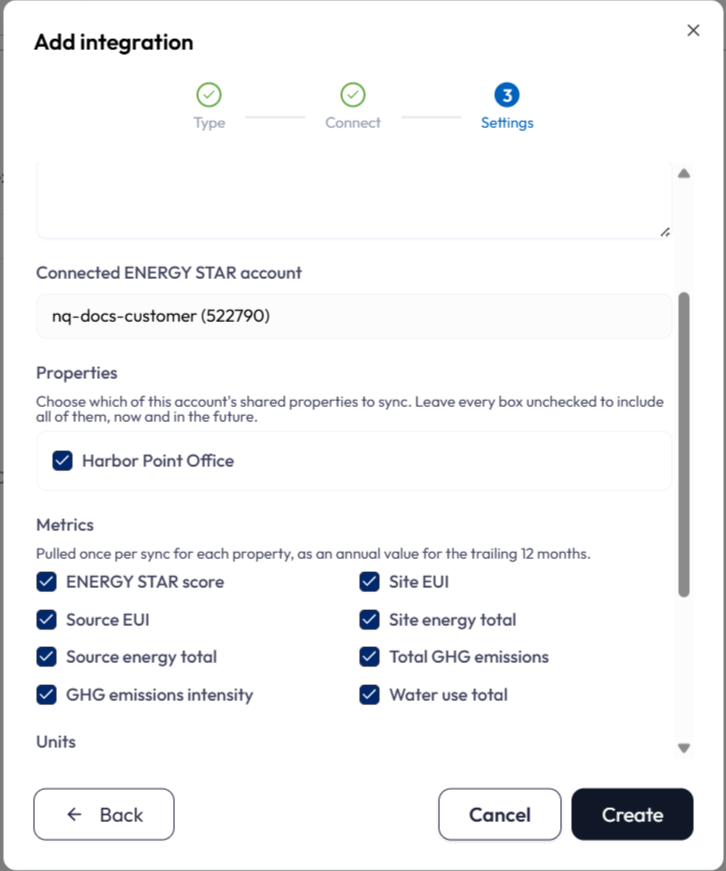
Metrics, units, and cadence are chosen once for the integration and apply to every property it syncs. -
3The integration appears in the list as a draft. Turn on its Status switch, then from its actions menu choose Create device(s) from sample and Pull sample. NEQTO.ai proposes one device per property, named after the property, with a field for each metric Portfolio Manager reports and the unit it reports it in. Review the proposal and choose Create device.
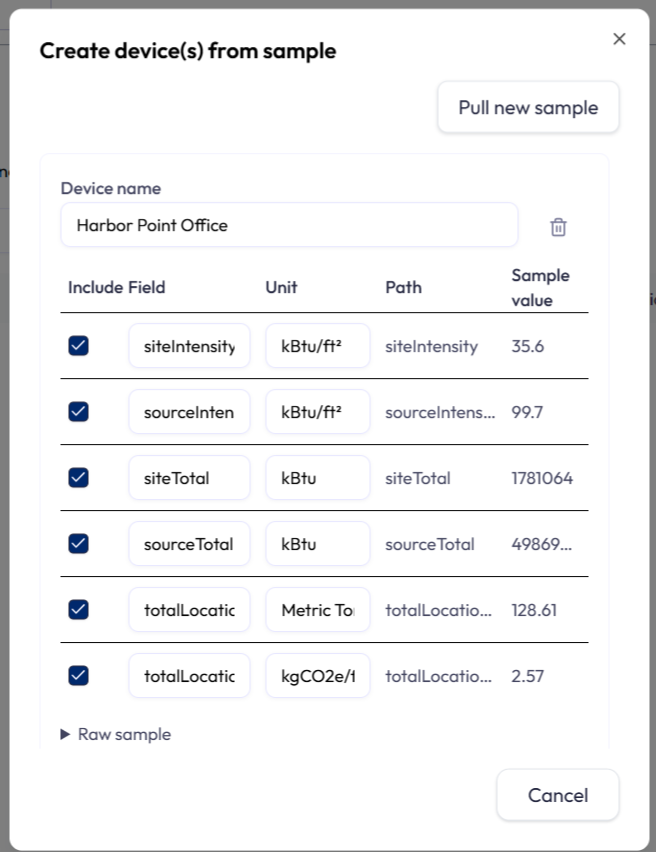
Only metrics with a value are proposed. Here the score and water use are absent because Portfolio Manager had not calculated them yet. -
4The first successful pull changes Pending activation to Active, and the device count shows one device per property. From here the devices behave like any other: dashboards, alerts, and exports all work, and each scheduled sync refreshes the values.
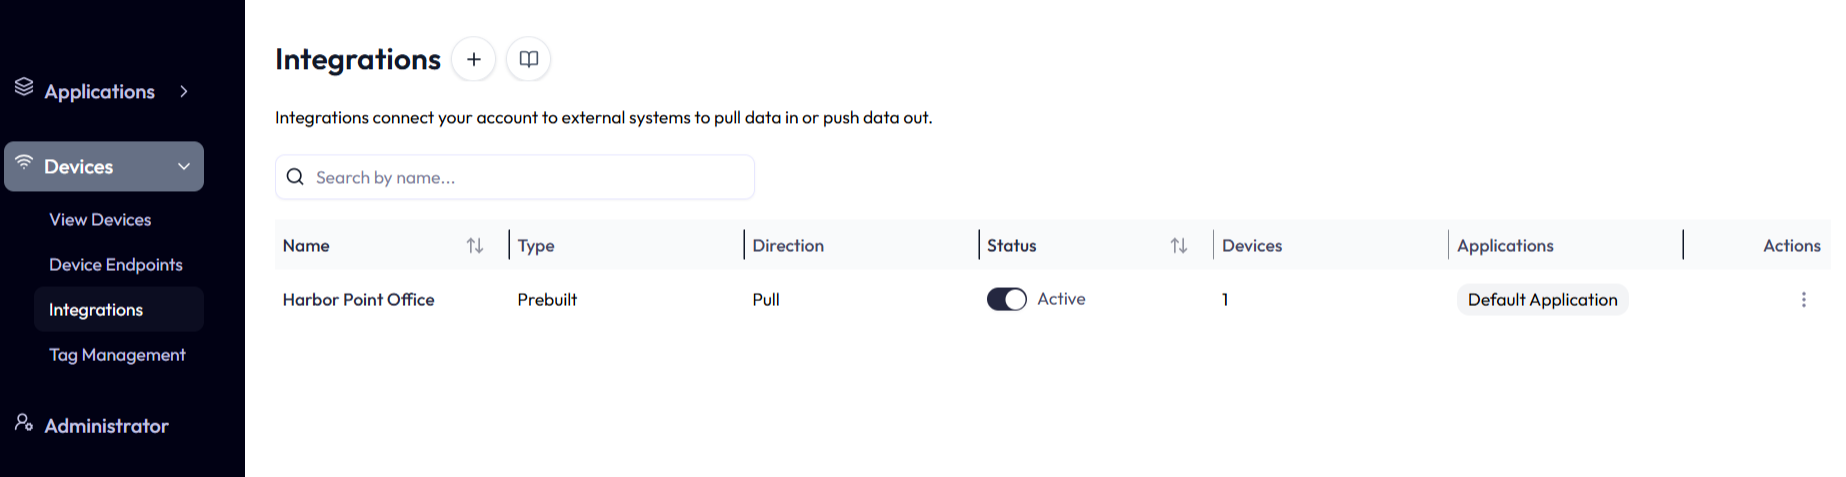
Active with one device. The next scheduled sync pulls the latest annual values.
The connector can pull these eight metrics:
- ENERGY STAR score
- Site and source energy use intensity (EUI)
- Site energy total and source energy total
- Total location-based greenhouse gas emissions and emissions intensity
- Water use total
Weather
The Weather connector pulls current conditions for one location on a schedule and creates a device for them. Weather readings can then be used beside your own data in dashboards, alerts, and analytics.
-
1On the Type screen, choose Weather. The wizard goes straight to Settings. There is no protocol to pick and no credential to supply.
-
2Name the integration, then set the location. Latitude runs from −90 to 90 and Longitude from −180 to 180. Location name is optional and is only a label. Conditions are fetched by coordinates, so the name never changes what is observed.
-
3Set the Sync interval in minutes, then choose Test. It fetches the current conditions for those coordinates and lists them, so you can confirm you have the right place before saving. Match the interval to how often the source actually updates: polling faster than the provider publishes gains nothing, and your plan sets the shortest interval allowed. If the prefilled value is shorter than your plan permits, creating the integration fails with The pull interval is shorter than your plan allows. Raise the number and try again.
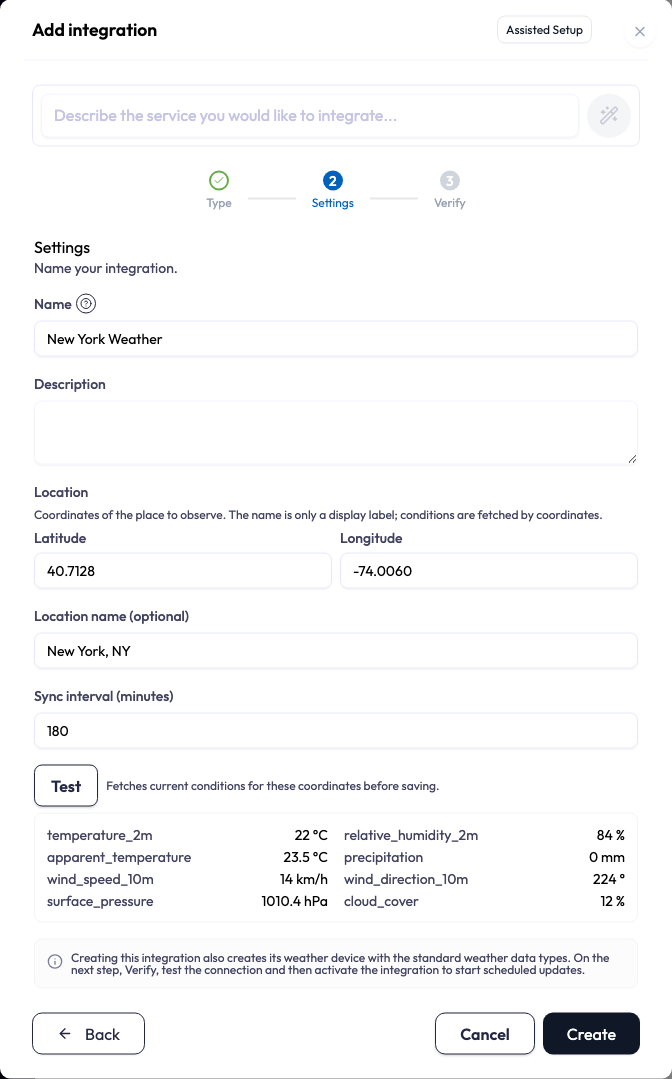
Weather’s Settings step. Test fetches the current conditions for those coordinates before you save. -
4Choose Create. Along with the integration, NEQTO.ai creates its weather device, with the standard weather attributes already mapped.
-
5The wizard moves to Verify, where you can test the connection and turn the integration on. You can also close the wizard and turn it on from its row later — scheduled updates do not start while the integration is a draft.
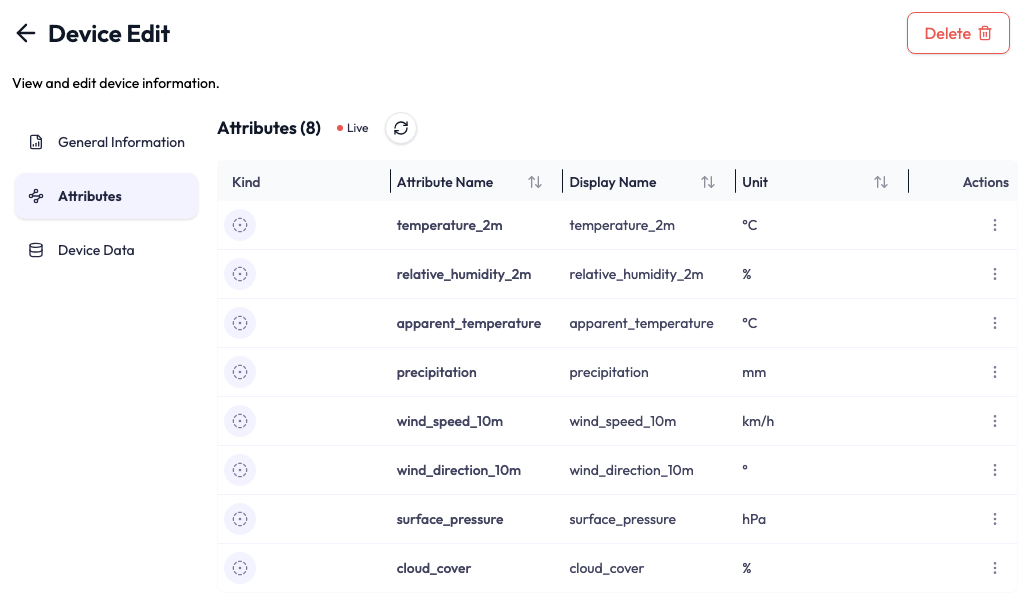
Every scheduled sync brings in the same eight variables:
- Temperature and apparent temperature (what it feels like)
- Relative humidity
- Precipitation
- Wind speed and wind direction
- Surface pressure
- Cloud cover
If the automatic device setup does not complete, the integration is still created. Open its actions menu and choose Create device(s) from sample to finish the job by hand.
Pull data and create devices
For a Custom pull integration, Create device(s) from sample makes an immediate request to the external service. HTTPS uses GET. WSS waits for the first message after the connection opens. MQTTS subscribes to the topic in the URL path, or to all topics when the URL has no path. In every case, the first payload must be a single JSON object no larger than 1 MB.
From a sample to a device
-
1Open the integration’s actions menu, choose Create device(s) from sample, then choose Pull sample. For a Custom integration, the AI inspects the JSON structure and proposes fields. Prebuilt connectors use their known provider fields instead.
-
2Review the proposed device name and fields. You can include or exclude fields, rename them, and correct their units. Changes are saved with the proposal, so you can close the dialog and return later. Select the trash button to reject a proposal without creating a device.
-
3Select Create device for each proposal you want. NEQTO.ai creates the device and its selected Attributes, and links it to the same applications as the integration. Devices created this way are labeled Integration in Devices & Data.
A Custom integration without a device identifier creates one device from its sample. When the account’s metadata mapping defines an identifier field, that value becomes the Device’s external ID. Later payloads must carry the same identifier value to reach that Device. NEQTO.ai freezes the identifier path when you confirm the first Device, so changing the account metadata mapping later does not reroute that integration.
Push data to an integration
A Custom integration set to Push or Pull & Push sends a JSON payload to your service. The protocol you picked decides what happens on the wire.
A Custom integration with direction Push or Pull & Push can send a JSON payload to the external service. The serialized payload can be up to 64 KiB. NEQTO.ai applies the integration’s saved authentication and custom headers.
| Protocol | Push behavior |
|---|---|
| HTTPS |
Sends a POST request with a JSON body and
Content-Type: application/json.
|
| WSS | Opens the WebSocket, sends the serialized JSON, then closes the connection. |
| MQTTS |
Publishes to the configured topic or the topic in the URL path. The topic must be
concrete. Publish wildcards such as # and + are not allowed.
|
An alert’s Payload push action can target an HTTPS or MQTTS integration that
supports push and is Active or Pending activation. To call a webhook when an alert fires,
create a Custom HTTPS integration with the webhook URL as its Push URL, then select that
integration in the alert’s Payload Push tab and save the alert. This creates the alert target’s
Action. Only then can you open that Action’s Dry run dialog, review it,
select Approve in the dialog, and return to the list to Enable
it. Dry run is the required UI path to Approve; creating the integration alone does not create
an Action. The webhook receives a JSON POST when the enabled
target’s alert fires. Alert payload push does not support WSS. See the
Alerts guide for payload
templates, target approval, and destination rules.
Verify: test and activate
Verify is the wizard’s last screen, headed Test and activate. It does three things in order: check the connection, turn the integration on, and watch for the first data.
Test the connection
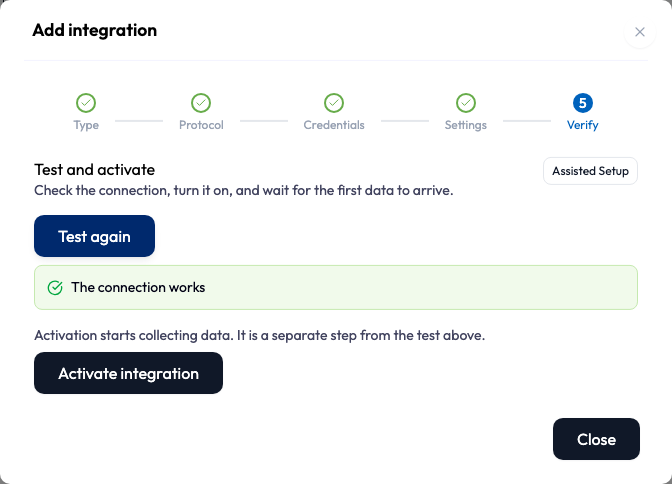
Choose Test connection to run it. A pass reports The connection works, and the button becomes Test again, so you can correct something and retest without leaving the wizard. A failure reports The connection test failed and the reason, such as Authentication rejected by the endpoint.
On a Custom integration this is the same check as Test connection on its row, so see that section for what each outcome means, including the credential probe that follows a successful connection. On a prebuilt connector the test asks the provider for a real sample instead, with no credential probe. That test is only on this screen; the row does not offer it.
When the provider must approve access
An integration that uses OAuth2 (authorization code) needs your approval at the provider’s website. Until you approve access, the Verify test reports Provider authorization required, and Activate integration does not appear.
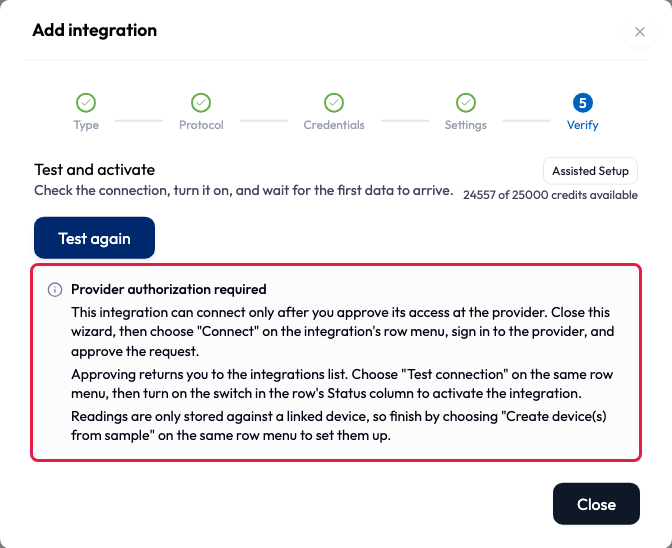
The integration is already saved as a Draft. Finish from the integrations list:
-
1Choose Close to leave the wizard.
-
2Open the integration’s row menu and choose Connect. NEQTO.ai sends you to the provider’s sign-in page.
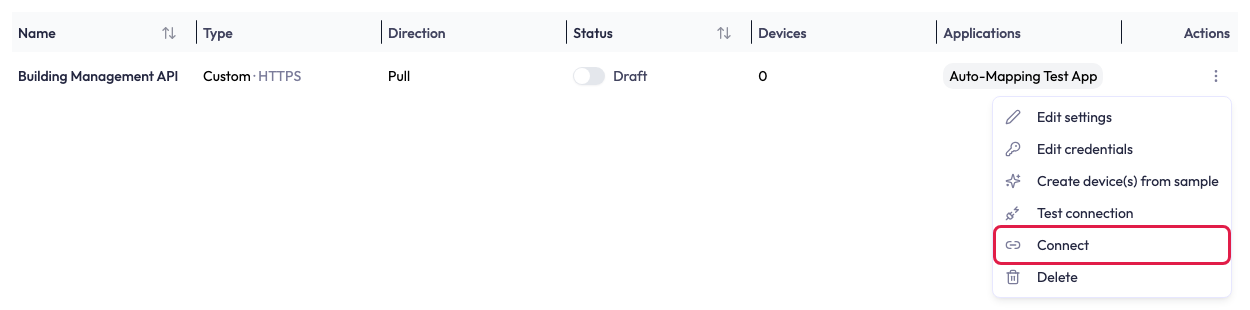
Connect appears on the row menu of an integration that uses OAuth2 (authorization code). -
3Sign in and approve the request. The provider returns you to the integrations list.
-
4Choose Test connection on the same row menu, then turn on the switch in the row’s Status column. A pull integration also needs Create device(s) from sample before its readings are stored.
Connect requires the Edit Integrations permission. If your role lacks it, Verify asks you to have someone with that permission finish these steps.
Activate the integration
Activate integration appears only after the test passes, below the line Activation starts collecting data. It is a separate step from the test above. Choosing it asks for confirmation — Yes, activate it or Not yet — so you can check a connection without committing to it.
Activating does not by itself make the integration Active. The status shows Pending activation, with a note that the connection is not live yet and is activated once the first exchange with the provider succeeds. If activation itself fails, the screen reports The integration could not be activated. Its status is unchanged. and offers the button again.
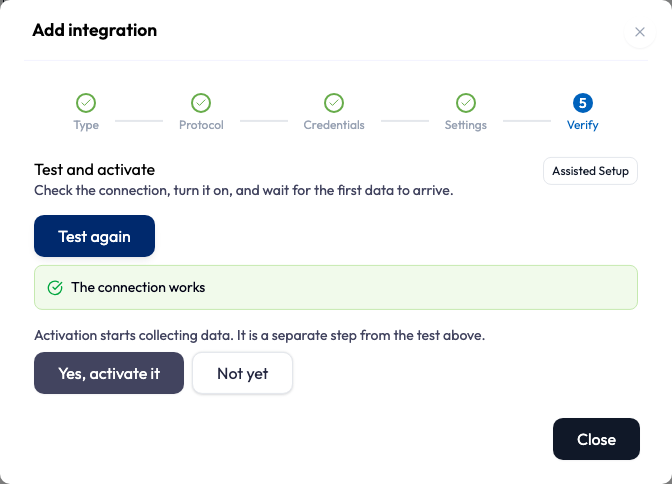
Wait for the first data
The screen then watches for readings, showing Waiting for the first data… while it looks, and reports what it finds. None of the states below is an error.
| What you see | What it means |
|---|---|
| The device has been created. Waiting for its first reading…, with the device under Devices observed marked no data yet | The connector made its device and NEQTO.ai is waiting for a reading. The no data yet label clears once one arrives. |
| This integration is connected, but no devices are linked to it yet. | Expected for any connector that creates no device during setup, which is every one except Weather. Use Create device(s) from sample on its row menu. Pulling a sample does not change the status; it moves to Active on the integration’s first automatic pull. A Custom integration pulls automatically only once it has a Sync interval; see From a sample to a device. |
| No data has arrived yet. | The screen stops watching after about five minutes. The integration keeps running, and readings appear against its devices whenever the source next publishes — normal for a source that publishes infrequently. |
When you are working inside an application, once devices exist a What next row offers Create alert and Create dashboard. Outside an application the row does not appear. Each opens that flow with the new devices already selected. The Alerts and Dashboards guides cover what to do there.
Integration status
A new integration starts as Draft. Turning it on changes the status to Pending activation. Its first successful pull or push changes the status to Active. Testing an integration, Custom or prebuilt, never changes its status, and neither does Create device(s) from sample; see Verify: test and activate.
| Situation | What happens |
|---|---|
| A scheduled pull or push gets 401, 403, or another non-retryable 4xx response. HTTP 408 and 429 are treated as retryable. | The integration changes to Disabled. Fix the credentials, URL, or request expected by the service, then turn it on again. |
| A scheduled pull is rate-limited (429) |
The integration stays enabled. NEQTO.ai waits for the service’s Retry-After
period when one is provided, or tries again at the next interval. Rate limits do not
count toward the five-failure cutoff below.
|
| A scheduled pull gets 408, a 5xx response, or a network error | NEQTO.ai tries again at the next interval. Five consecutive scheduled pull failures change the integration to Disabled. A successful scheduled pull clears the failure count. |
| A scheduled push gets 408, 429, a 5xx response, or a network error | The integration stays enabled and the push is tried again at its next interval. |
| A manual sample pull fails | The dialog reports the error, but the failure does not disable the integration. |
| A prebuilt connector is waiting for authorization or a property share | The integration stays enabled and displays the waiting reason. This does not count as a failed pull. |
Read the Status column
A status that needs explaining carries an icon next to its switch. Hover it for the sentence. A Disabled row shows the reason NEQTO.ai recorded when it was deactivated, so you know what to check. A Pending activation row explains that it activates on the next successful pull or push.

Test connection
Test connection on a Custom integration’s actions menu opens a connection with the stored credentials but does not pull or push data. Prebuilt connectors do not offer this action because NEQTO.ai manages their endpoints and credentials. For HTTPS, any response other than 401 or 403 passes the reachability test. Even a 404 passes, although it may mean the URL points to the wrong resource. WSS and MQTTS must complete their protocol handshakes. For an integration with both directions, this initial test uses the pull URL.
After a successful connection test, NEQTO.ai probes the configured endpoint or endpoints with a deliberately invalid version of the credential. This checks whether the selected authentication method changes the response. Other controls, such as custom headers or network access rules, may still protect the service. The test has four possible outcomes:
| What you see | What it means |
|---|---|
| Connection successful | The endpoint answered, accepted your credential, and refused the wrong one. No action is needed. |
| Connection successful, with The endpoint credential check could not be completed this time | The connection works, but the credential check reached no verdict because the endpoint timed out, returned an error, or responded inconclusively. Try again later if you want a verdict. |
| The endpoint rejected the stored credential | The endpoint is reachable but will not accept what is stored. Update the credentials through Edit credentials and test again. |
| The endpoint accepted an invalid credential | The endpoint accepted the deliberately altered credential. The configured authentication method may not be enforced for this endpoint, although another access control may still apply. See the warning below. |

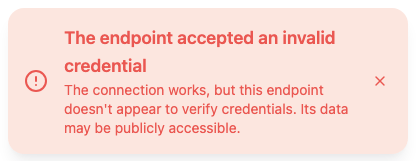
Edit and delete integrations
Both start from a row’s actions menu. Editing credentials replaces only the secrets you type, and deleting is permanent.
Open a row’s actions menu and choose Edit settings to change its name and description. Edit credentials is available for Custom integrations and replaces only the secret values you enter. Prebuilt connectors keep their provider credentials under platform control.
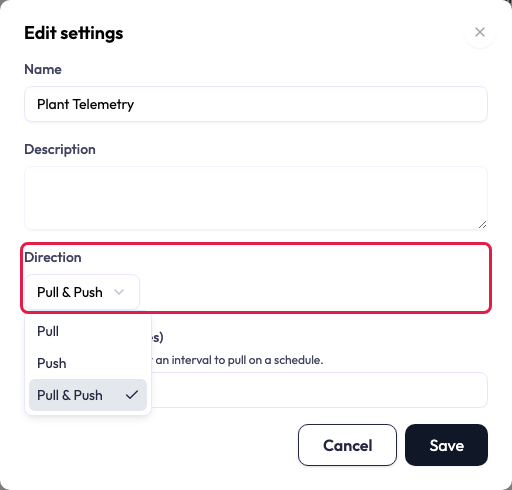
Edit settings shows Direction only when more than one direction is available. Prebuilt connectors always pull. Custom integrations use the URLs set at creation, which you cannot change in the edit screens. An integration created as Pull & Push has both URLs and can switch between all three directions. One created as Pull or Push keeps that direction.
Permissions
| Task | Required permission |
|---|---|
| Open the list and view saved proposals | View Integrations |
| Create an integration | Create Integrations |
| Edit, connect, test, change status, or pull a sample | Edit Integrations |
| Open the sample action and confirm a proposal as a Device | Edit Integrations and Create Devices |
| Delete an integration | Delete Integrations |
NEQTO.ai checks account permissions on the account-level page and application permissions inside an application. A missing permission may hide the control or reject the request.
Example: pull from your own service
Use a service you control when testing the Custom pull flow so you can inspect its response and repeat the request.
-
1Expose one HTTPS URL that returns a single JSON object of current readings. A flat response makes the proposed fields easier to review, although nested fields are supported.
{ "meter_id": "MTR-114", "power_kw": 8.4, "energy_kwh": 15230.7, "temperature_c": 41.2 } -
2Create the integration: type Custom, protocol HTTPS, direction Pull, that URL, and whichever authentication method your service expects. Then run Test connection to check reachability. A conclusive credential result also confirms whether the endpoint accepts the stored credential and rejects the altered one.
-
3Open Create device(s) from sample, pull a sample, and confirm the proposed fields. That creates the device. Later manual samples use the same endpoint. To pull on a schedule, set a Sync interval in the row’s Edit settings, as explained above.
Troubleshooting
Each message below names what NEQTO.ai could not do and what to change before you try again.
| Message | Meaning |
|---|---|
| Failed to pull data from the external service | The service could not be reached, timed out, or returned an error status. Check the URL and that the service is up, then pull again. |
| The external service did not return a JSON object | The response was not a single JSON object (for example, plain text, HTML, or a bare array). Point the URL at an endpoint that returns a JSON object. |
| The external service rejected the integration credentials | The service answered with an authentication error (401 or 403). Update the credentials in the integration’s settings. |
| OAuth connection required. Please connect this integration again. | The stored OAuth session can no longer be refreshed (for example, access was revoked at the provider). Choose Connect on the integration’s row and sign in again. |
| Waiting for ENERGY STAR properties to be shared with the platform account | The Portfolio Manager account connection is verified, but it has not shared a property yet. Share the property with the platform account. NEQTO.ai accepts the share automatically and tries again on the next sync. |
| The provider has not published values for this record yet | A prebuilt connector found the source record, but it had no usable metric values. Pull a new sample after the provider publishes data. |
| No object in the sample had a usable device identifier | The identifier field configured in the account’s metadata mapping is missing, blank, or not a string, number, or boolean in the sample. Correct the response or the mapping, then pull a new sample. |
| A device with this identifier already exists for this account | Another Device already owns the proposed external ID. Use the existing Device or change the source identifier. A disabled Device still reserves its external ID until it is permanently deleted. |
| The external service rejected the push request | The service answered a push with an error status other than an authentication error. Check the push URL and the payload format the service expects. |
| The pull interval is shorter than your plan allows / The auto-push interval is shorter than your plan allows | Increase the interval, or contact support about faster cadences. |
| The MQTT push topic must be a concrete topic without # or + wildcards | Replace the wildcard with the exact topic the payload should be published to. |
| Failed to fetch a PEM certificate from certificateUrl |
The Certificate URL could not be fetched or did not return a PEM certificate. Check the
URL, or paste the CA directly as caPem via
Edit credentials.
|
Limits and security
The caps and network rules that apply to every integration.
| Item | Limit |
|---|---|
| Connection security | TLS only: HTTPS, WSS, and MQTTS. Plain HTTP, WS, and MQTT are not supported. |
| Reachable hosts | Public hosts only. Private and internal network addresses are blocked. |
| Connection timeout | 15 seconds for HTTPS, WSS, and MQTTS connection work. |
| Custom pull response | Up to 1 MB, and the response must be one JSON object. |
| Push payload | Up to 64 KiB after JSON serialization. |
| Pull and auto-push intervals | Minimum intervals depend on your plan. |
| Integration count | No limit unless your plan has a Device limit. The account and its subaccounts can then create up to that many integrations. |
| Name and description | Name: 100 characters and unique within the account. Description: 500 characters. |
| Proposed fields | Up to 50 fields per Device proposal. |
| ENERGY STAR properties | Up to 200 explicit selections. No selection means all shared properties. |
| Certificate URL | HTTPS only, up to 2,048 characters. The PEM fetch times out after 10 seconds and accepts up to 64 KiB. |
| Custom headers | Enter a JSON object. Only string and numeric values are sent as headers. |
| Saved credentials | Encrypted at rest, write-only, and never returned after saving. |