

Administration
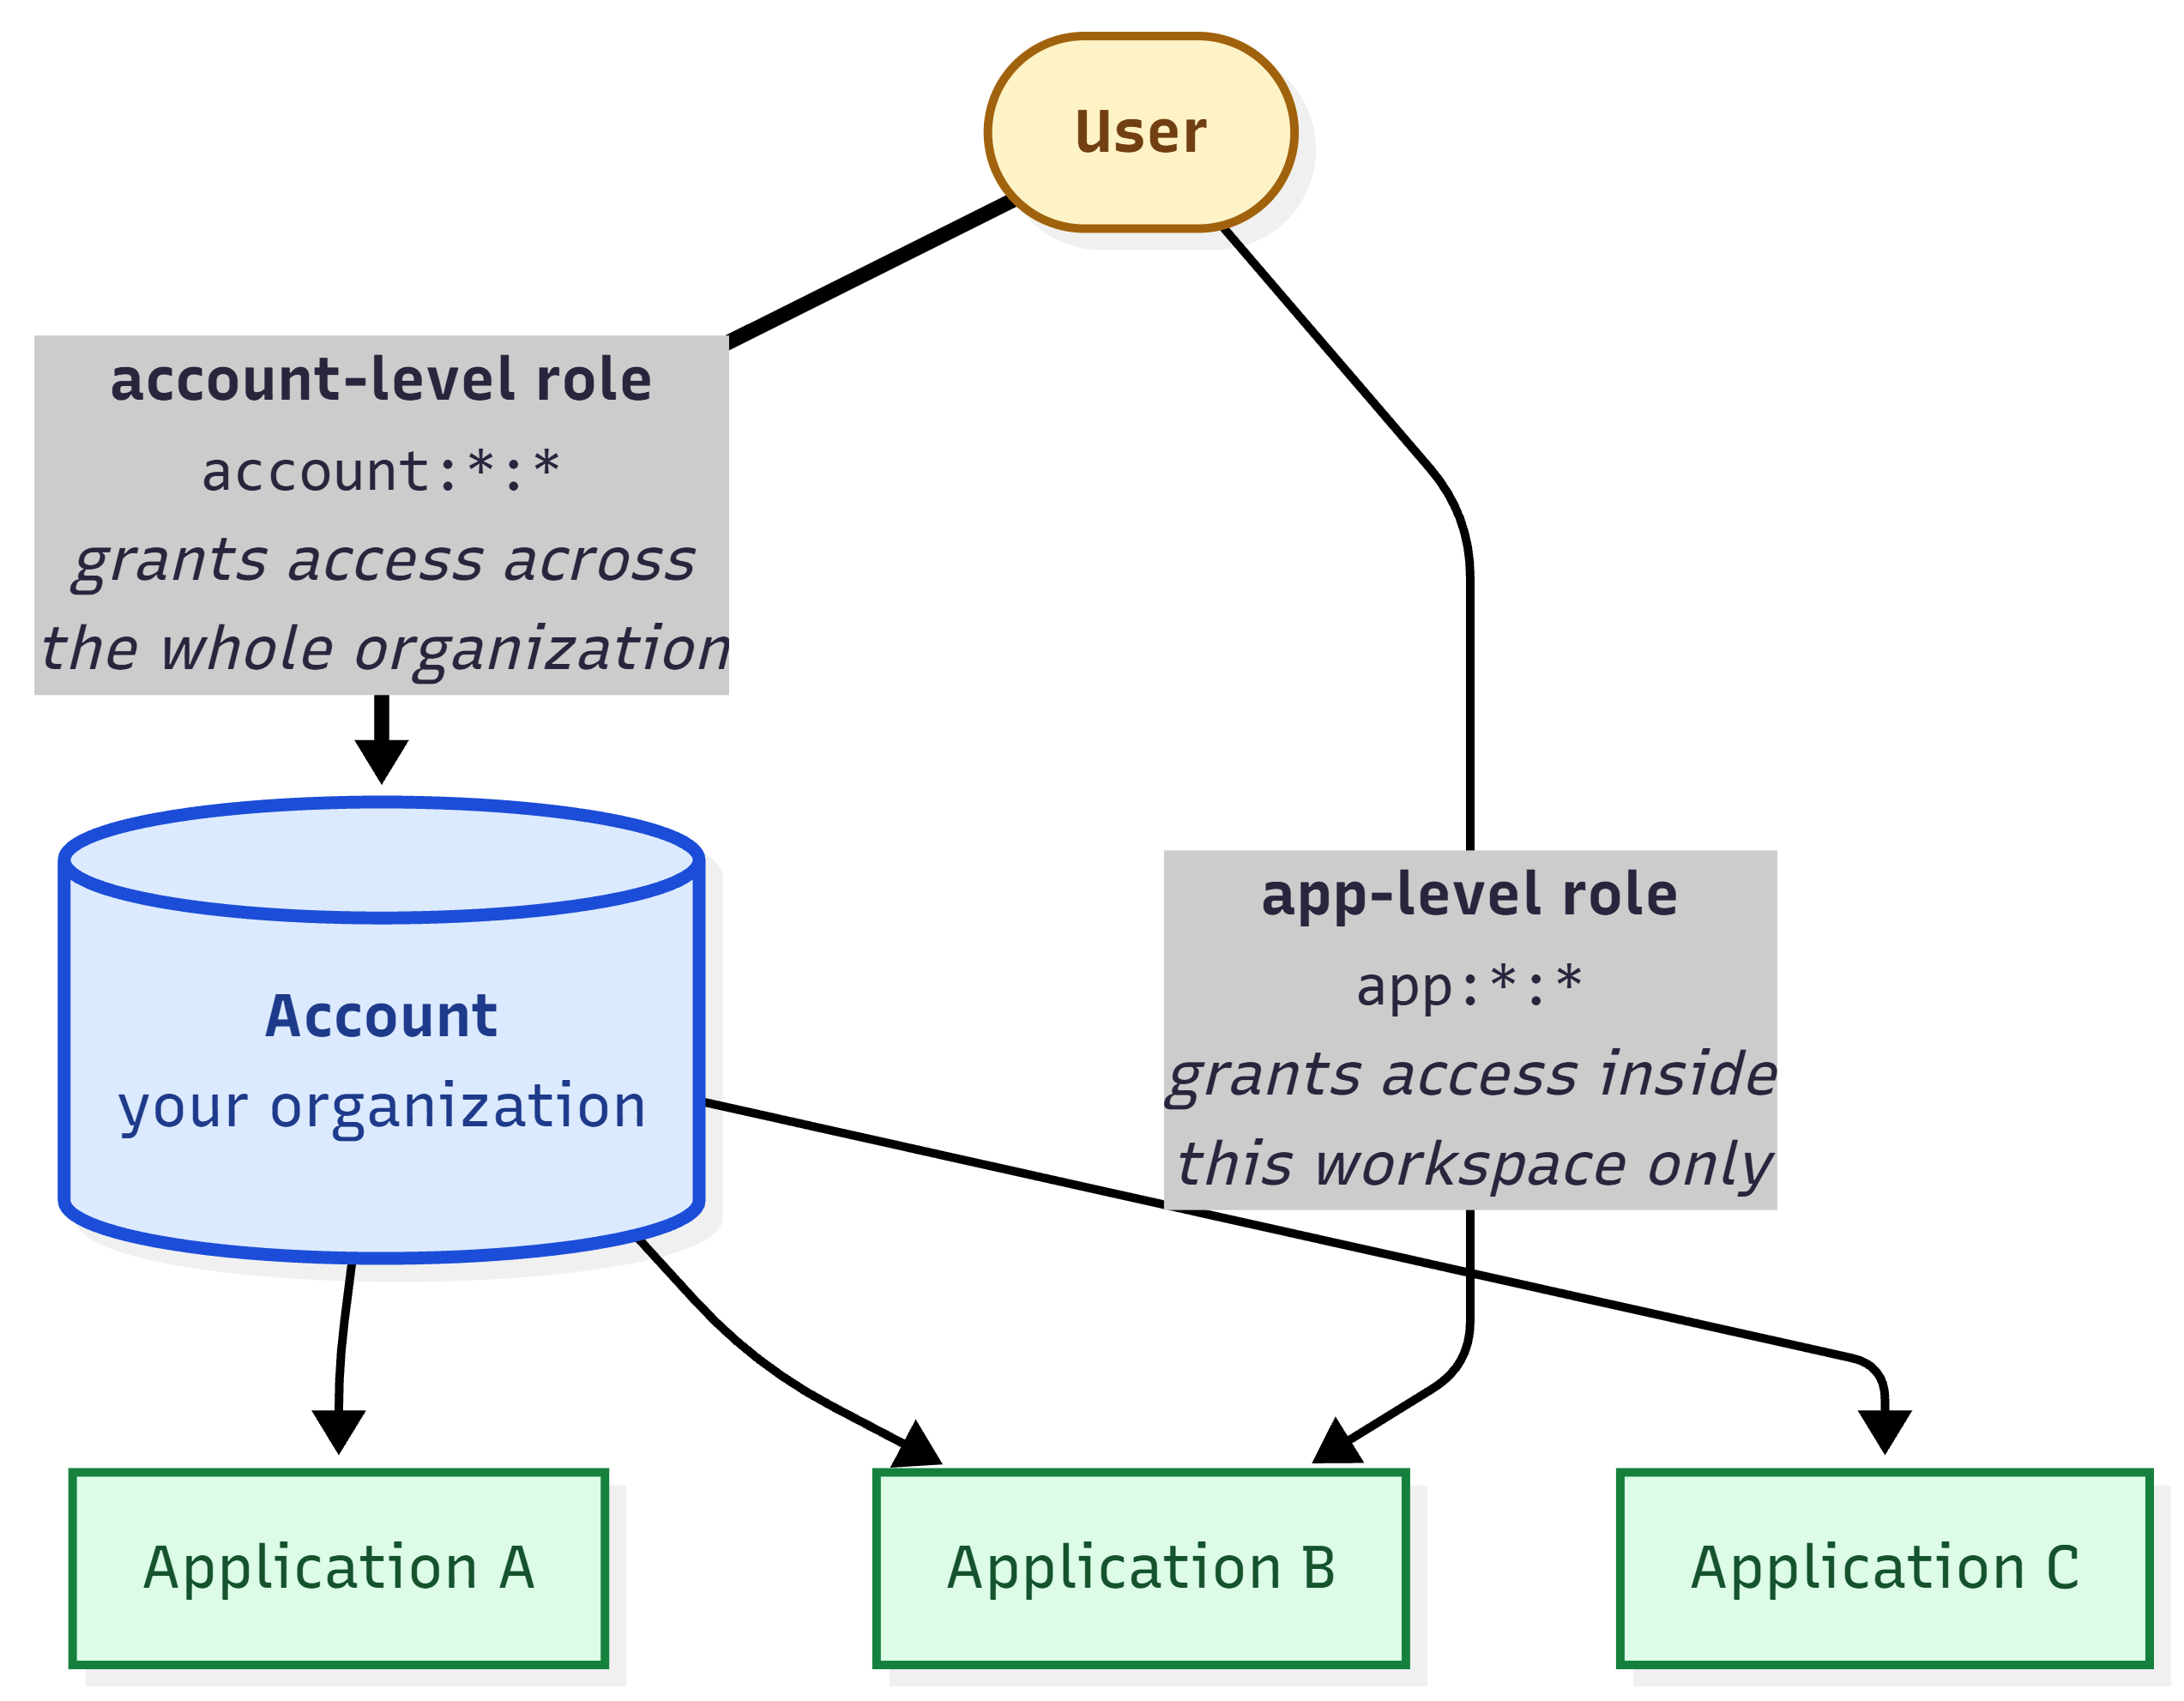
Administration controls who can use your account and what they can do. An Account is your organization, and Applications are workspaces inside it. Users can have an account-wide role, a role in one or more applications, or both. Account and application permissions are separate.
The Account Model
Applications divide an account into separate workspaces, and each application shows only the endpoints, devices, dashboards, alerts, and members assigned to it. Sub-accounts exist in the permission model but not in the self-service UI.
Accounts and sub-accounts
Some plans and permission lists mention sub-accounts. They cannot currently be created or managed through the self-service UI.
Applications
An Application is a scoped workspace. Endpoints, devices, dashboards, alerts, and members all belong to an application. A user added to an application gets a per-application role that decides what they can do in that workspace only, independent of any account-wide role.
- Default application. One application in the account is flagged as the default. Screens that are not opened from inside a specific application (for example Alert History) fall back to scoping their data to this default application.
-
Access to every application. The account permission
account:manage:applicationsgrants full access to every application, regardless of the user’s application roles. Grant it carefully.
Account Settings
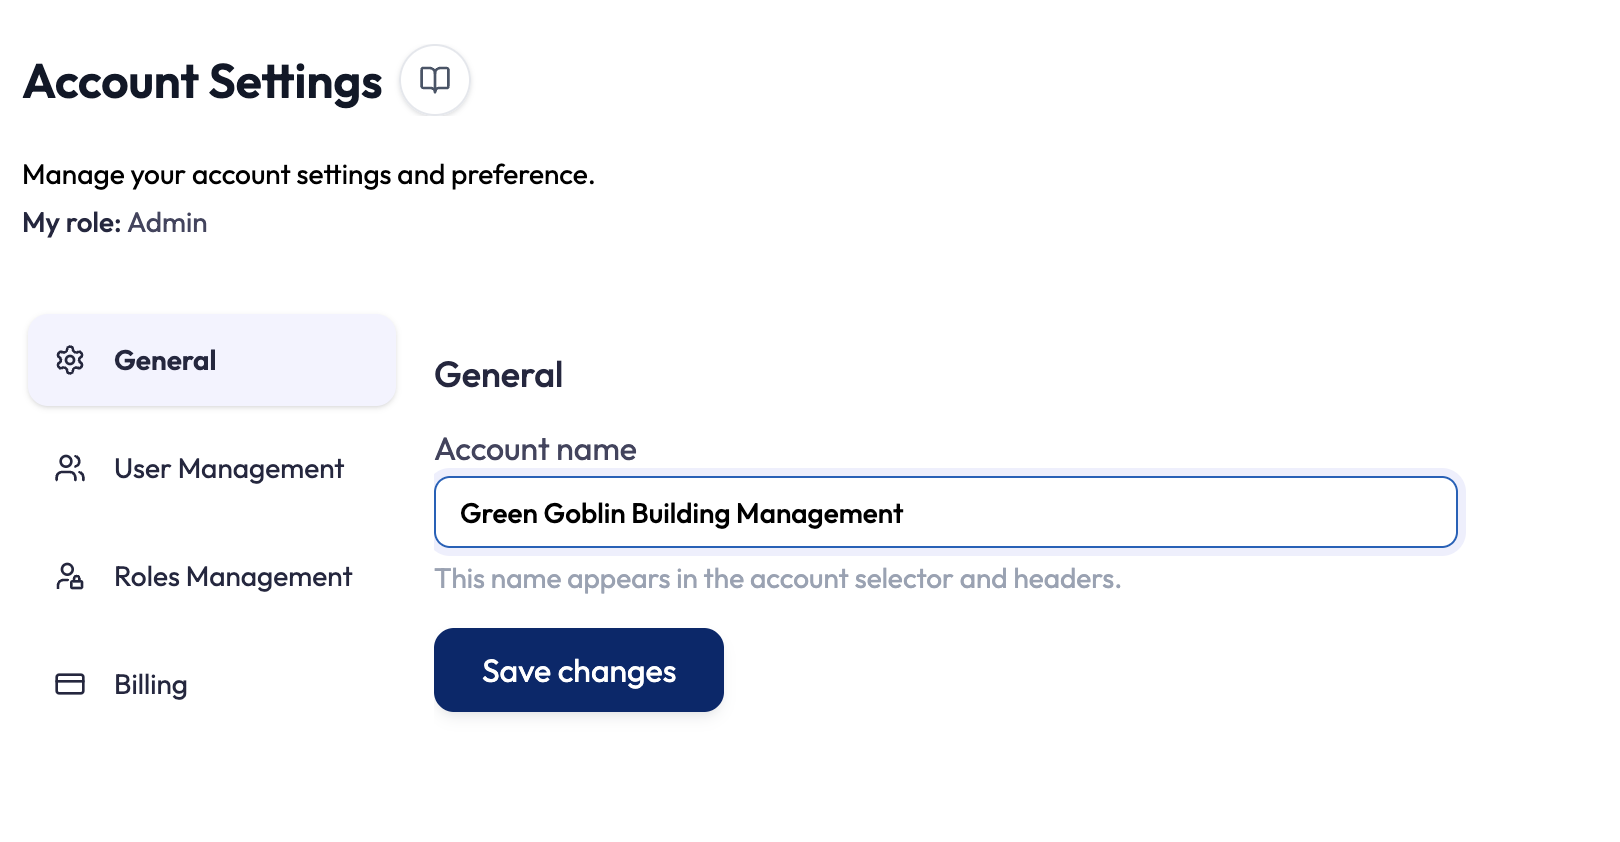
Open Administrator from the main sidebar to reach Account Settings. The page shows your own role at the top (“My role”), then up to four tabs. You only see a tab if your role grants the matching view permission.
| Tab | What it does | Permission to see it |
|---|---|---|
| General | View and edit the account’s name. | account:read:settings or account:update:settings |
| User Management | Invite, edit, and delete users in the organization. | account:read:users |
| Roles Management | View roles; create, edit, duplicate, or delete custom roles. | account:read:roles or account:update:roles |
| Billing | View your plan, current usage, and compare available plans. Shown when billing is enabled. See Billing and Plans. | account:read:billing |
If your role grants none of these, the page shows an Access Denied message instead of the tabs.
General: the account name
The General tab holds account-wide settings. Today it has one: the
Account name. Edit the field and click Save changes. Its
helper text notes the name “appears in the account selector and headers”, so renaming the
account updates it everywhere it is shown. The field is read-only unless your role grants
account:update:settings.
Billing and Plans
Your plan sets your AI credit allowance, data retention, and available features. View it on the Billing tab, which appears when billing is enabled and your role grants access.
The Billing tab
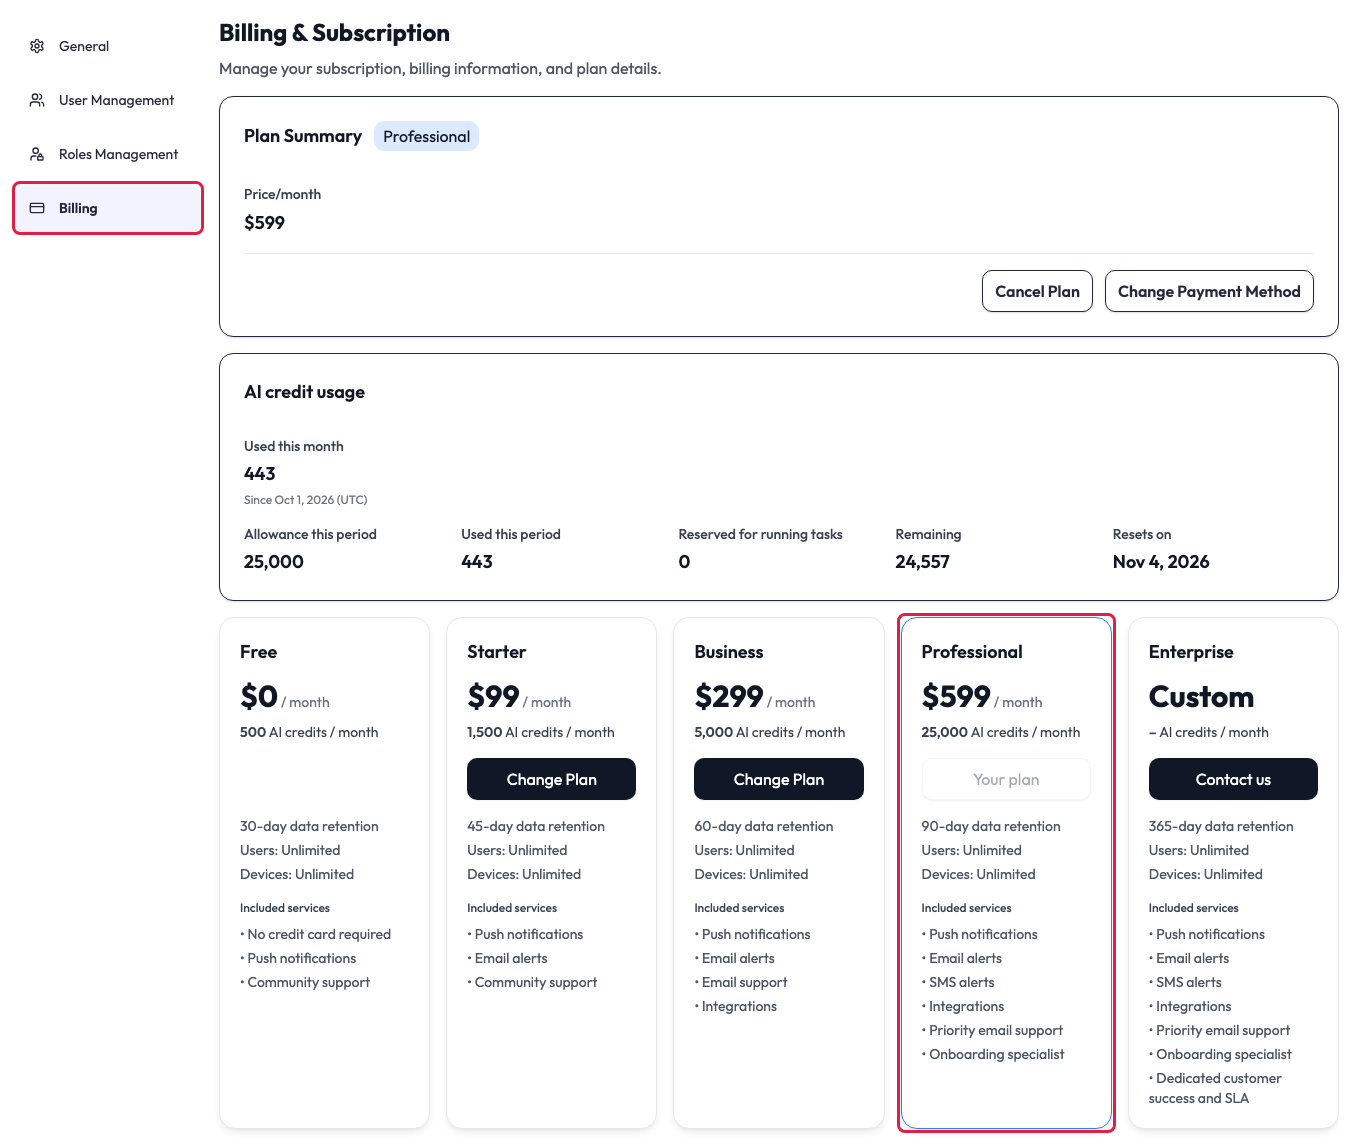
Open Administrator and choose the Billing tab, headed Billing & Subscription. Plan Summary at the top names your current plan and its price, plus the renewal or expiry date when the plan has one.
The plan cards list monthly prices, AI credits, data retention, user and device limits, and included services. Your current plan has a blue border and a Your plan button if it is listed. During a paid plan’s free trial, users who can change billing see Subscribe to followed by the plan’s name. Custom plans and plans no longer offered appear only in Plan Summary.
-
Viewing Billing needs
account:read:billing. -
Changing the plan needs
account:update:billingas well. With it, plans you can buy online show Change Plan, and Plan Summary on a paid plan shows Cancel Plan and Change Payment Method, or Renew Subscription once the plan is canceled. Without it, the tab is read-only.
Change Plan takes you to checkout. If you already have a paid subscription, it
opens the billing portal instead. The Free card has no plan-change action. Enterprise’s
Contact us button opens an email to support@neqto.ai.
AI credit usage
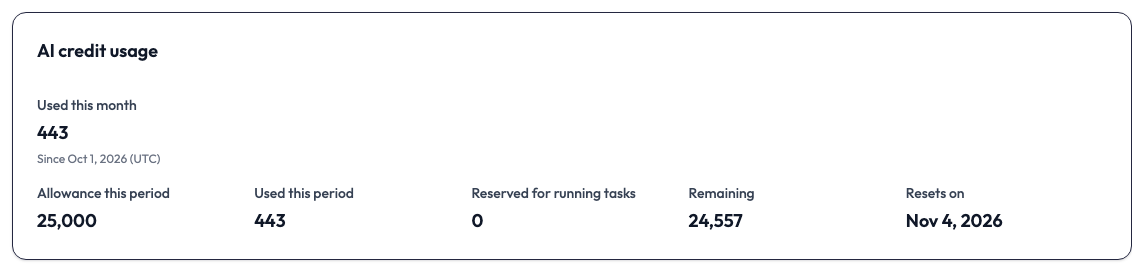
AI requests, such as chat messages and drafts, use your plan’s AI credits. Paid subscriptions renew credits with each billing cycle; annual subscriptions receive a monthly allowance. A trial gets one allowance for the whole trial. Other plans renew credits every 30 days from the plan’s start date. AI controls show a price or estimate before they run, and some requests need confirmation. Requests stop when available credits cannot cover the cost. They resume when credits become available, such as after renewal or an upgrade that increases the allowance.
When your plan uses AI credits, Billing adds an AI credit usage card. Used this month counts credits spent since the start of the calendar month in UTC. The other figures show the current period’s allowance, used credits, reservations for running tasks, and remaining credits. Resets on shows when that period ends.
Features that depend on your plan
Your plan determines access to email alerts, SMS alerts, prebuilt integration connectors, and report cadences. Check the plan cards for included services.
| Feature | When your plan does not include it |
|---|---|
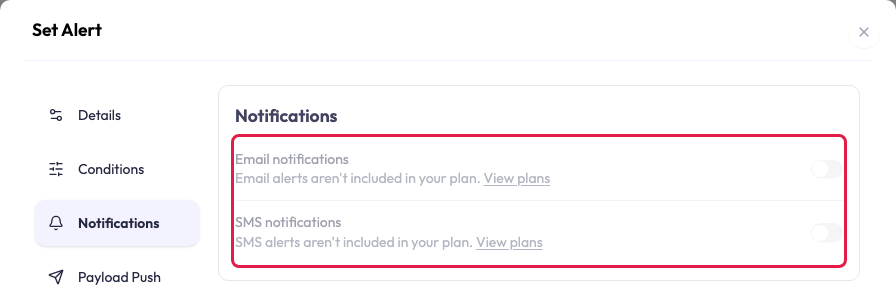
| Email and SMS alerts | The channel is greyed out and switched off in an alert’s Notifications step, with the line Email alerts aren’t included in your plan. or SMS alerts aren’t included in your plan. A device’s connectivity and anomaly notifications and notification groups disable the channel the same way. |
| Prebuilt integration connectors | Free and Starter do not include prebuilt connectors such as ENERGY STAR Portfolio Manager and Weather. Custom integrations are available on every plan. See Integrations. |
| Scheduled reports | Report schedules your plan does not include are greyed out. |
View plans opens Billing when it is enabled and your role can view it. Switching to a plan without email or SMS alerts preserves your alert settings, but stops delivery through those channels until your plan includes them again.
Trial reminder
During the last 7 days of a trial, everyone in the account sees a banner under the page header with the trial’s end date. If the account moves to Free afterward, email alerts and prebuilt integrations become unavailable; Custom integrations remain available. Review billing & upgrade opens Billing when it is enabled and your role can view it. The X hides the banner for the rest of your browser session.
Users
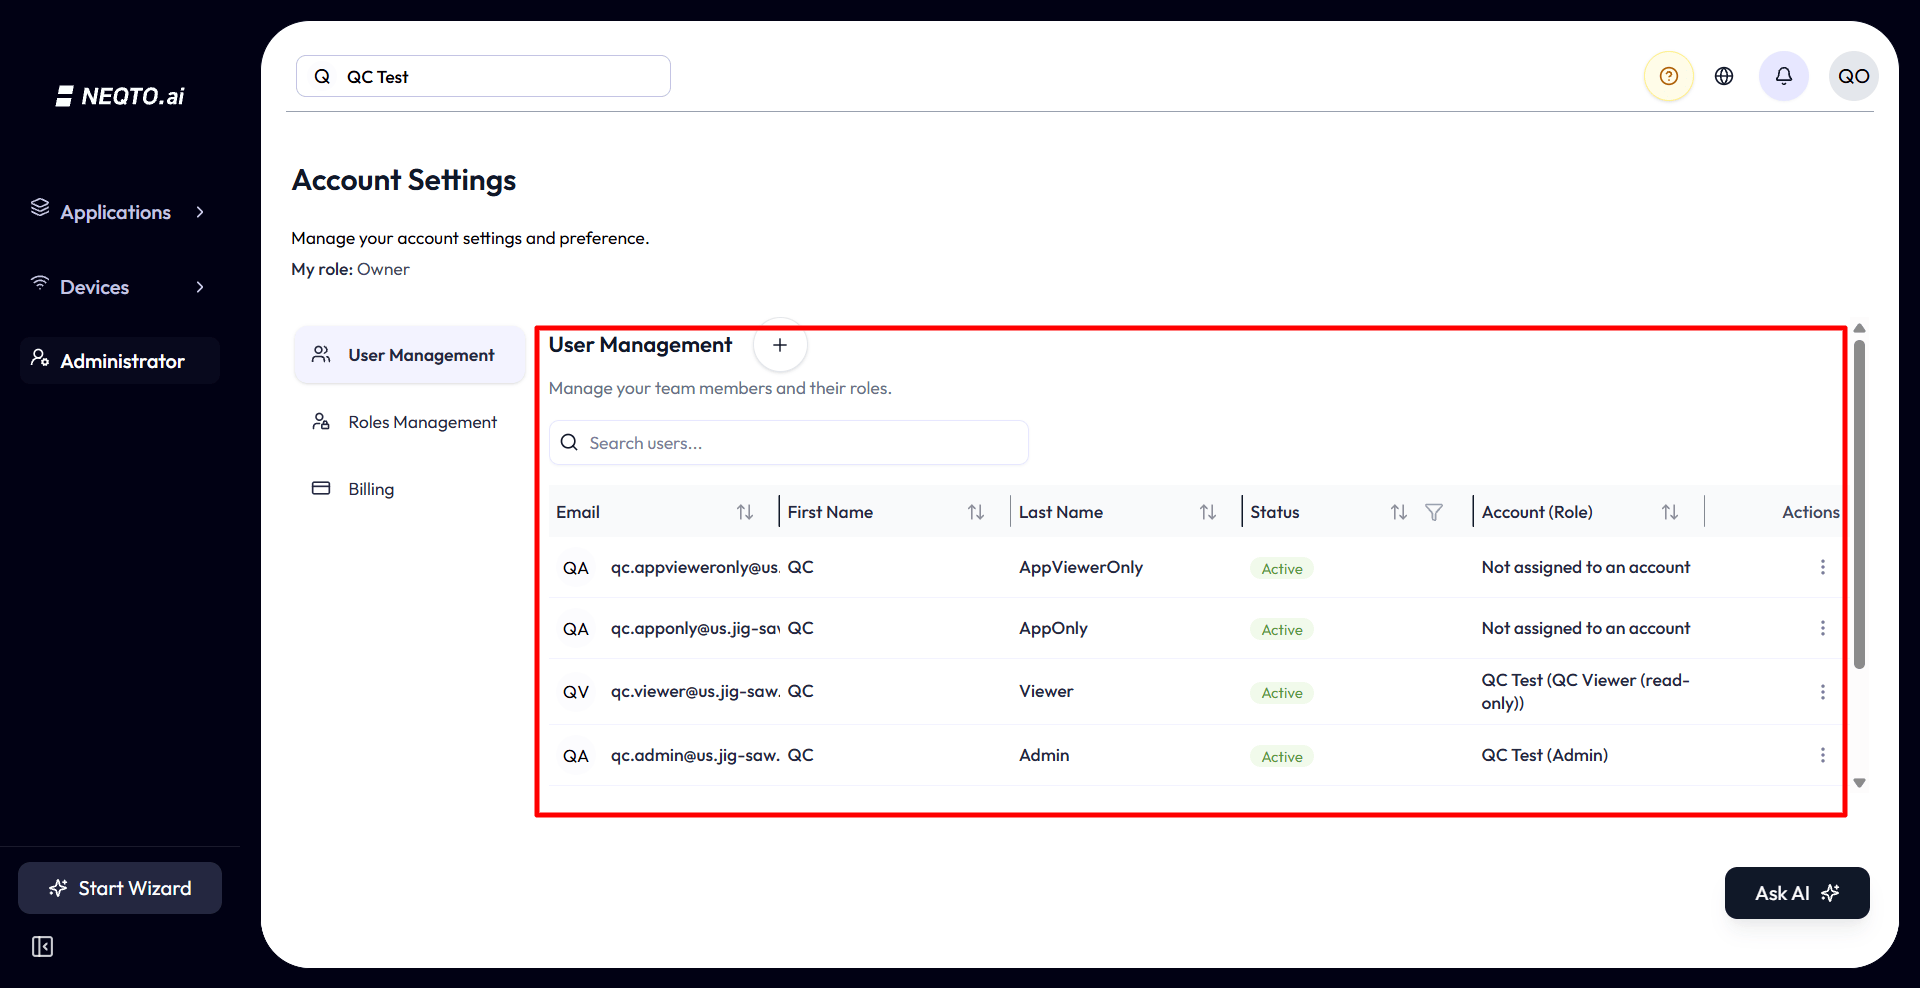
User Management lists everyone in your organization. Search by name or email, invite users, and manage their details and account roles from the table. The Account (Role) column shows each organization a user belongs to and their role there.
How sign-in works
Reset or change a password
A user who has forgotten their password resets it from the login screen. A user who is signed in changes it from their own settings.
-
1On the login screen, select Use password instead, then Forgot your password?
-
2Enter your sign-in email address and select Send Reset Link. The email arrives only for a verified address.
-
3Open the link in the email. On Create a New Password, enter the new password twice and select Reset Password, then sign in with it. The link expires after a short time. An expired link shows Invalid or Expired Link with a Resend Link button.
To change a password while signed in, open Settings from the avatar menu. Under Change Password, enter the Current Password and the new one twice, then select Change Password. A new password needs at least 12 characters, including at least one letter and one number or special character, and it must differ from the current one.
Staying signed in
- A short connection failure does not immediately end the session. NEQTO.ai retries the token refresh and keeps the local session if the platform cannot be reached.
- Each browser or device keeps its own session. Signing in or out on one device does not sign the user in or out on another. A browser refresh also does not end the session.
Inviting a user
-
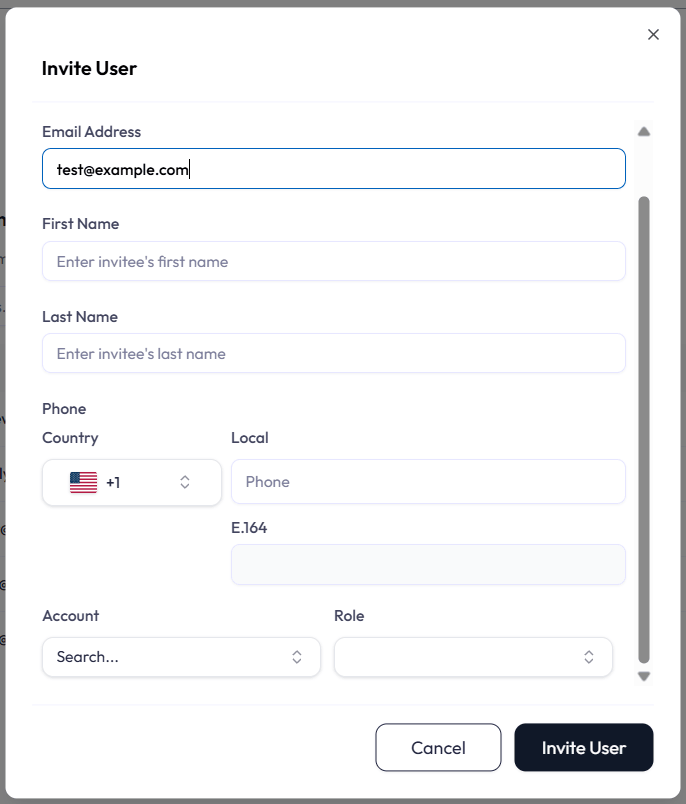
1Enter the email. If the address already belongs to a platform user, you only assign organizations and roles. If it is new, you also fill in First Name, Last Name, and an optional Phone (E.164 format, for example
+1234567890). -
2Pick an organization (account). The Role next to it is optional. Leaving it blank invites the person as a member of the account with no account-wide role, which is the right choice when they should only get access through a specific application.
-
3Send the invite. The user receives an email and, once verified, can sign in. App-scoped roles can be added later from the Edit User page or from an application’s own user screen.
Row actions, status, and delete
Each non-Owner row has an actions menu (the Owner’s own row shows no menu). The menu offers two items:
-
Edit (needs
account:update:users) opens the Edit User page, where you change the person’s details and their per-organization roles. -
Delete (needs
account:delete:users, and is hidden on your own row) removes the user after a confirmation that warns it cannot be undone and that the user will lose access to the system.
The Status column shows each user as Active or Suspended and can be filtered. The current row menu has no action for changing that status.
Roles and Permissions (RBAC)
Access is granted through roles, and every role is a bundle of permission slugs. Permissions come in two scopes that never mix: account-scope (the whole organization) and application-scope (one workspace).
Account roles and Application roles
Roles Management splits its list into two sub-tabs: Account roles (the
account: scope) and Application roles (the
app: scope). The two system roles always live under Account roles. The application
roles (Admin, Operator, Viewer) you assign to per-app members are custom app:-scope
roles that live under the Application roles tab and are shared across the account.
System roles vs custom roles
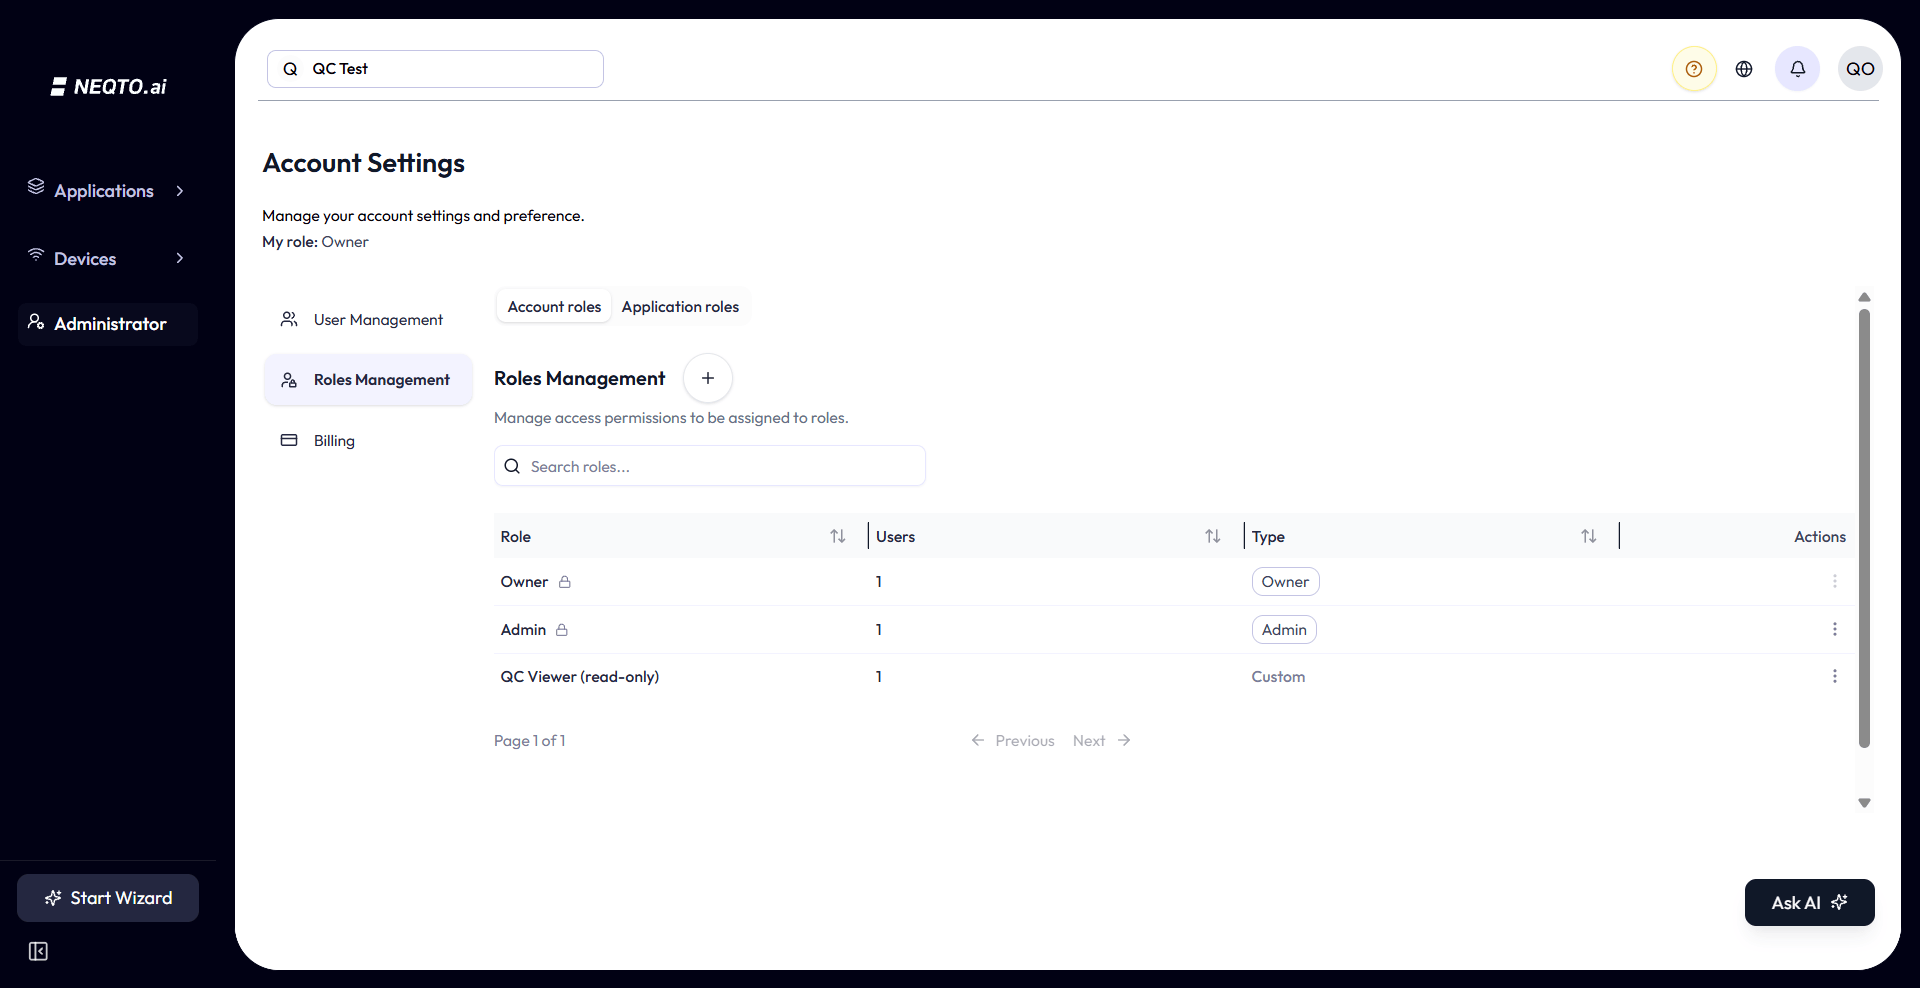
Each account ships with two locked system roles, plus any number of Custom roles you build. The Roles Management table tags each role’s Type as Owner, Admin, or Custom, and shows a lock icon on the system ones.
| Role | What it is | Editable? |
|---|---|---|
| Owner | Full permissions. Each account has one Owner, who automatically passes every permission check. | No. Cannot be edited, duplicated, deleted, or reassigned through the UI. |
| Admin | Granted the full permission catalog at account creation. | Editable only by the Owner. Cannot be deleted. |
| Custom | Any role you create, with exactly the permissions you toggle on. | Yes (with the right roles permission). Create, edit, duplicate, delete. |
The two permission scopes
Permission slugs are formatted scope:action:resource, for example
account:create:users or app:read:devices. The scope prefix decides
which slug set is checked: account-scope slugs come from your account-level role,
application-scope slugs come from your role in the application you are currently viewing.
| Scope | Covers these resources | Example actions |
|---|---|---|
Account (account:) |
Users, Roles, Billing, Settings, Applications, plus account-side Devices, Tags, Device Endpoints, Integrations, and Attributes. | Most resources support read, create, update, and delete. Billing and Attributes support read and update only. |
Application (app:) |
Dashboards, Widgets, Alerts, Reports, Chatbot, the Simulator, plus app-side Users, Devices, Tags, Device Endpoints, Integrations, and Attributes. | Most resources support read, create, update, and delete. Chatbot uses one manage permission, Simulator uses read and execute, Attributes use read and update, and Alerts add a fifth action, approve. |
account:read:devices and app:read:devices. Holding one does
not grant the other. A user may see Devices from the main sidebar but not inside an
application, or the reverse.
Editing a role’s permissions
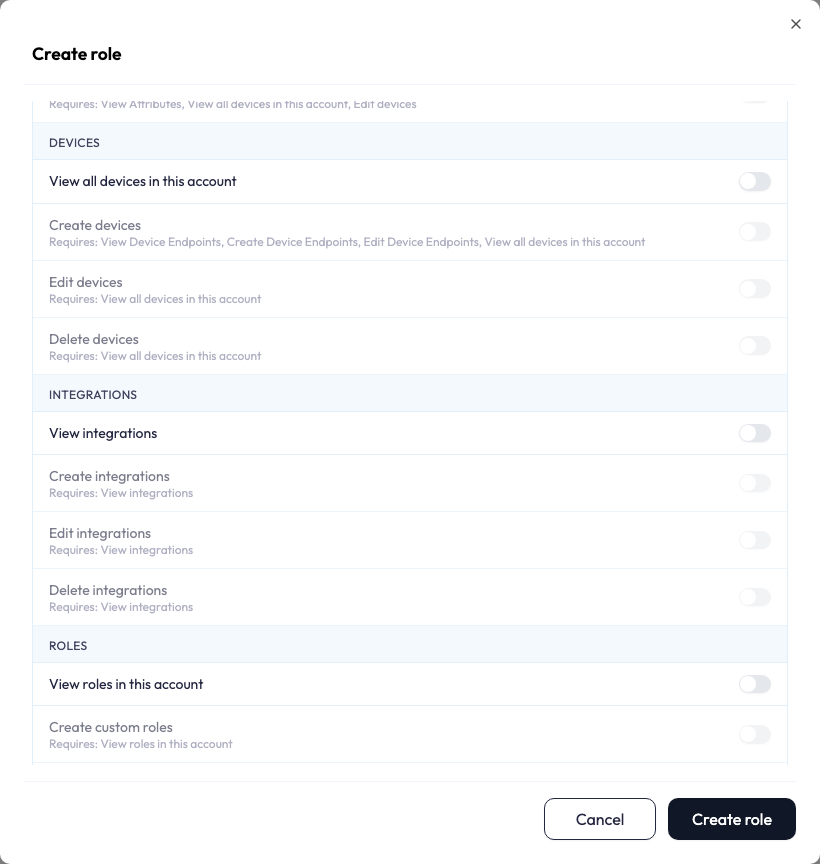
Open a Custom role (or Admin, if you are the Owner) to get the permission editor. Each permission is a plain-language toggle, such as Invite users to this account or View devices in this application. Toggles are grouped by feature. A Select all switch at the top grants every permission in that scope.
Alerts and Reports permissions
Two permission families were added after the original set, and both are application-scope only.
An account-scope user reaches them the same way they reach any other alert setting: through
account:manage:applications, or, for a read, through
account:read:applications.
| Permission | What it allows | Requires |
|---|---|---|
Approve outbound actions (app:approve:alerts) |
Approving an outbound action so it may deliver. Kept separate from editing on purpose: editing an alert’s push configuration is what invalidates an approval, so one permission able to do both would be a speed bump rather than a gate. | app:read:alerts |
app:read:reports |
View reports. Downloading a generated file also requires permission to view devices. If the file includes Alert or Anomaly summaries, it requires permission to view alerts. | — |
app:create:reports |
Create report schedules and one-shot reports. | app:read:reports, app:read:devices |
app:update:reports |
Edit, pause, resume and regenerate report schedules. | app:read:reports |
app:delete:reports |
Delete report schedules. | app:read:reports |
app:read:alerts. Without it those sections cannot
be switched on, even by someone who can otherwise create reports.
Who can manage roles
- Create / duplicate a role needs
account:create:roles. -
Edit a custom role needs
account:update:roles. The Admin role can only be edited by the Owner; the Owner role cannot be edited at all. -
Delete a custom role needs
account:delete:roles. System roles (Owner, Admin) can never be deleted.
Application Roles and Members
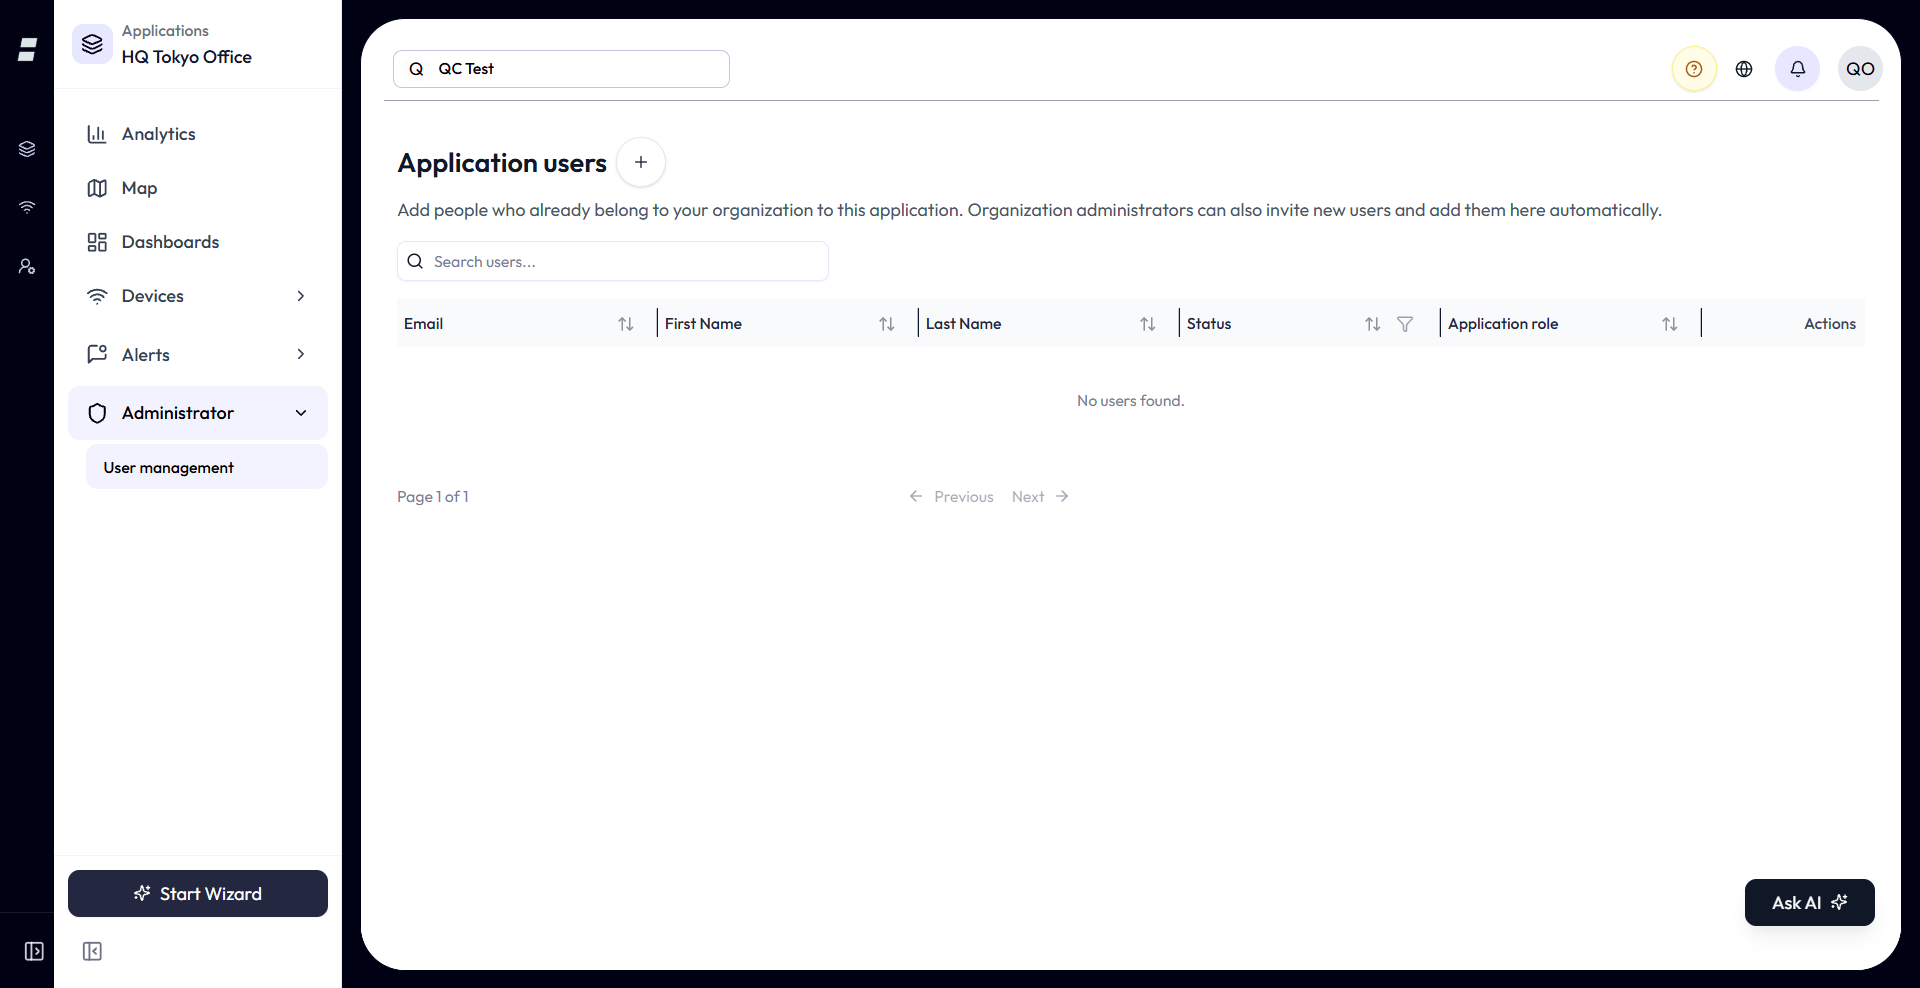
Inside an application, the Administrator area has its own user screen. This controls who belongs to that one workspace and what they can do there, separately from their account-wide role.
Application roles
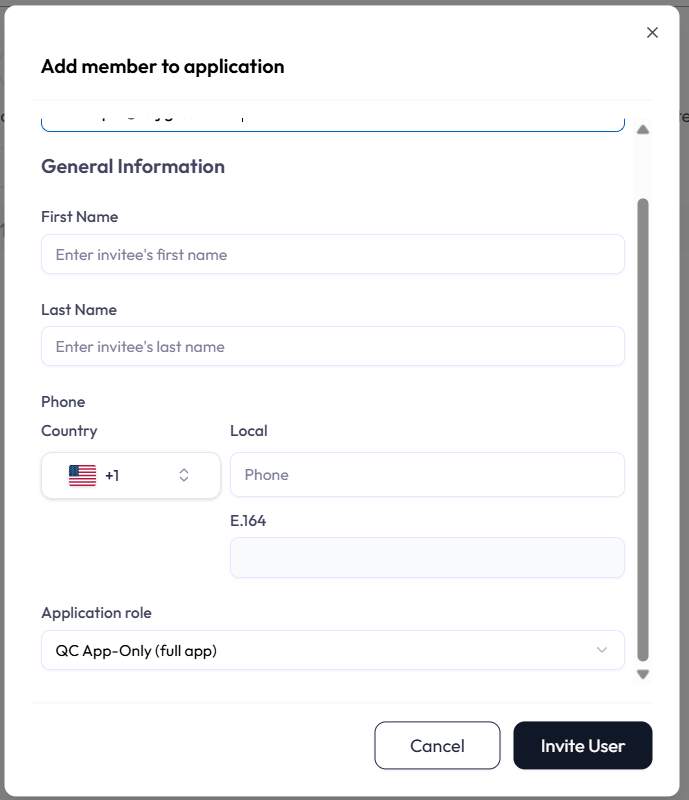
Application roles are shared across the account. New accounts include three: Admin has full feature access and can manage application members, Operator has full feature access but cannot manage members or roles, and Viewer has read-only access. Custom application roles may also appear. The add-member dialog defaults to Operator. An application Admin role does not grant the account-wide Admin role.
Adding an application member follows the same email lookup as inviting an account user. An
existing user can be added directly. A new email shows name and phone fields only if you can
invite users with account:create:users, app:create:users, or Owner
access. Otherwise, you can add only registered users.
Who can manage application members
Application permissions, account permissions, and the account-wide application override can all grant access. The required permission depends on the action:
| Action | Permission |
|---|---|
| View application members |
app:read:users, account:read:users, or
account:update:users
|
| Add a member | app:create:users or account:create:users |
| Change an application role | app:update:users or account:update:users |
| Remove a member | app:delete:users or account:update:users |
The Owner and users with account:manage:applications can perform all of these
actions.
account:update:users, they can change only a member’s role in the current
application. Removing a member from an application removes access to that workspace but leaves
the user in the organization.
How Permission Gating Shows Up
What happens when a permission is missing depends on what it controls. NEQTO.ai may hide the page or action, or show an Access Denied screen.
- Pages. Opening a page without its required permission shows Access Denied.
- Actions. Buttons, menu items, and sections that you cannot use are usually hidden. For example, a delete action is hidden rather than disabled.
- Navigation. The main sidebar uses account permissions, while an application’s sidebar uses application permissions. A link may appear in one and not the other.
Good to Know
The Owner role and account:manage:applications both bypass per-application roles.
Check who holds them before you grant new access.
- Choose the Owner carefully. Each account has one Owner. The role has every permission and cannot be edited or reassigned in the UI.
-
Grant application-wide access carefully.
account:manage:applicationsgives a user full access to every application, regardless of their application roles.