

Built-in Simulator
The Built-in Simulator sends sample Device readings through a Demo Device Endpoint. Use it to build Dashboards, check how a payload becomes Device data, and test Alerts before connecting hardware. Simulated readings appear alongside other data in your Application, so give test Devices recognizable names.
The gateway controls your added simulated Devices. Use AI to prepare and apply a Device setup, or add Devices from the catalog. Choose how often they send readings. The demo Endpoint also has an automatic [SIM] Demo Multi-sensor that sends temperature, humidity, and battery readings. Its Always on banner is separate from the controls for Devices you add.
Quick Start with AI
The quickest way to create a simulated Device is to describe it in the AI field on the Simulator page.
-
1
Open an Application and select Simulator in the sidebar. Choose a demo Endpoint under Use existing, or use Create new and Create & Open. See Open a Simulator.
-
2
In the on-page AI field, describe the Device, readings, units, and interval you want. Press Enter or select the wand button beside the field.
-
3
Answer questions in Ask AI and request changes until the setup is right. Review the AI proposal and the populated Device form, including whether publishing will start after adding.
-
4
Select Apply proposal to create the reviewed Devices. With start publishing after adding, the new Devices start automatically. With add without starting, start them later from their Device controls.
-
5
Check the apply result and each Device status. Let readings arrive, then confirm the matching Device, Attributes, values, and units in the Application. See Verify the created Device.
You can complete this flow without first using Start Gateway or manually adding a catalog Device. The AI apply step connects the gateway when needed. If AI is unavailable, use manual setup.
Open a Simulator
Each Simulator page belongs to one demo Endpoint in the selected Application. The picker opens that page or creates the Endpoint first.
Select Simulator in the Application sidebar. If recent shortcuts appear, choose an Endpoint to return to it, or select Browse all / Create… for the full picker. Account owners always have access. Everyone else needs either full access to every Application in the Account or both the View simulator and Run simulator operations permissions in this Application. If the Simulator item stays missing, ask an administrator to check your access.
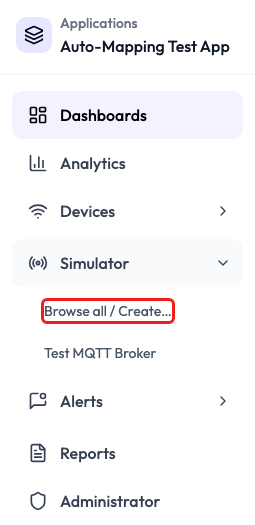
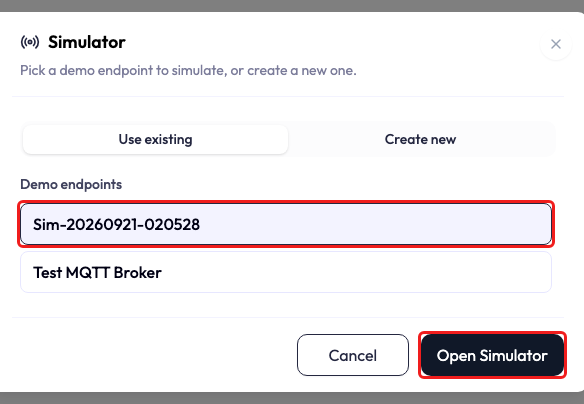
Select an existing simulator
In the Simulator modal, choose Use existing, select a row under Demo endpoints, and select Open Simulator. Check the Endpoint name at the top of the page before making changes. Opening an existing simulator keeps its added Devices; it does not start a new empty setup.
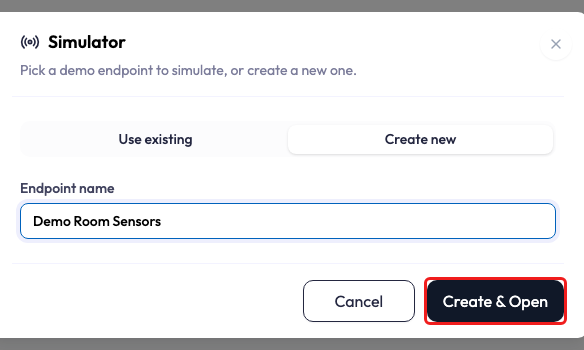
Create a simulator
Choose Create new, enter an Endpoint name such as Demo Room Sensors, and select Create & Open. This creates a demo Endpoint in the Application and opens its Simulator page. You then use AI or the catalog to add simulated Devices. Create new is available only when you can create Endpoints. If the list says there are no demo Endpoints and you cannot create one, ask an Account or Application administrator for access or an Endpoint to use.
Create Devices with Ask AI
Describe the simulation, refine it in chat, review the Device setup, and apply it when ready. Sending a request fills a proposal; Apply proposal creates the Devices.
1. Describe the Devices on the page
At the top of the Simulator, find Describe the devices and readings you would like to simulate…. Include the kind of Device, how many you need, a recognizable name, fields and units, normal ranges, and how often it should report. State whether it should start publishing after you apply the proposal.
The field appears only if you have Ask AI access. When your plan uses AI credits, each request is charged like a chat message, and the line under the field shows the credits you have left. See Ask AI for how credits work.
Example request. Add a Room Test temperature sensor reporting every 30 seconds.
Press Enter or select the wand button beside the field. Use Shift+Enter for a new line. Wait for the response; the page may show Drafting with AI…. The AI uses the available catalog templates and the Endpoint’s current limits.
![Simulator page for Test MQTT Broker with a running gateway. The AI request field contains Add a Room Test temperature sensor reporting every 30 seconds, and its wand submit button is outlined in red. Below it are the [SIM] Demo Multi-sensor Always on banner, Stop Gateway, Add Device, and limits showing 2/3 devices and a minimum 10-second interval. Existing Device cards show Fridge 1 stopped and Room Test 1 running.](https://neqto.ai/wp-content/uploads/2026/09/built-in-simulator-s04-ai-request-field.png)
2. Refine the setup in chat
If more detail is needed, the Ask AI chat panel opens with a question. Reply in its message field, or use a suggested answer if one is offered. Keep this Simulator page open while the conversation fills its proposal.
Continue the conversation to adjust the setup. For example: “Also add humidity between 40 and 60 percent, and start publishing after adding.” Ask for another template, a different count, or a longer interval as needed. If chat is closed, open Ask AI to continue. See Ask AI for the chat controls.
A response can ask another question or update the proposal and expand Add Device from Catalog. Draft applied to the form. means settings have been filled for review. It does not mean a simulated Device has been created or started.
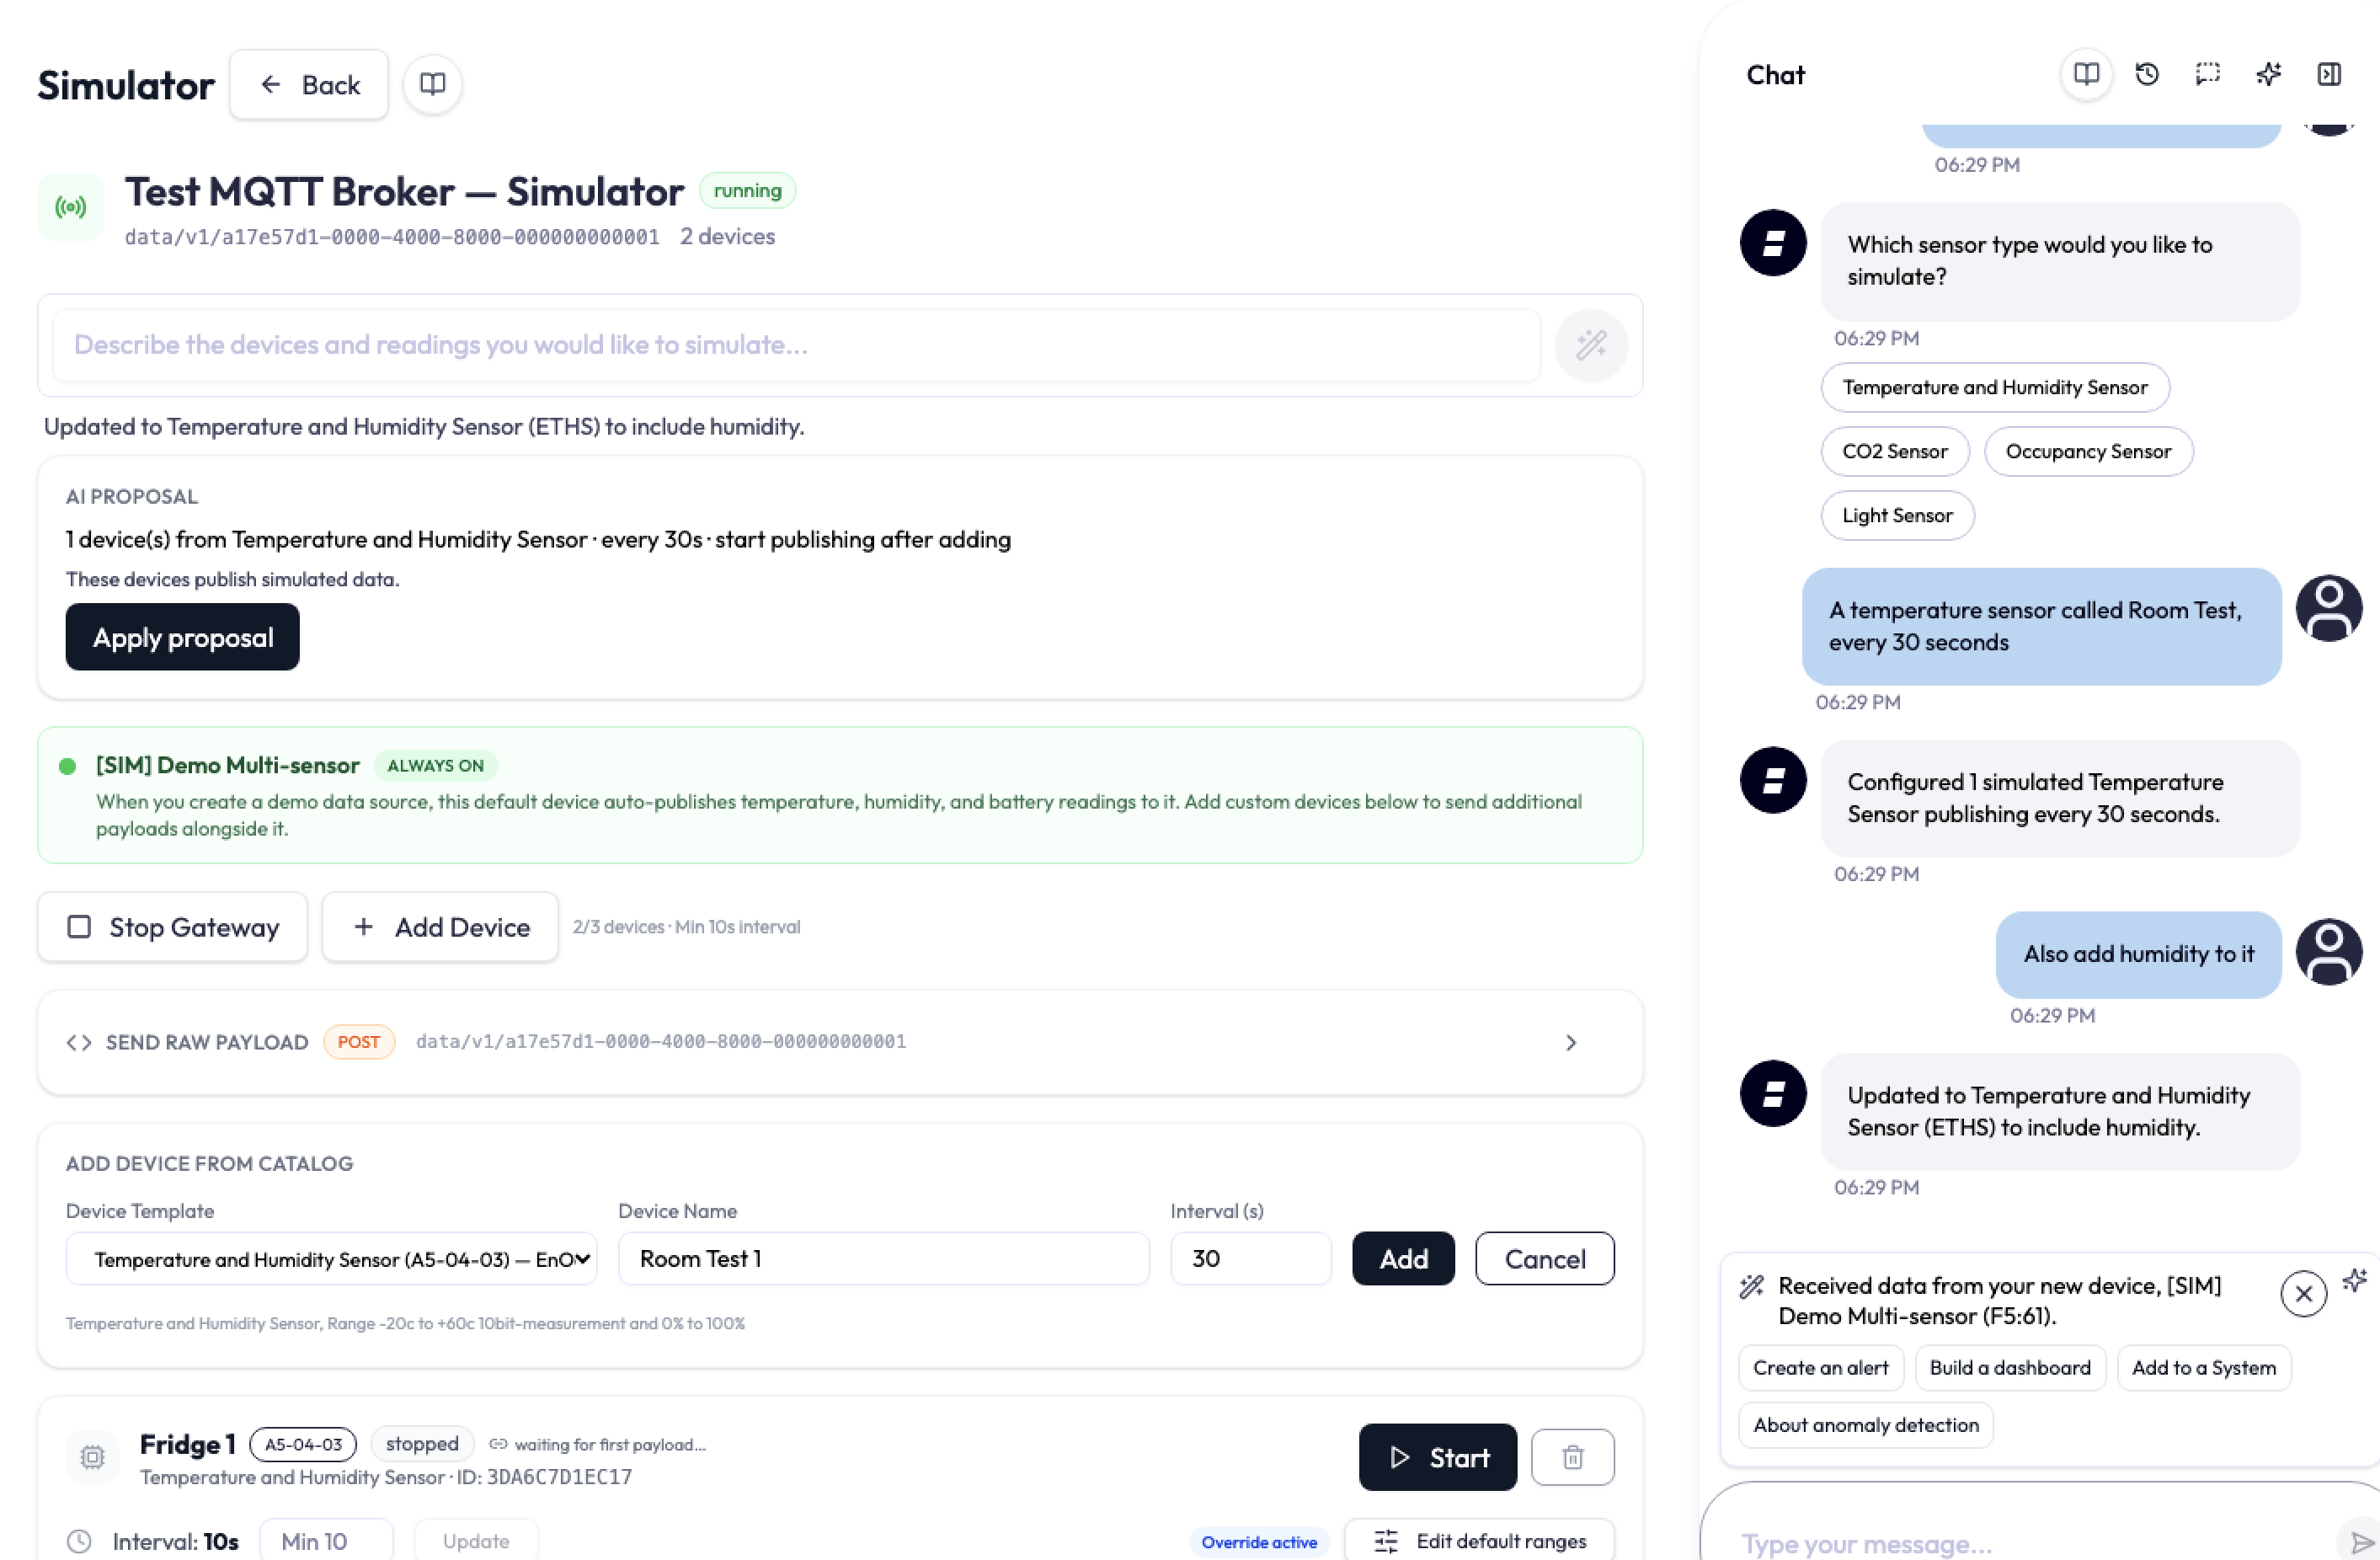
3. Review the Device before applying
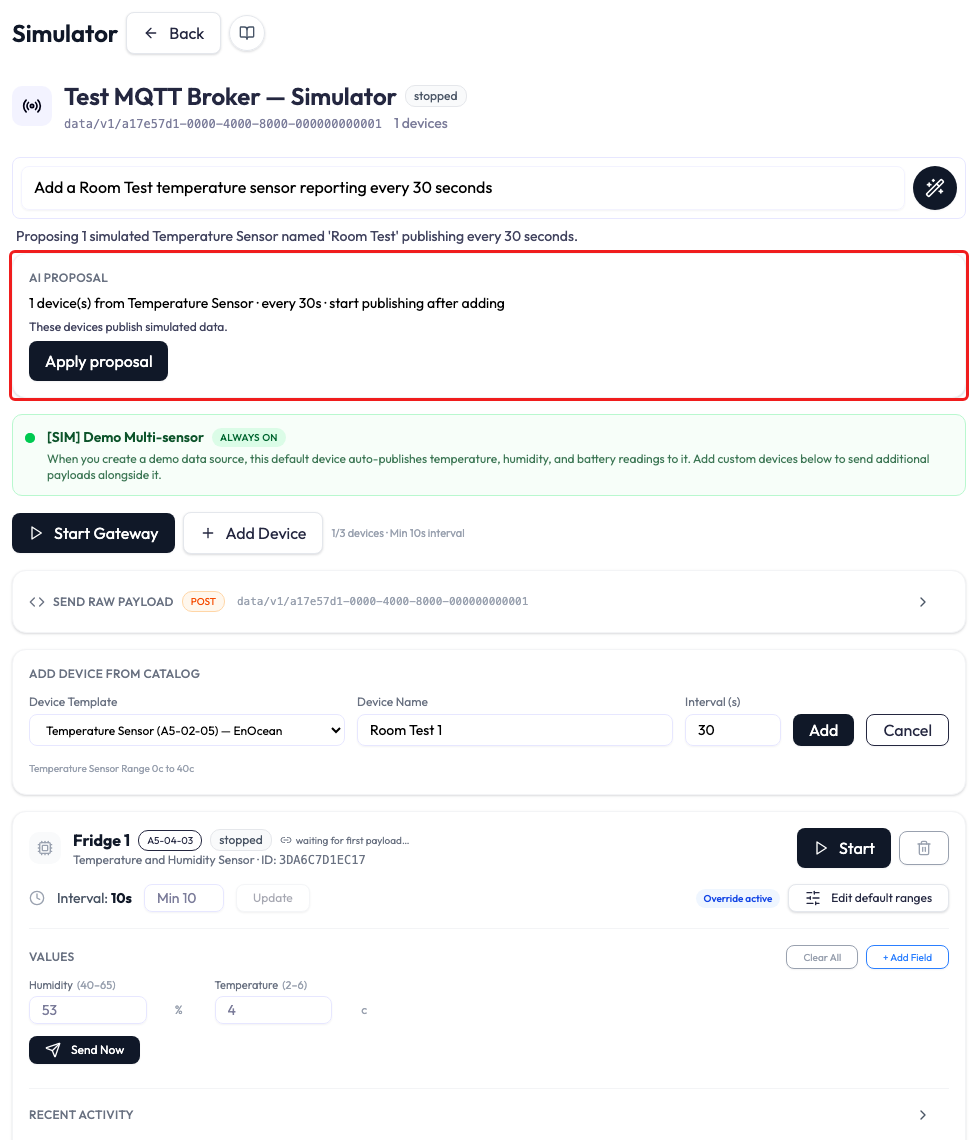
Read the latest AI proposal on the Simulator page. The summary shows the Device count, catalog template, interval, and startup choice. A details block lists proposed ranges and custom fields when supplied. The expanded Add Device from Catalog form shows the template, Device Name, and Interval (s).
- Check that the template and fields represent the Device you intended.
- Check units, numeric Min/Max bounds, and any allowed Text values.
- Check the count, name, and interval against the displayed limits.
- Check start publishing after adding versus add without starting.
Request corrections in chat before applying. Changing the template, name, or interval directly in the Add Device form hides the current AI proposal until it is refreshed; review the next proposal again. For the complete AI setup, use Apply proposal. The catalog form’s Add button is the separate manual path for adding one Device.
4. Apply the reviewed proposal
Select Apply proposal to deploy the proposed simulated Devices to this Endpoint. The page shows Applying… while it connects the gateway if needed, adds Devices, sets ranges and custom fields, and starts the new Devices if requested. Applying this proposal does not start every other stopped Device on the gateway.
Read the per-Device result list and check the new panels. Names use the requested prefix with a number and skip names already in use. With add without starting, the new Devices remain stopped until you select their Start controls.
Check partial results before retrying. A Device cap or another error can leave some Devices added, or a Device added with setup unfinished. Inspect the result list and existing Devices first. Applying another proposal adds new Devices; use the normal Device controls to change an existing one.
5. Verify the created Device
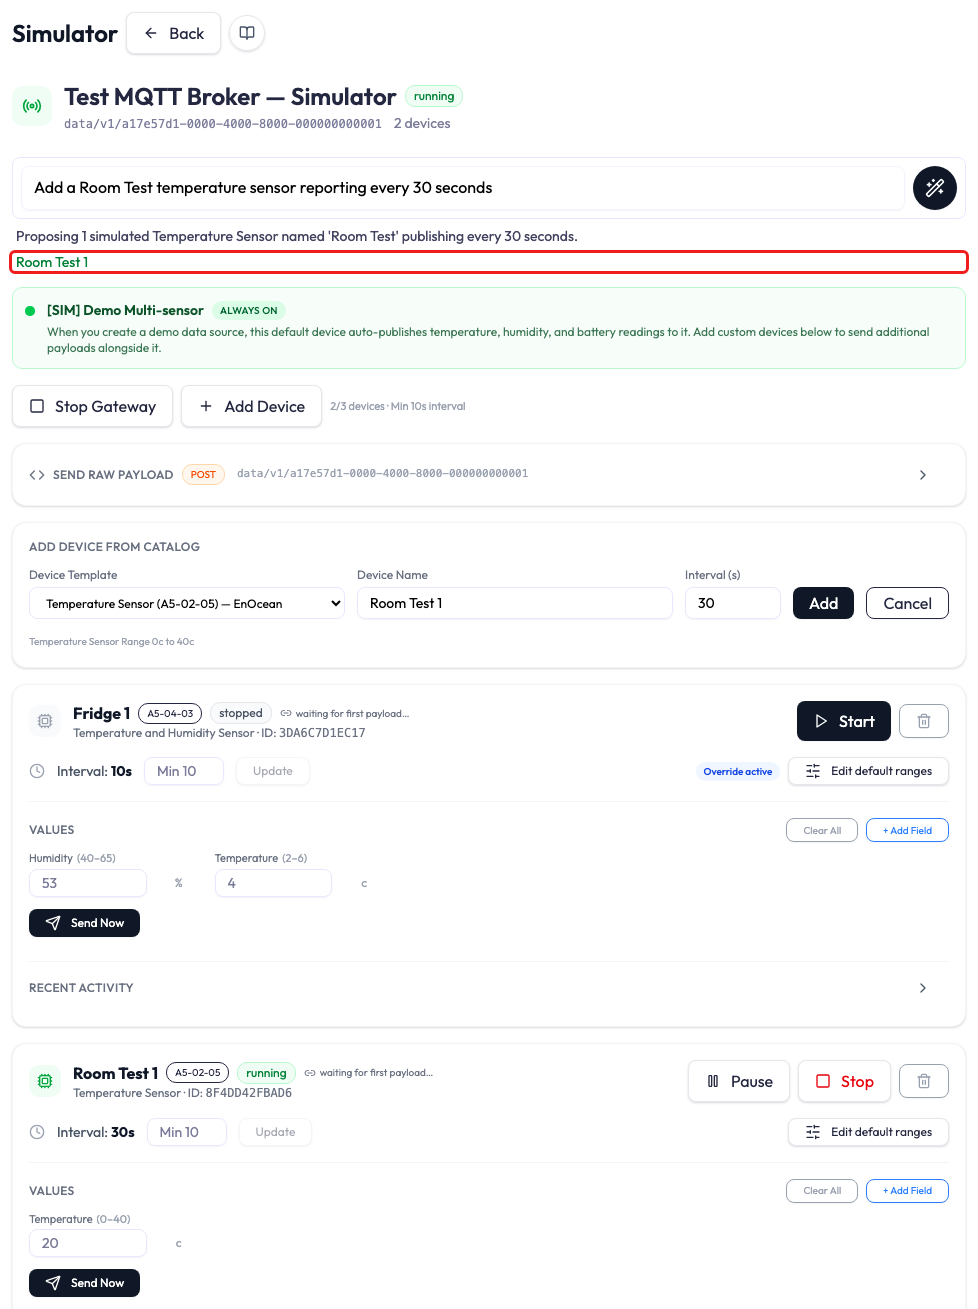
Confirm that the gateway and the Device are running. A new Device may show waiting for first payload… before it becomes linked to device list. Open the Application’s Device list and check the matching Device’s readings, units, and timestamps. A successful apply result confirms simulator setup; stored readings confirm that the payload reached the platform and was processed.
Use Edit default ranges or Send Now to continue the test. Check an Alert separately using Test Alerts and anomaly detection.

Manual Setup and Simulator Controls
Use these controls to add Devices manually or adjust an AI-created Device. If AI already created your Device, skip the creation steps and go to Device panel controls.
Step 1: create a demo Device Endpoint
-
1
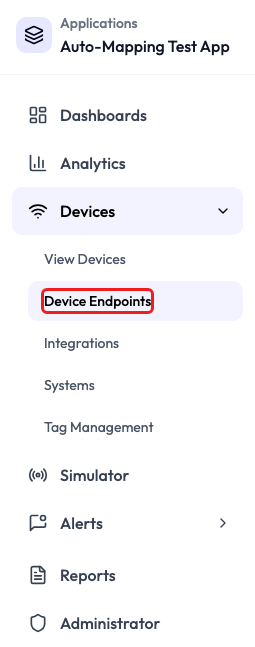
Open an Application, expand Devices, and select Device Endpoints.
-
2
Select Add Device Endpoint, then Create Demo Device Endpoint. Enter an Endpoint name, select Next, and select Finish when setup completes. The simulator uses the demo Endpoint’s connection settings for you.
Step 2: open the Simulator
In the demo Endpoint’s Actions menu, select Simulator. This action is available for demo Endpoints when you have Simulator access.
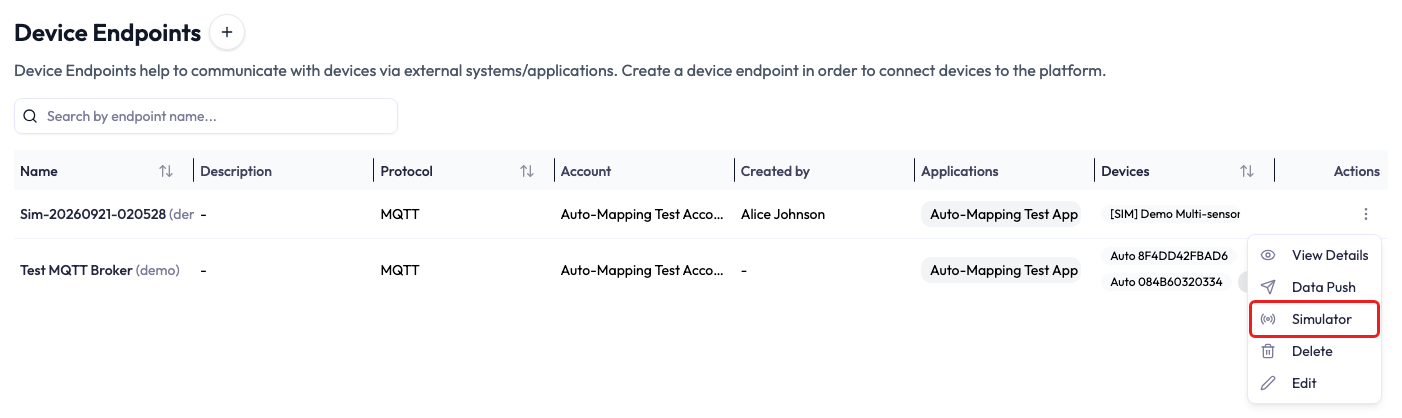
The sidebar Simulator picker provides another route to the same page, with recent shortcuts and an option to create a demo Endpoint.
Step 3: start the gateway
Select Start Gateway to connect the gateway and start its added Devices within the available limits. Each added Device has its own Start, Pause, and Stop controls. A Device must have a running gateway before it can start. Stopping the gateway stops its added Devices.
![Simulator page for a demo Endpoint showing stopped gateway status, the separate [SIM] Demo Multi-sensor Always on banner, Start Gateway and Add Device buttons, a Device count and minimum interval, and a collapsed Send Raw Payload panel.](https://neqto.ai/wp-content/uploads/2026/06/SimulatorStartGateway.png)
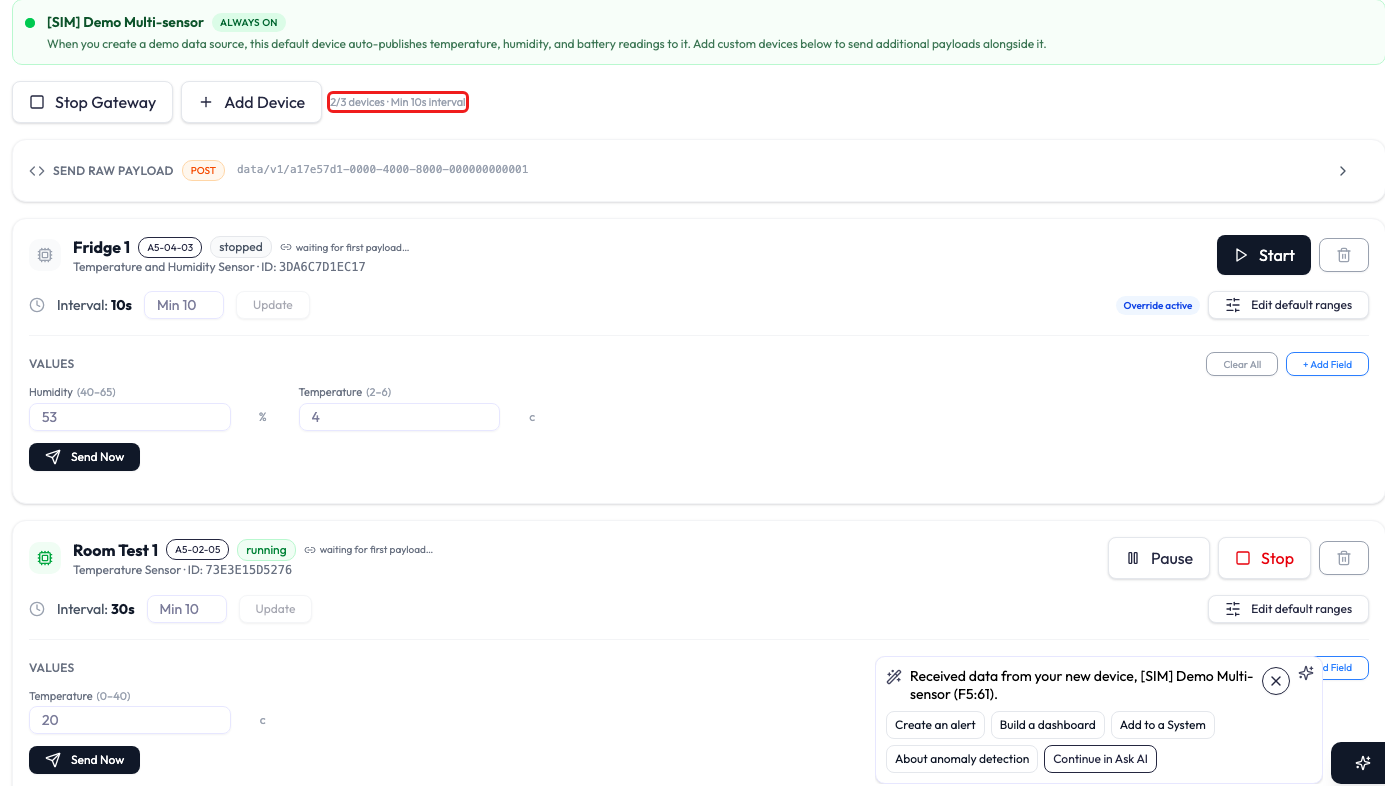
Read the Device count/cap and minimum interval beside the gateway controls. Use the limits displayed for your plan and Endpoint; the values in a screenshot are examples. Check each Device’s status after starting the gateway if a limit prevents some Devices from running.
Step 4: add a Device
-
1
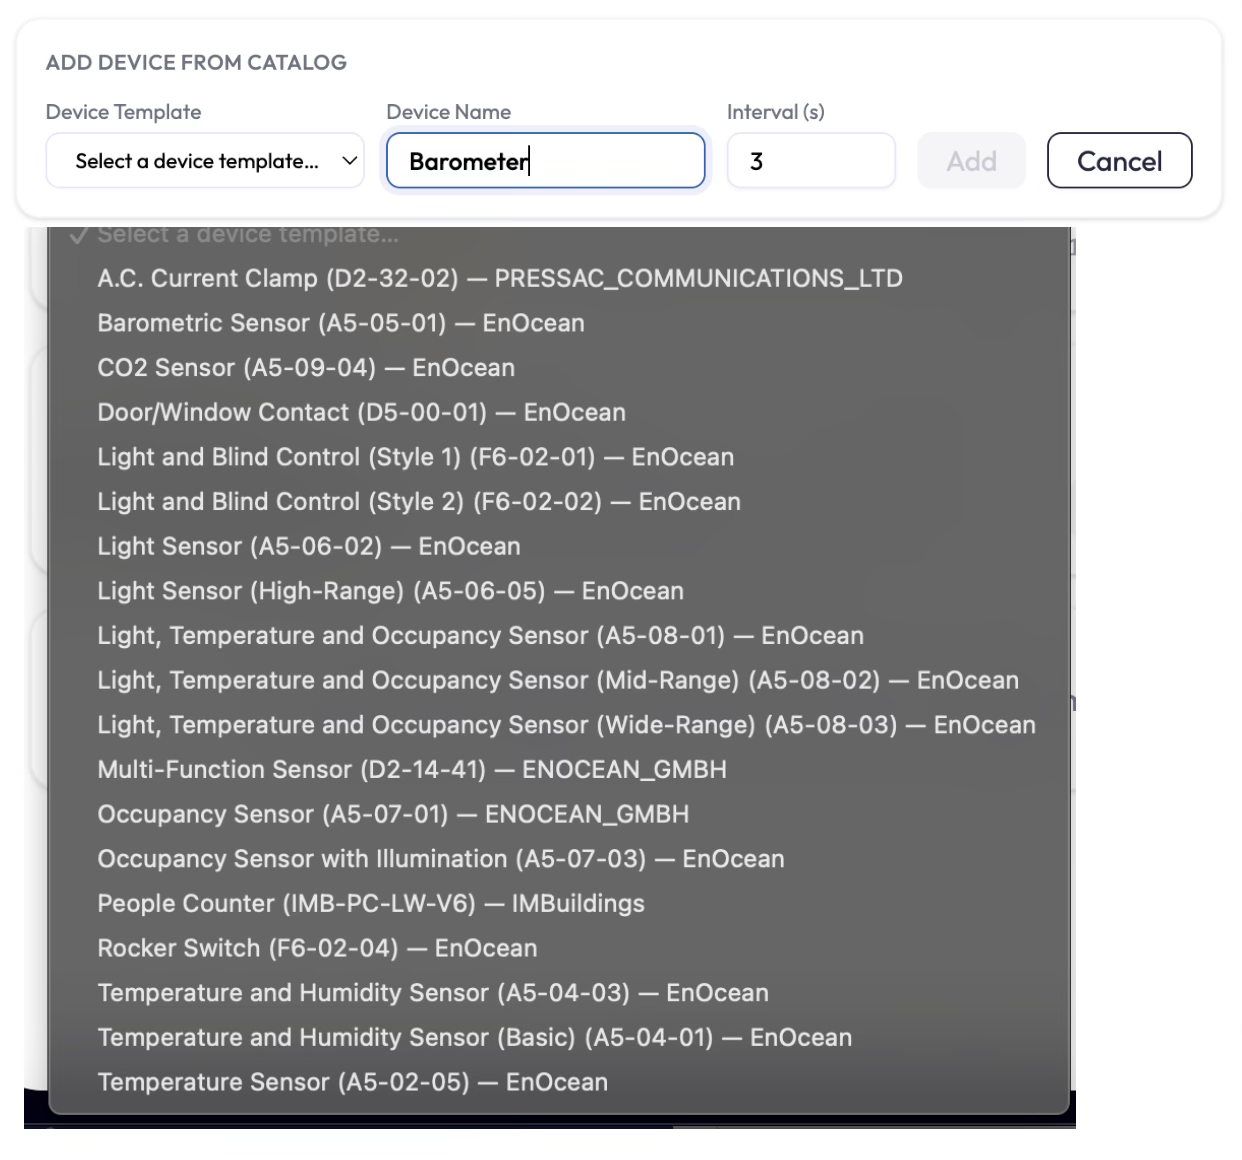
Select Add Device to open Add Device from Catalog.
-
2
Choose a Device Template, such as a Barometric Sensor. The template determines the initial fields, units, and generated values.
-
3
Enter a Device Name that is unique on this Endpoint. Set Interval (s) to the number of seconds between automatic sends, at or above the displayed minimum.
-
4
Select Add. The new Device starts automatically when the gateway is running. If it remains stopped, check the gateway and select the Device’s Start control. Confirm its link status and readings in the Application.
Device panel controls
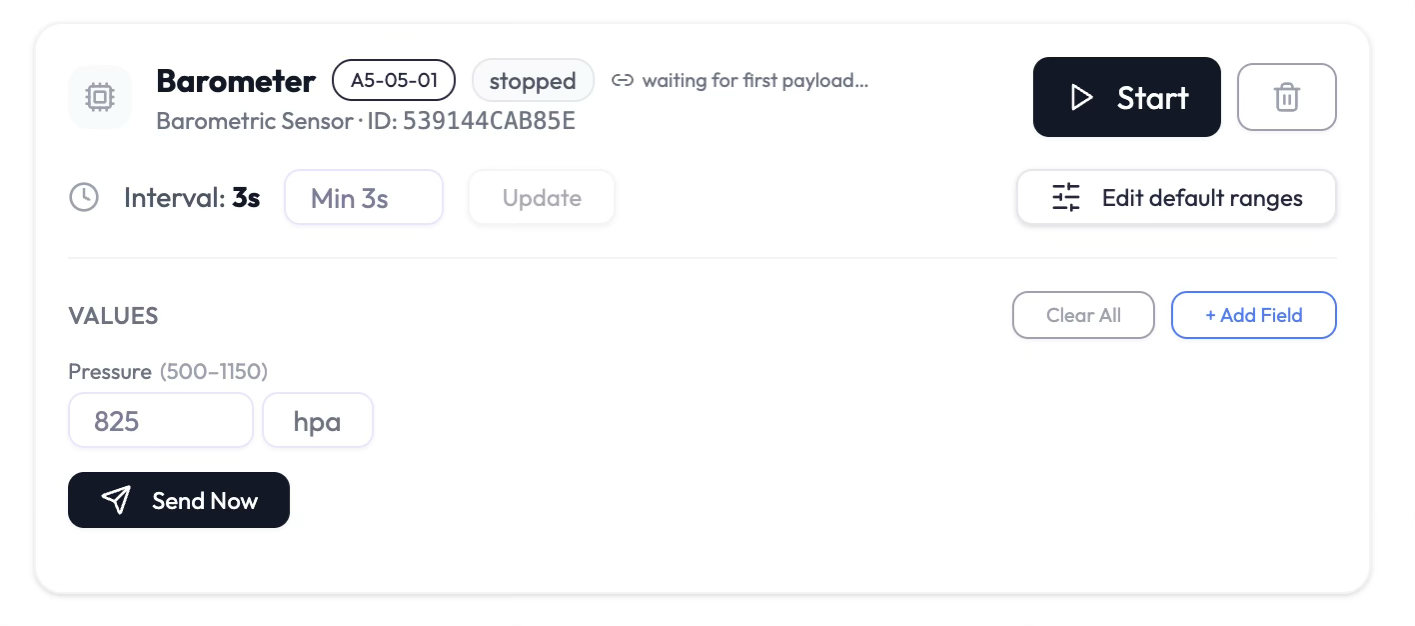
| Control | What to do |
|---|---|
| Start / Pause / Resume / Stop | Control this Device while the gateway is running. Check its status before sending values. |
| Interval and Update | Enter the seconds between sends and select Update. Respect the displayed minimum interval. |
| Edit default ranges | Set how automatic values are generated. Save your changes with Save ranges. |
| Values and Send Now | Enter specific readings for an immediate manual send. |
| + Add Field | Add a Number or Text field to the Device payload. |
Step 5: edit default ranges
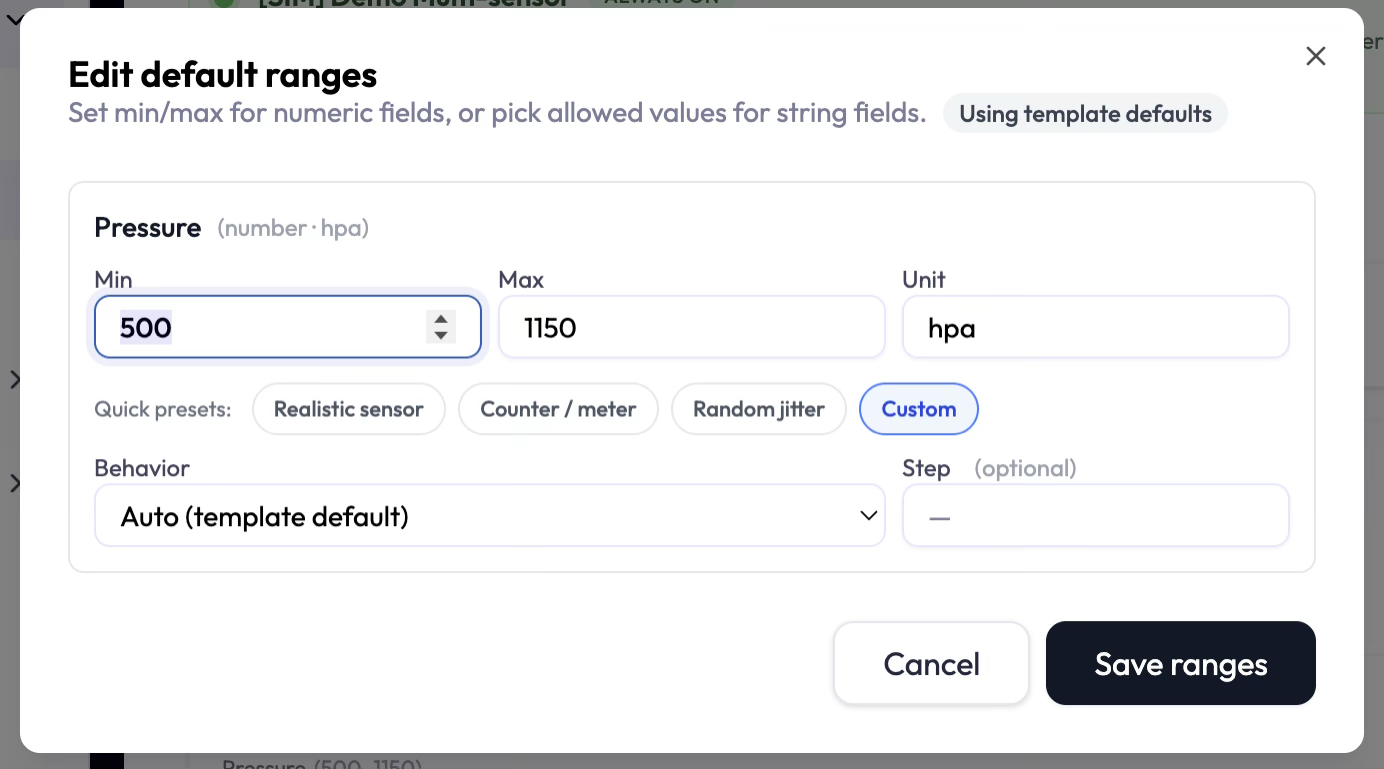
Select Edit default ranges. For numeric fields, Min and Max bound the generated values. Catalog field units are read-only. A numeric custom field can have an editable unit of up to 10 characters. For a Text field, configure its Allowed values instead of numeric bounds.
Choose a generation behavior
Quick presets select a starting behavior. Realistic sensor uses a wobble around the midpoint, Counter / meter counts upward and wraps at the maximum, and Random jitter generates unrelated values. Custom lets you tune the controls directly.
Some catalog templates give specific fields a daily pattern. Temperature, humidity, barometric pressure, and light levels can rise and fall across the day. The People Counter generates more crossings during business hours. These patterns follow Japan Standard Time. Leave Auto (template default) selected to keep a field’s pattern. The Custom preset resets Behavior to Auto. Realistic sensor, Counter / meter, Random jitter, or another non-Auto behavior replaces the pattern for that field.
| Behavior | Generated values |
|---|---|
| Auto (template default) | Use the template’s generation behavior. |
| Wobble around midpoint | Move around the midpoint within Min and Max. Step sets the maximum jump per tick. |
| Count up monotonically | Add an increment each tick, then wrap from Max to Min. Step sets the increment per tick. |
| Pure random each tick | Choose a fresh value within Min and Max on every tick. This mode hides the Step input. |
Select Save ranges to apply the settings. Override active indicates that the Device uses changed settings. Use the reset controls when you want to return to template defaults.
Step 6: add a custom field
-
1
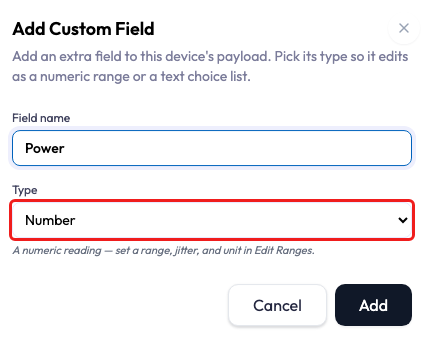
Select + Add Field in Values to open Add Custom Field.
-
2
Enter a field name that is not already used on this Device. Select Number for a numeric reading or Text for a status or other text value.
-
3
Select Add. Enter the field’s value in Values. Use a numeric value for a Number field; use text for a Text field. Select Cancel if you do not want to add it.
-
4
Use Send Now for a one-time send. To include the custom field on automatic ticks, enter a valid value and enable its Auto control.
Auto initially repeats the entered value and, for numeric fields, its unit on every tick while the gateway and Device run. A blank value cannot be auto-published, and a Number field requires a numeric value. Open Edit default ranges to widen a numeric range or add Text choices when you want values to vary. Turning Auto off stops automatic publication of that custom field.
Step 7: send specific values
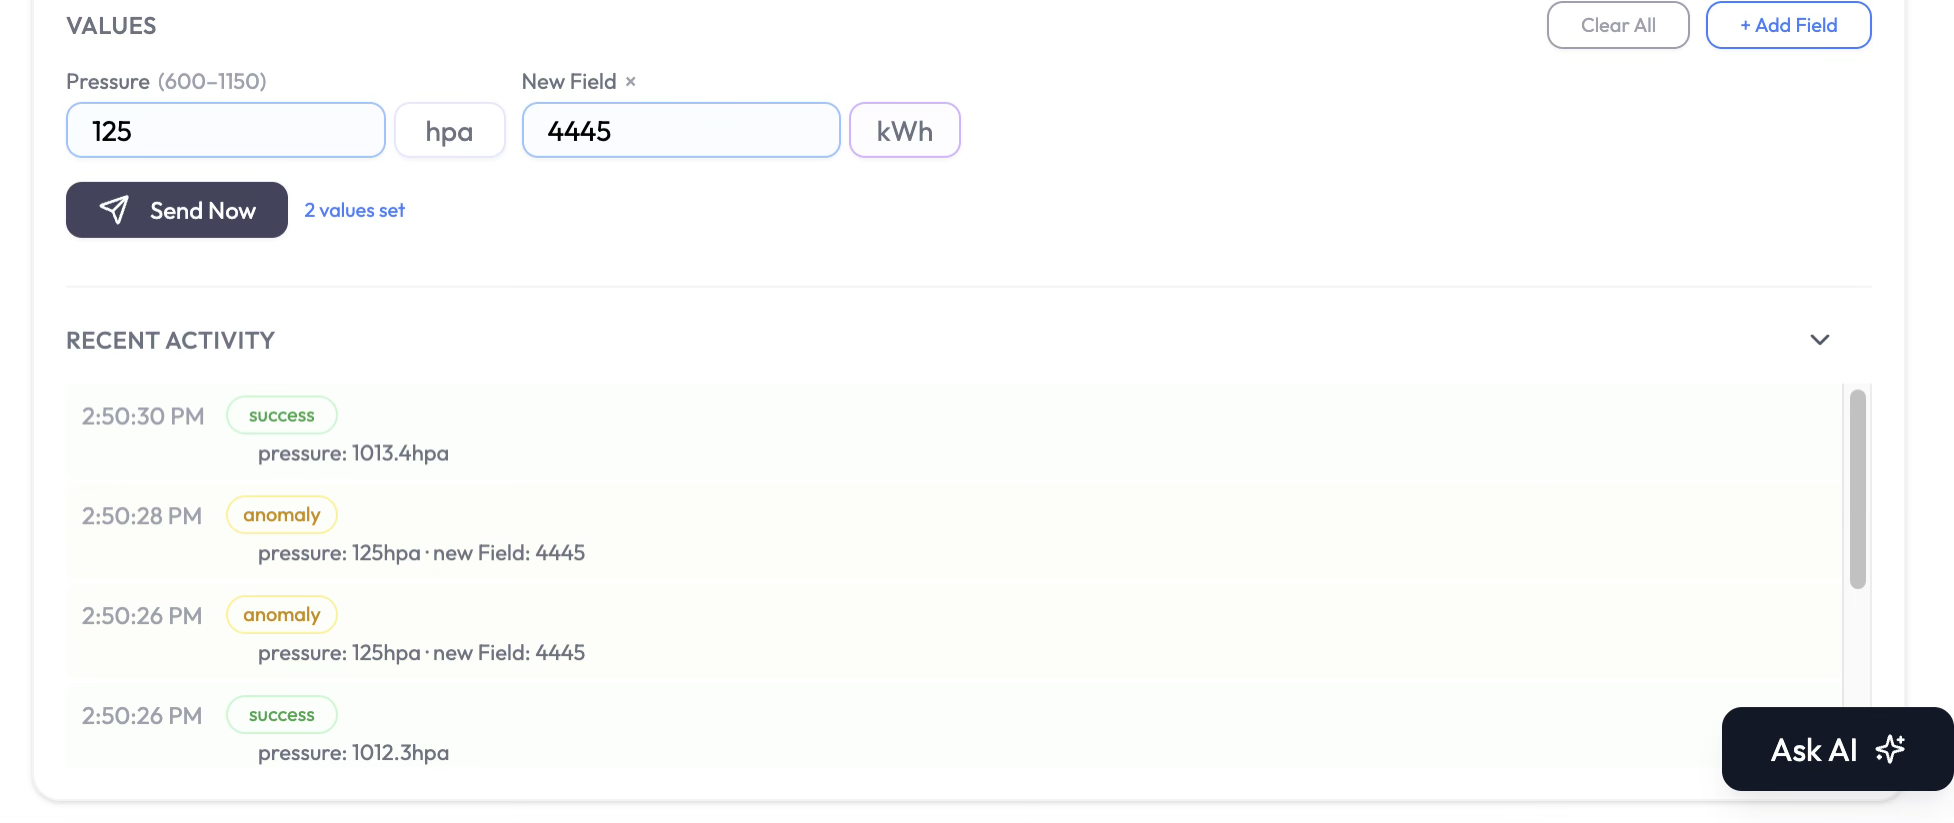
With the gateway and Device running, enter readings in Values and select Send Now. Quick Fill Presets, such as temperature spike, door open, power fail, CO2 critical, or battery low, fill example values for the selected Device type. A preset only fills the fields; review them and select Send Now to publish. These scenarios are separate from the generation behaviors in Step 5.
Understand Recent Activity
Recent Activity keeps the latest 15 entries for a Device, including sends, connection events, and errors. Expand the list to inspect timestamps, values, and messages.
| Status | What it means |
|---|---|
| success | The simulator reports a successful publish. This does not confirm that the platform stored the reading or raised an Alert. |
| anomaly | The simulator labels a successful manual send with custom values as anomaly. Even an ordinary in-range value can have this label. It is not a result from platform anomaly detection. |
| error | The simulator encountered an error. Read the entry’s message and check the gateway, Device, and connection status. |
Step 8: test Alerts and anomaly detection
Use separate tests for a Threshold Alert and a statistical Anomaly Alert. Create or enable the relevant Alert in the Application, select the correct Device and Attribute, and configure the intended notification channels. See Alerts.
-
1
For a Threshold Alert, check its condition and whether it is ready to fire. For example, a temperature-above-30 °C rule needs a reading above 30 °C. An Alert that is still locked may need its unlock condition to be met before it can fire again.
-
2
For a statistical Anomaly Alert, open the Device’s Anomaly Detection Settings tab. Check the Attribute’s warm-up state and current learned range. Let enough normal readings arrive to complete warm-up. Time since Device creation alone is not sufficient.
-
3
Start the gateway and Device. Enter a value that meets the Threshold Alert condition or falls outside the current learned statistical range, then select Send Now.
-
4
Confirm the reading in the Device data view. Then open Alerts > Alert History and check the Device, Attribute, event time, and value. Check email, SMS, or other configured notification actions separately.
Simulator Min and Max are generation settings. They do not define the platform’s learned anomaly range. Physical bounds and learned statistical bounds are separate detection checks; statistical warm-up does not mean every kind of detection is inactive. The simulator’s anomaly activity label does not prove that either check fired.
Step 9: send a raw payload
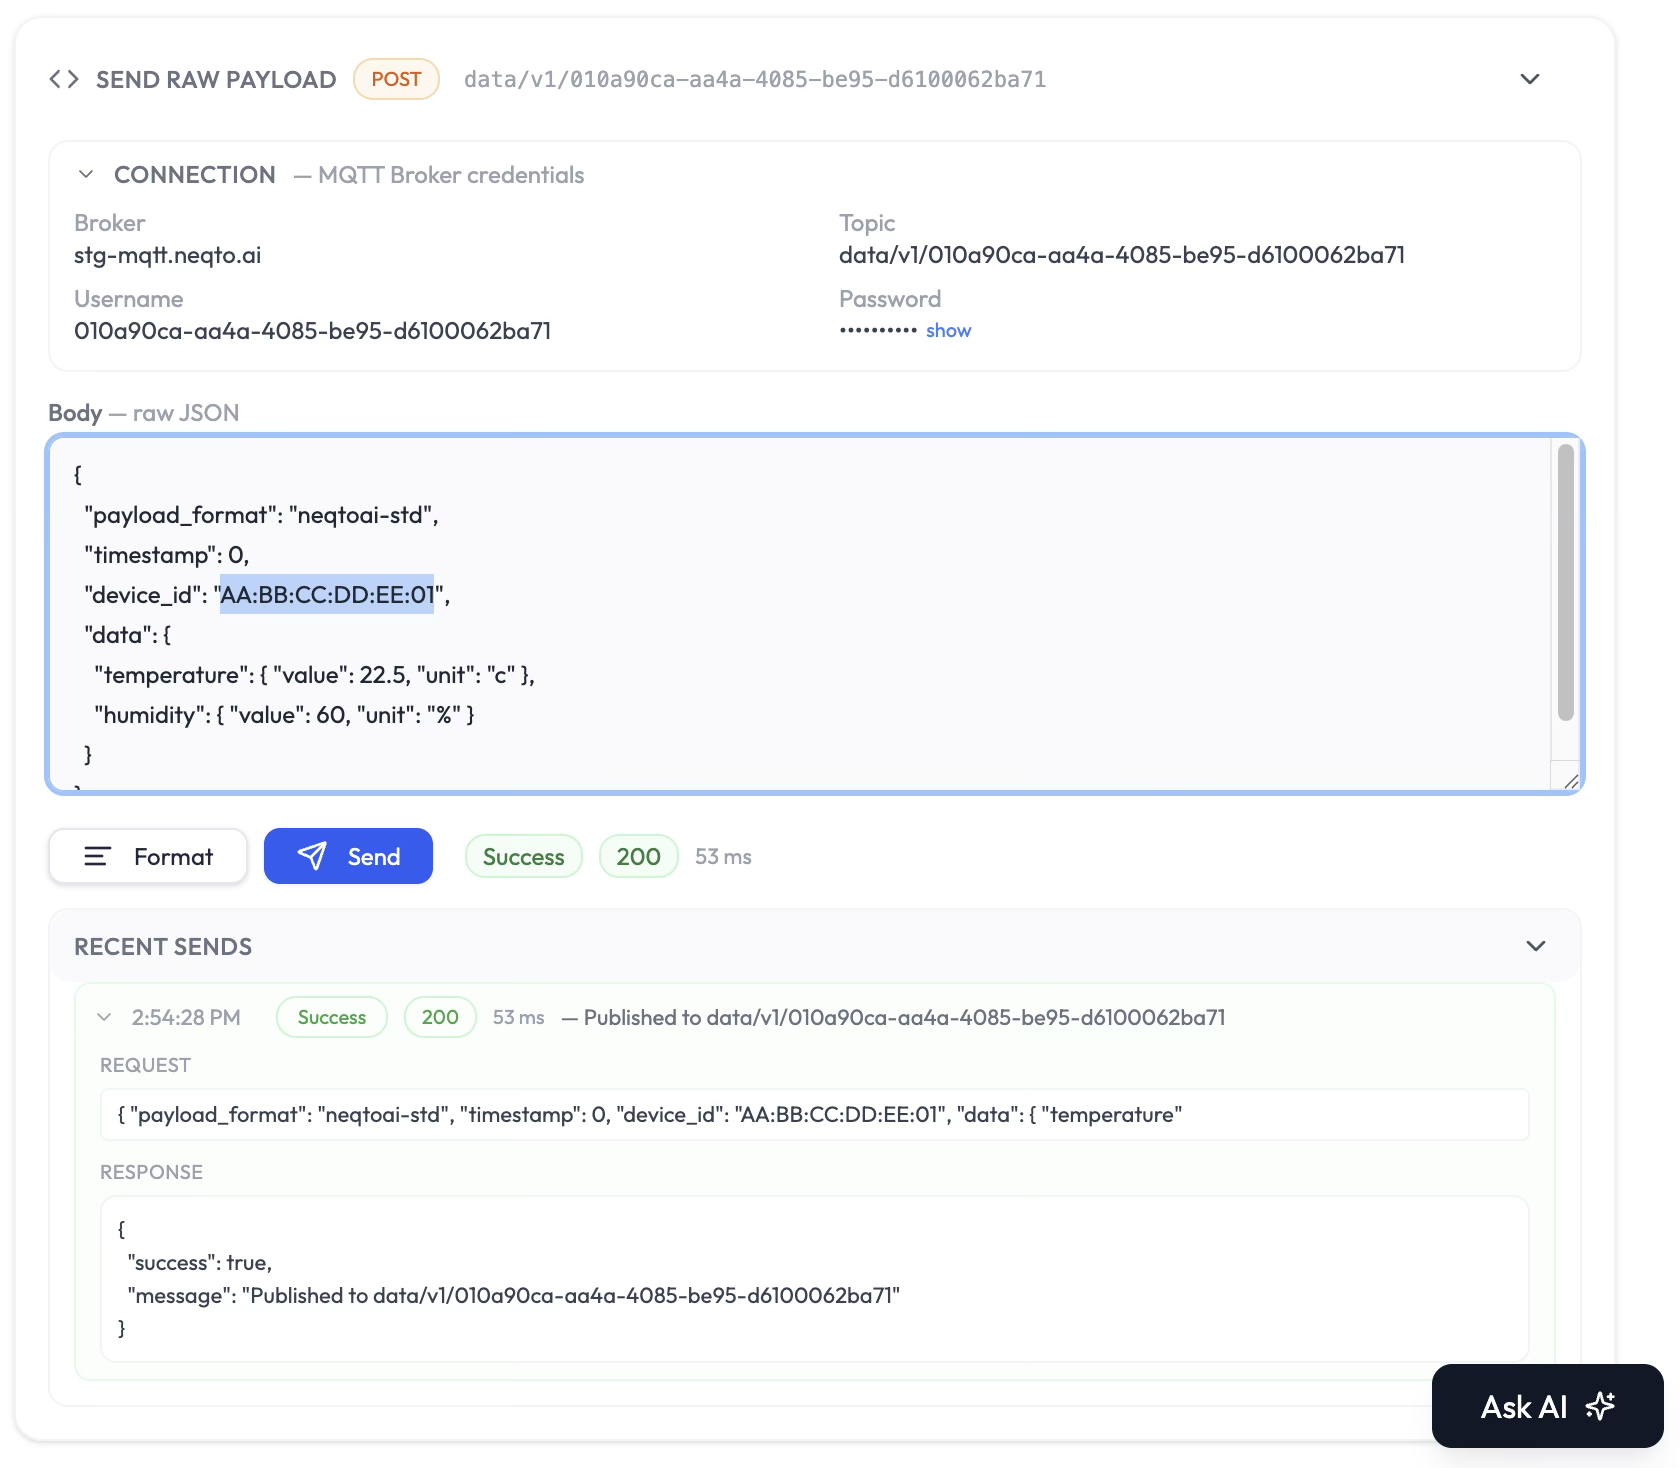
Send Raw Payload publishes JSON to the demo Endpoint’s MQTT topic. Use it to check Device identifiers and mapping before writing firmware. A successful send still needs verification in the platform.
-
1
Expand Send Raw Payload. The Connection area shows Broker, Topic, Username, and Password. Use show only when you need to inspect the password.
-
2
Edit the JSON in Body. The default example uses the recommended
neqtoai-stdenvelope:
{
  "payload_format": "neqtoai-std",
  "timestamp": 0,
  "device_id": "AA:BB:CC:DD:EE:01",
  "data": {
    "temperature": { "value": 22.5, "unit": "c" },
    "humidity": { "value": 60, "unit": "%" }
  }
}payload_formatidentifies the recommended envelope.-
timestampis the reading time. Replace the sample0with a current Unix timestamp in seconds or milliseconds, or an ISO 8601 string. Remove the field to use the time NEQTO.ai receives the message. A0is stored as 1 January 1970, so the reading does not appear in recent charts. See Endpoints & Devices for time zones and the accepted range. -
device_idis the stable identifier for this Device. Use a distinct test identifier if you want to create a separate Device. -
dataholds readings with explicitvalueandunitfields.
-
3
Select Format to format the JSON, correct any syntax errors, and select Send. Inspect the displayed status, response, and timing. Recent Sends keeps the latest 15 request/response entries.
-
4
Open the Application’s Device list and verify that the expected Device, Attributes, values, and units appear after processing. Check Endpoint ingestion feedback if they do not. See Endpoints & Devices for payload guidance.
Limits and Good to Know
Use the displayed limits and confirm each stage of a test separately.
| Item | Behavior |
|---|---|
| Endpoint and access | The simulator uses a demo Endpoint in an Application. Actions depend on your Simulator and Endpoint permissions. |
| Device count and interval | Read the current cap and minimum interval in the Simulator header. They depend on the plan and Endpoint. |
| Manual values | Send Now requires both the gateway and the added Device to be running. |
| Custom units | Numeric custom field units are editable up to 10 characters. Catalog units are read-only. |
| Activity history | Recent Activity and Recent Sends each keep their latest 15 entries. They are short diagnostic lists, not the platform’s reading or Alert history. |
| Alert confirmation | Verify stored values in Device data and detection in Alert History. Configure notification channels if you also want messages. |